D2
Администратор
- Регистрация
- 19 Фев 2025
- Сообщения
- 4,380
- Реакции
- 0
Author: memoryx1322
Source: xss.is
In this article, we will explore a chaining attack of many vulnerabilities in order to get domain user or domain admin access (if it's our lucky day) in the context of BlackBox.
If you have no idea what is GLPI :
“GLPI is a free software for IT service management and help desk management. This open-source solution is developed in PHP and distributed under the GPLlicense. As an open technology, anyone can run, modify, or develop the code whichis free."
Getting access to Dashboard :
During our internal penetration tests, one strategy we often employ is hunting for initial access points in web applications. In this section, we'll examine a scenario involving a GLPI web application. Upon visiting the target site, we typically encounter a page like this
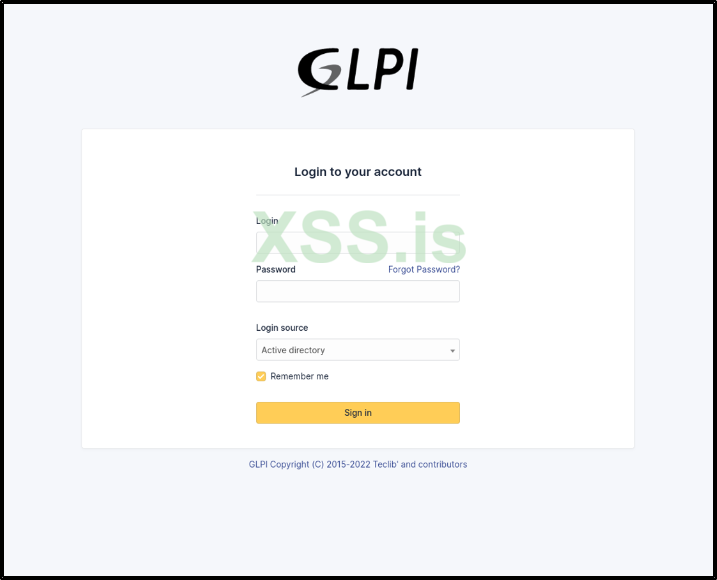
This is the main login page of GLPI, which, as you can see, supports two methods of authentication: Active Directory and local database.
As a pentester, you naturally won't have access to domain user credentials or standard login details. So, what's the next step? Firstly, it's important to know that a default GLPI installation comes with three predefined users :

The most intriguing option to attempt is the Super User (GLPI) login. It could be an easy win if it works...
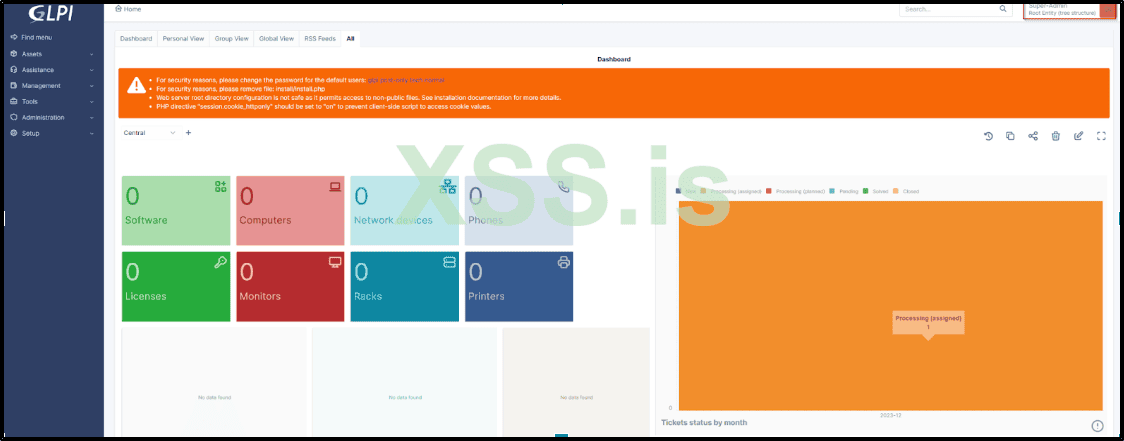
Now, you might be wondering what can be achieved with this Super User access. Well, there are numerous possibilities, particularly in the realm of Active Directory reconnaissance.
Given that Active Directory users can utilize their accounts for authentication in GLPI, there's an option to configure LDAP within the dashboard settings. This can be found by navigating to Menu → Authentication → LDAP Directories.
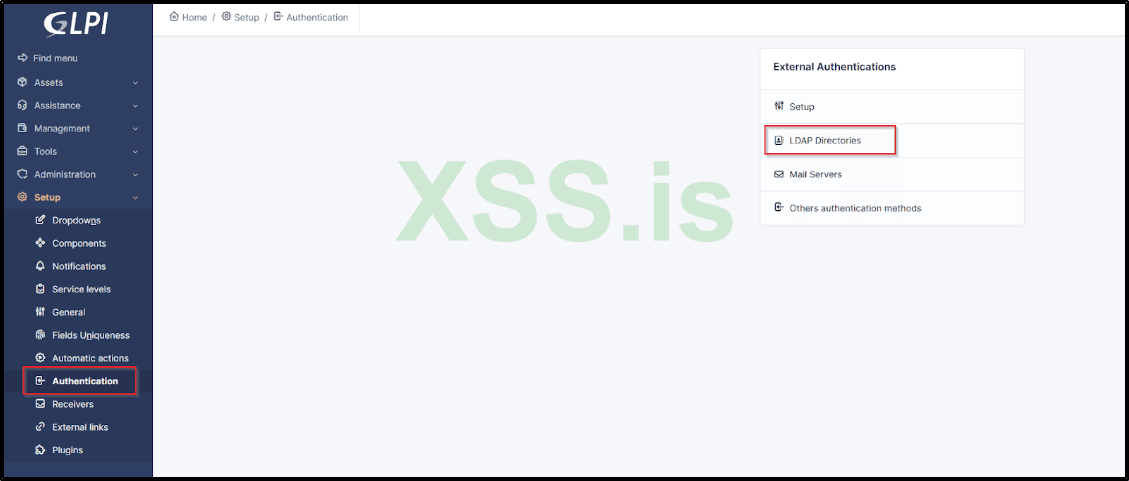
Upon accessing this section, you'll discover some intriguing information, such as the Domain Controller's IP and Hostname, which are invaluable for our reconnaissance phase.
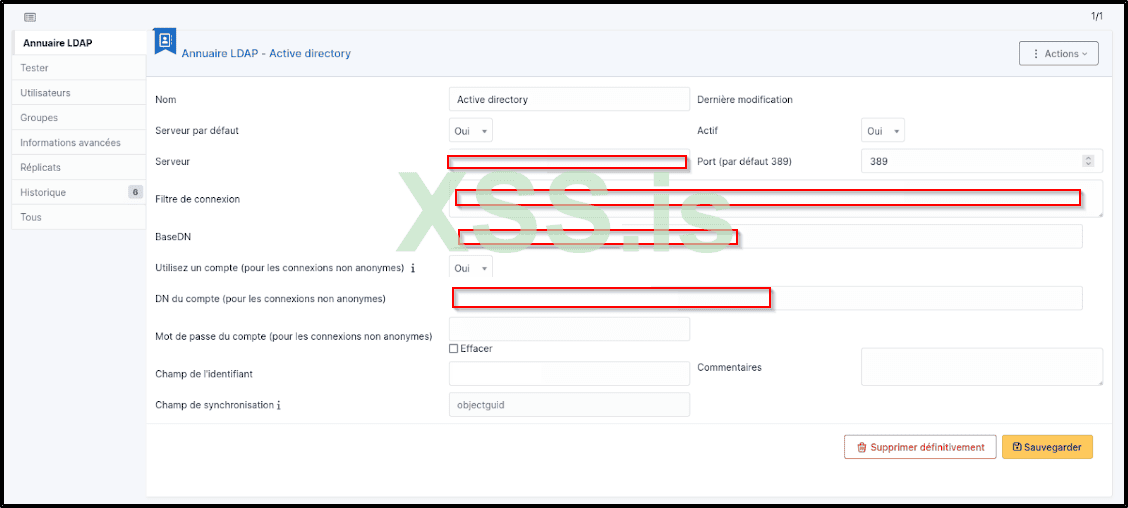
If you navigate to /front/user.php, you will find a list of all domain users who have connected to GLPI at least once.
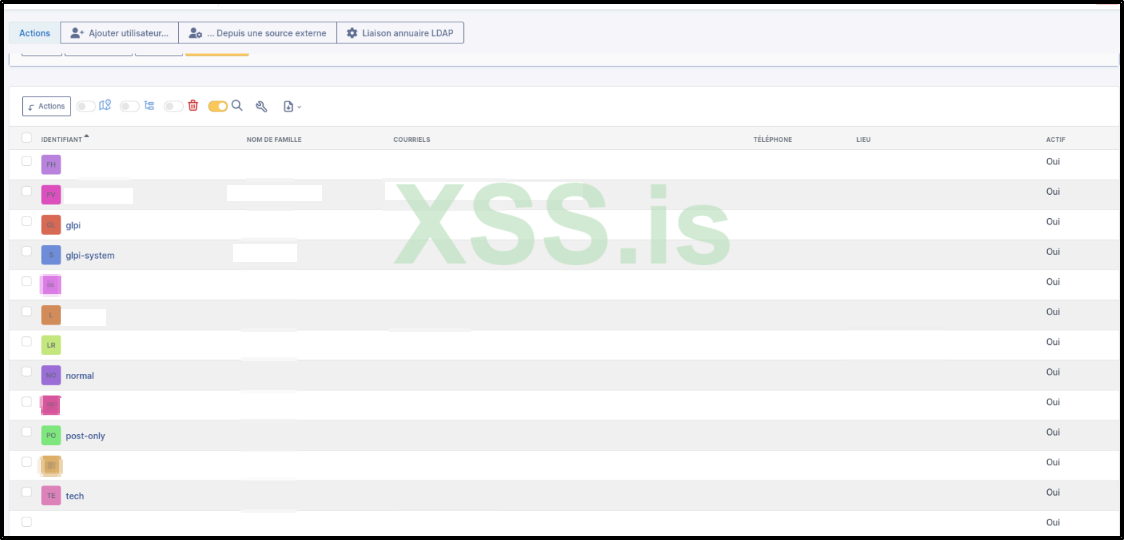
Now, what if the administrator has already changed the GLPI password?
No worries, we still have a few more tricks up our sleeve Try visiting the path /files, and you'll be presented with several folders.
Among these, our primary focus will be on the _sessions/ directory
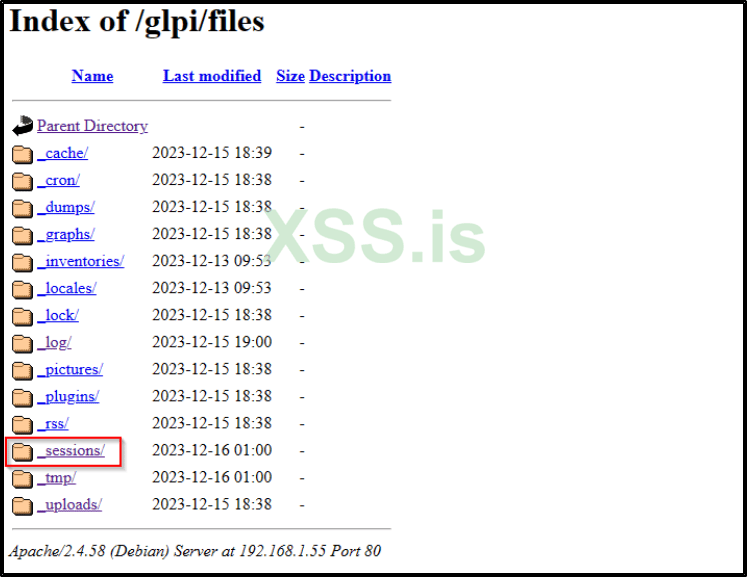
Inside the _sessions/ directory, you'll find contents similar to the following:
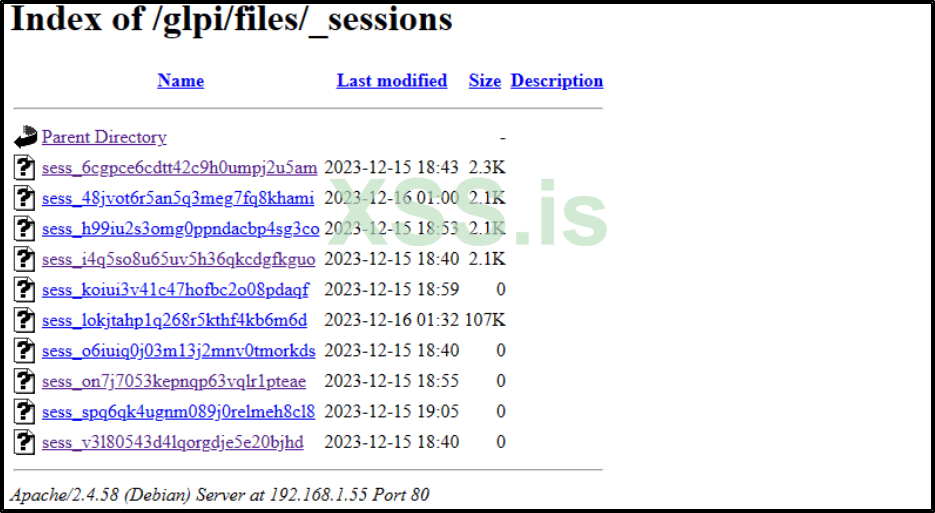
This folder stores the sessions of all users who have connected to GLPI in the last 24 hours. Typically, the session file of the super user can be identified as the one with the largest size; in this instance, it's the one sized 107K. Let's open this file to explore its contents.

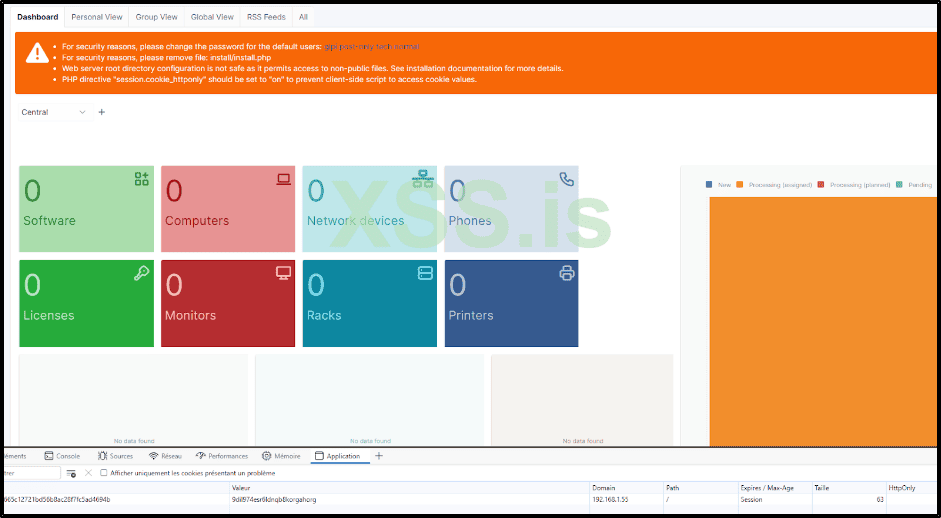
Disregard the other details in the previous picture and concentrate on the value within the URL. Copy this value, then go to your cookie manager and use it as the value for your cookie.
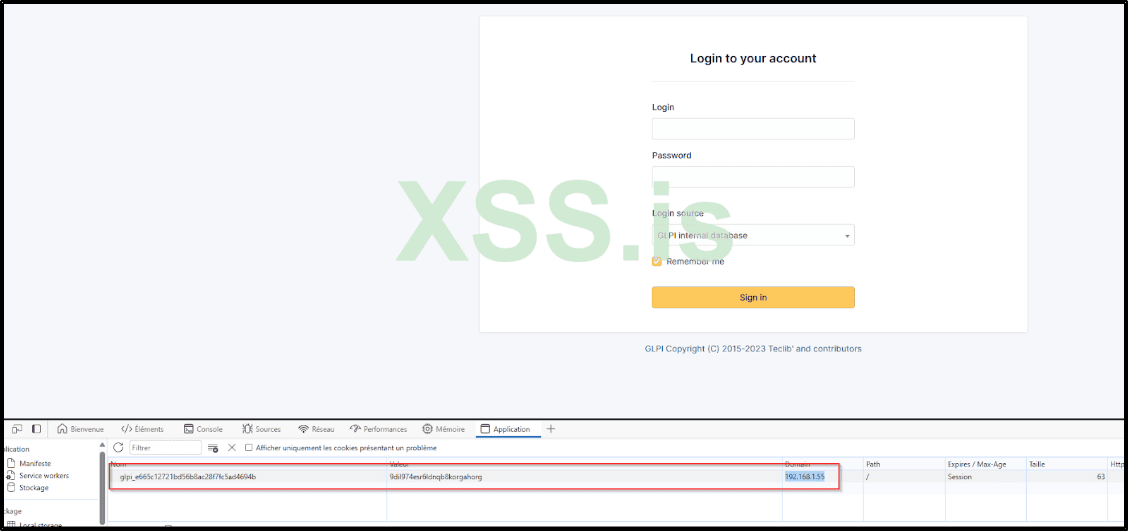
Refresh the page, and bingo!
[Internal Phishing]
Now that we have access to the dashboard as a super user, the next step is to aim for something bigger. One approach is to search for known vulnerabilities like SQL Injection, Remote Code Execution, etc., which might provide direct access.
However, in our scenario, we'll assume that the system is secure and up-to-date, requiring us to employ a more unique method. If we navigate to the endpoint /front/document.form.php, we encounter a useful form with a file upload feature. Unfortunately, due to a whitelist filter, uploading a PHP shell is not possible. The silver lining, however, is that we can upload HTML files.

The strategy involves creating a counterfeit login page for the GLPI application, which we will equip with JavaScript to transmit user credentials to a remote server under our control.
While the specifics of crafting a deceptive page and embedding a backdoor are well-known and extensively covered in various online tutorials, this article will concentrate on the application of such a page. We'll focus on where to upload it, how to ensure that potential victims access it, and the effective use of this method in a penetration testing scenario.
Assuming you have your weaponized Welcome.html file

Now let's upload our html file into that form we already found
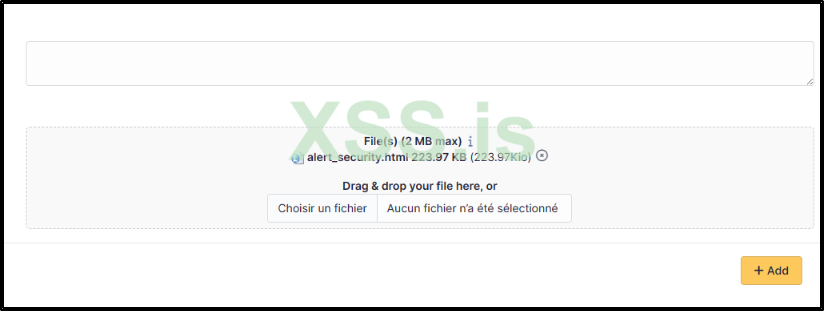
The page simply confirms that the upload was successful, without revealing the location of the stored file.
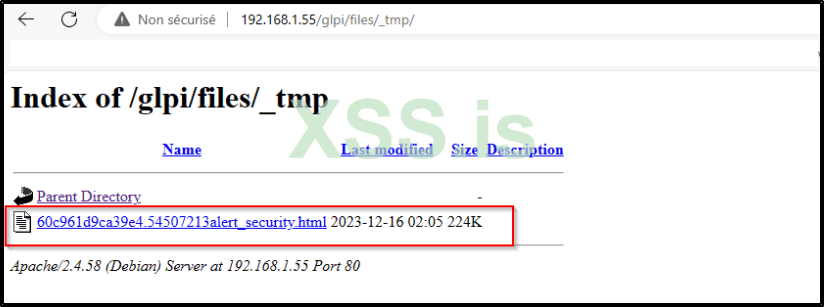
From my experience, there isn't a straightforward method to directly determine the storage location of uploaded files in GLPI. However, through thorough analysis of GLPI's structure, I've found that it also stores all uploaded files in a temporary (TMP) folder. This TMP folder can be located at a specific path /files/_tmp, where you'll find the HTML file you uploaded.
Now comes the exciting part
What exactly can we accomplish with all these steps? First, copy the path of the HTML file that you've uploaded with the backdoor. Next, navigate to the GLPI dashboard via the path /front/ticket.php to create a new ticket. When creating this ticket, make sure to use an appealing title and message to attract attention.

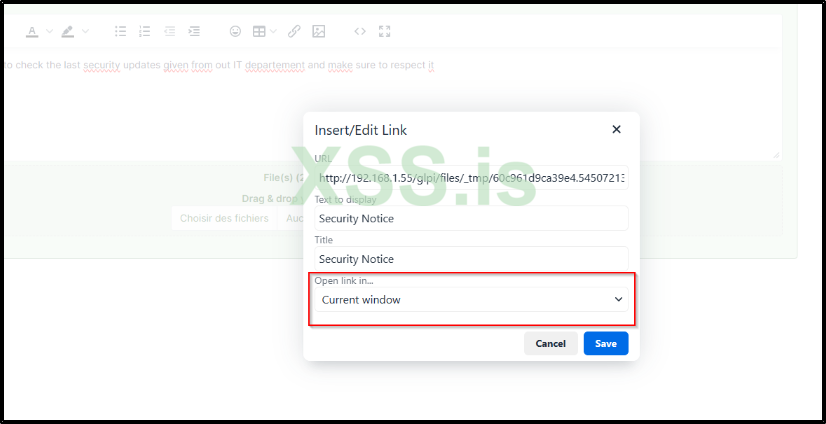
Then, utilize the feature that allows you to add a link within the ticket's message. Accompany this link with a relevant title and ensure to set the option to 'Open link in Current Window'. Once done, save your changes.
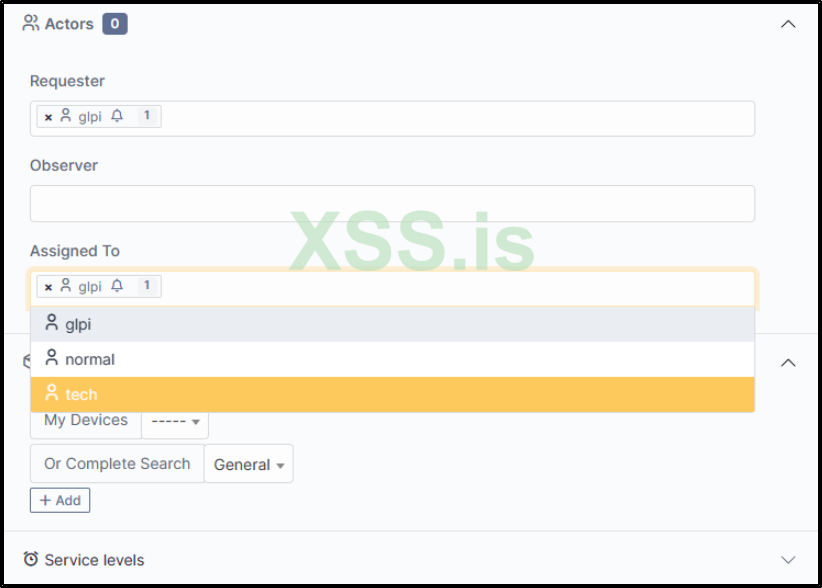
On the left side of the page, select the most relevant users by their roles – those who should receive this ticket. After making your selections, click 'ADD' to proceed.
Now, for demonstration purposes, let's log in as a different user (the victim) and observe how the ticket appears in our dashboard

If we open it, the ticket will appear like this

Of course, if the victim clicks on the 'Security Notice' link, the fake login page will appear. Believing they have been disconnected, the victim is likely to attempt to log in again, at which point we will receive their credentials.
Happy Hacking!
Source: xss.is
In this article, we will explore a chaining attack of many vulnerabilities in order to get domain user or domain admin access (if it's our lucky day) in the context of BlackBox.
If you have no idea what is GLPI :
“GLPI is a free software for IT service management and help desk management. This open-source solution is developed in PHP and distributed under the GPLlicense. As an open technology, anyone can run, modify, or develop the code whichis free."
Getting access to Dashboard :
During our internal penetration tests, one strategy we often employ is hunting for initial access points in web applications. In this section, we'll examine a scenario involving a GLPI web application. Upon visiting the target site, we typically encounter a page like this
This is the main login page of GLPI, which, as you can see, supports two methods of authentication: Active Directory and local database.
As a pentester, you naturally won't have access to domain user credentials or standard login details. So, what's the next step? Firstly, it's important to know that a default GLPI installation comes with three predefined users :
The most intriguing option to attempt is the Super User (GLPI) login. It could be an easy win if it works...
Now, you might be wondering what can be achieved with this Super User access. Well, there are numerous possibilities, particularly in the realm of Active Directory reconnaissance.
Given that Active Directory users can utilize their accounts for authentication in GLPI, there's an option to configure LDAP within the dashboard settings. This can be found by navigating to Menu → Authentication → LDAP Directories.
Upon accessing this section, you'll discover some intriguing information, such as the Domain Controller's IP and Hostname, which are invaluable for our reconnaissance phase.
If you navigate to /front/user.php, you will find a list of all domain users who have connected to GLPI at least once.
Now, what if the administrator has already changed the GLPI password?
No worries, we still have a few more tricks up our sleeve Try visiting the path /files, and you'll be presented with several folders.
Among these, our primary focus will be on the _sessions/ directory
Inside the _sessions/ directory, you'll find contents similar to the following:
This folder stores the sessions of all users who have connected to GLPI in the last 24 hours. Typically, the session file of the super user can be identified as the one with the largest size; in this instance, it's the one sized 107K. Let's open this file to explore its contents.
Disregard the other details in the previous picture and concentrate on the value within the URL. Copy this value, then go to your cookie manager and use it as the value for your cookie.
Refresh the page, and bingo!
[Internal Phishing]
Now that we have access to the dashboard as a super user, the next step is to aim for something bigger. One approach is to search for known vulnerabilities like SQL Injection, Remote Code Execution, etc., which might provide direct access.
However, in our scenario, we'll assume that the system is secure and up-to-date, requiring us to employ a more unique method. If we navigate to the endpoint /front/document.form.php, we encounter a useful form with a file upload feature. Unfortunately, due to a whitelist filter, uploading a PHP shell is not possible. The silver lining, however, is that we can upload HTML files.
The strategy involves creating a counterfeit login page for the GLPI application, which we will equip with JavaScript to transmit user credentials to a remote server under our control.
While the specifics of crafting a deceptive page and embedding a backdoor are well-known and extensively covered in various online tutorials, this article will concentrate on the application of such a page. We'll focus on where to upload it, how to ensure that potential victims access it, and the effective use of this method in a penetration testing scenario.
Assuming you have your weaponized Welcome.html file
Now let's upload our html file into that form we already found
The page simply confirms that the upload was successful, without revealing the location of the stored file.
From my experience, there isn't a straightforward method to directly determine the storage location of uploaded files in GLPI. However, through thorough analysis of GLPI's structure, I've found that it also stores all uploaded files in a temporary (TMP) folder. This TMP folder can be located at a specific path /files/_tmp, where you'll find the HTML file you uploaded.
Now comes the exciting part
What exactly can we accomplish with all these steps? First, copy the path of the HTML file that you've uploaded with the backdoor. Next, navigate to the GLPI dashboard via the path /front/ticket.php to create a new ticket. When creating this ticket, make sure to use an appealing title and message to attract attention.
Then, utilize the feature that allows you to add a link within the ticket's message. Accompany this link with a relevant title and ensure to set the option to 'Open link in Current Window'. Once done, save your changes.
On the left side of the page, select the most relevant users by their roles – those who should receive this ticket. After making your selections, click 'ADD' to proceed.
Now, for demonstration purposes, let's log in as a different user (the victim) and observe how the ticket appears in our dashboard
If we open it, the ticket will appear like this
Of course, if the victim clicks on the 'Security Notice' link, the fake login page will appear. Believing they have been disconnected, the victim is likely to attempt to log in again, at which point we will receive their credentials.
Happy Hacking!