D2
Администратор
- Регистрация
- 19 Фев 2025
- Сообщения
- 4,380
- Реакции
- 0
My name is vincenzoo72 , and I am writing that article for the XSS.is forum only, and all rights are given to the XSS.is forum.
What we are going to cover in that article
1. Brief guide about the VPN.
2. Why do we have to use a VPN rather than our real IP address?
3. Why we don't have to use company VPNs
4. Advantages of the personal VPN.
5. How to set up our own VPN server
Note: All the information provided in that article is only for educational purposes and does not promote any illegal or unethical activities.
"WHAT IS VPN AND ALL NECESSARY GUIDE"
VPN stands for (Virtual Private Network) and this runs on such kind of technology that provides us with a great secure and encrypted connection over the internet and gives full freedom to the user to browse safely and securely with full privacy and anonymity.
"HOW VPN PROVIDE US ANONYMITY AND PRIVACY"
(Virtual Private Network) run for an encrypted technology that masks the user's real IP and provides them a new and unique IP address to ensure that the user browses safely without sharing his/her actual IP address, location, and time zone. (Virtual Private Network) make us untraceable from government officials, hackers, and all the third-party sites that steal our data.
2. Download the VPN Software
Download and install the VPN on your Device.
3. Log In to the VPN App
Open the VPN application on your device and log in using your credentials.
4. Choose a Server Location
VPNs provide a vast range of server locations that you guys will choose according to your needs.
5. Connect to the local VPN
Click the "Connect" button to get the encrypted IP address
6. Make your browsing anonymous
Your real IP address is now hidden and a fake one will work, and your internet activity is secure and encrypted.
7. Disconnect When You are done with browsing
If their is no usage of VPN than , disconnect from it .
ADVANTAGES OF USING A VPN(VIRTUAL PRIVATE NETWORK)
There are so many reasons behind that but using VPN actually depends on the user and for what purpose he/she wants to get from it. now I will share a few most important and useful benefits of using a good VPN.
1. Getting access to inaccessible
VPN allows us to overcome censor barriers put up by the government or regionally geo-restricted content to make sure the terrorists are free and happy countries. VPN’s strong servers enable geo masking making us access all kinds of banned websites, apps, links without and hazards.
2. Extension of bandwidth
VPN extension in bandwidth means if we are using the best and official VPN it provides us a handsome speed of internet which may reach up to 1000MBPS
3. Anonymity Encryption of sensitive transactions
VPN protects personal data like credit cards password details or other blueprints easily accessible over the web at a click.
4. Torrenting without risk
VPN allows users to conceal their identities while downloading torrents, unlike many ISPs and government regulators that put restrictions on it.
5. P2P file share with deep encryption
P2P users are the most sought-after by Cyber criminals because identity theft and credit card fraud are quite common. VPN users are safe in this aspect as well.
6. Prevent Cyber Bullying attacks
VPN allows concealment of real IP address, raising anonymity and protection from advertisers, hackers, or various other accessors.
7. Monitoring by Businesses
VPN provides security to company data, therefore it's easier to control remote employee connections.
The Benefits of a personal VPN
 Privacy Protection and Anonymity:
Does not allow the user’s web identity and activities to be viewed or accessed.
 Personal Data Sharing With Public Wi-Fi:
Protects against unauthorized access to information on open service areas.
 Crack Geo-Restrictions:
Enables the user to access location-specific content, such as Netflix’s various libraries, along with other blocked sites including sensitive content.
 Avoid Censorship:
Assists in nations where internet access is heavily filtered or controlled, such as China, UAE, or Iran. After Using A VPN Their can easily access all the inaccessible sites and forums that are banned by the government.
 Masking ISP Tracking:
Protects users from internet service providers spying on them tracking and downloading their personal data.
 Safe Online Banking & Shopping Anonymously:
Safeguards online transactions against cyber threats and criminals.
 Torrenting Anonymously And Encrypted :
Allows users to download content without being traced or monitored.
 Improve Gaming Experience:
Eliminates lag and IP bans in gaming, along with enhancing the overall experience.
Disadvantages of Utilizing a Local Company VPN
 Reduced Internet Speeds:
The process of encryption, masking the original IP address and rerouting with the fake address and secure Ip servers can lead to a decrease in connection speed if he/she is using the local company or free VPN.
 Security Concerns with Certain VPNs:
Every free company that provides user free VPN is illegally downloading his/her personal data without permission and sharing it with the government and other third-party companies.
 Access Limitations on Certain Websites:
While accessing the inaccessible site and forum it may be detected that you are interacting with the masking IP address rather than the real leads to the ban of your original IP address for that particular site such as(Netflix and banking apps).
 Legal Limitations in Specific Regions:
The use of VPNs is banned or restricted in countries like China, Russia, the UAE, and Iran. In order to minimize the cyber attacks and spy on every single person that he/she is doing any unethical thing or not.
 Financial Cost:
Trustworthy VPN Charges a heavy amount of subscription fee monthly/yearly.
 Device Compatibility Challenges issues:
Not all VPNs are compatible with every device or application, especially for iPhone and Mac users.
How to Create a Personal VPN
It is very easy and simple to create an advanced VPN with zero cost and get full privacy and anonymity control in our hands.
These are the following most important steps that help us to create our own VPN from the scratch with zero investment.
1. Select a Provider for Server Hosting
A good and trustworthy remote server is required to set up a personal VPN. Among the options are:
Cloud service providers such as Vultr, Linode, DigitalOcean, and AWS, Your server (using a dedicated server, an old PC, or a Raspberry Pi)
NOTE: WE will create a free secure VPN by using the digital ocean because it provides us the free 200$ credit for everything we want in our Cloud server.
2. Set up a VPN protocol:
Protocols are needed by VPNs to transmit and encrypt data. The most typical ones are:
The most popular and secure VPN is OpenVPN.(NOTE); WE WILL MAKE A FREE VPN WITH THE HELP OF OPEN VPN
Following is the list of other VPN-making prototypes;
1. Wire Guard (Faster and newer).
2.(Older but still useful) L2TP/IPSec.
3.SoftEther (multiple protocol support, flexible).
3. Set up the VPN server software For Free with Digital Ocean by using OpenVPN:
NOTE: FOLLOW ALL THE STEPS AND CODE THE SAME AS IT IS FOR MAKING FREE SECURE ENCRYPTED VPN WITH FIREWALL SETUP.
1 . Open the digital ocean account and sign up on it to get the free 200$ credit.
2. Click on the create button on the right top appears in the green color.
3. Now select the location what ever you want I would like to go with the London.
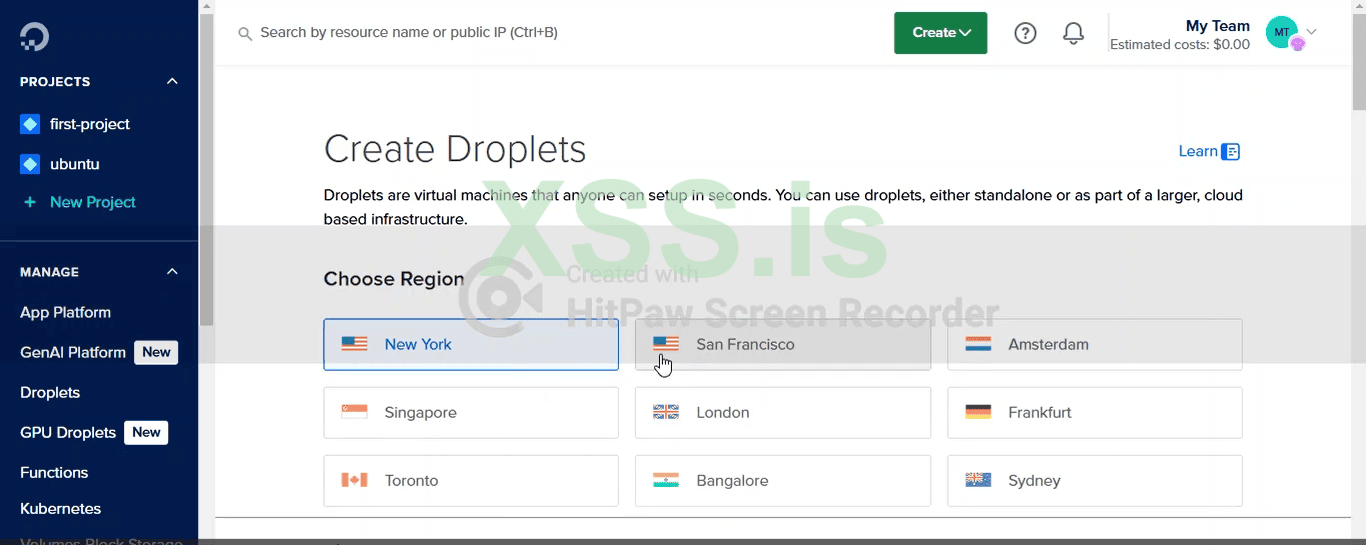
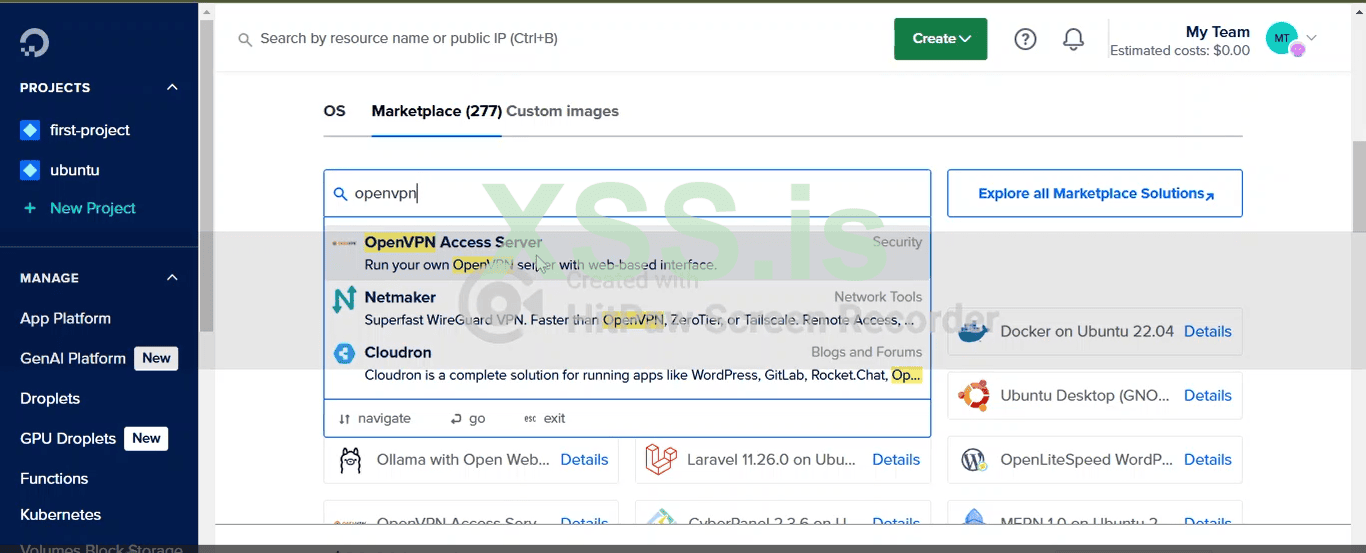
4. After selecting the server location, scroll down to the marketplace and search for (OpenVPN access server) and click on it and wait for 30 seconds.
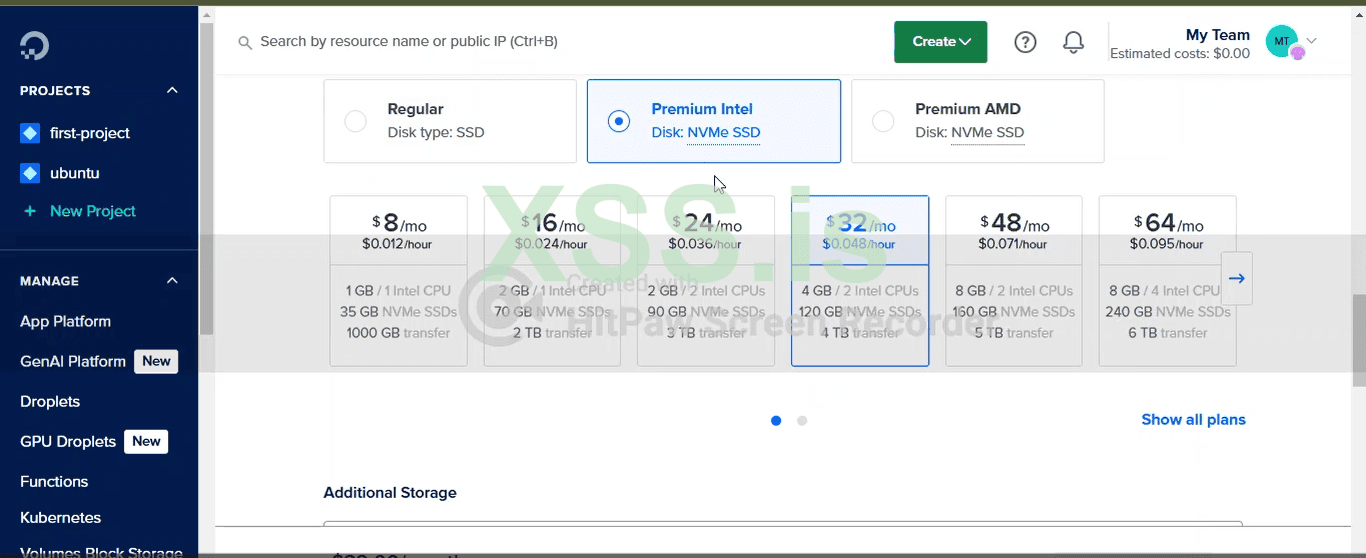
5. Scroll down to select the RAM, ROM, and storage package for a new user it is recommended to go with regular price, but I am according to my budget and using a higher premium intel SSD disc
NOTE: As much you guys go for the higher options it will cost you higher according to per hour.
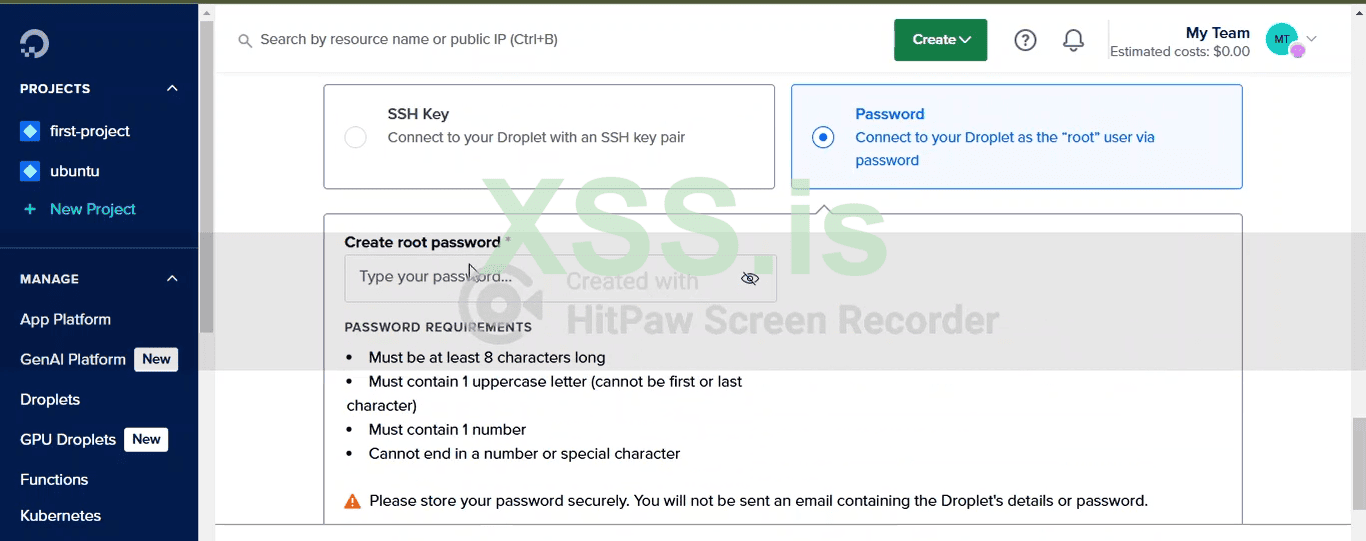
6. Scroll down now and select the password option and create a unique and handsome password for your droplet of the OpenVPN.
7. Now scroll down and give the name to your own personal VPN server than click on the right bottom button named "create droplet". All set your personal VPN is all most crated.
NOTE: I am using the xss.is forum name because I am making VPN for that forum for the article you guys will choose the best name that suits you.
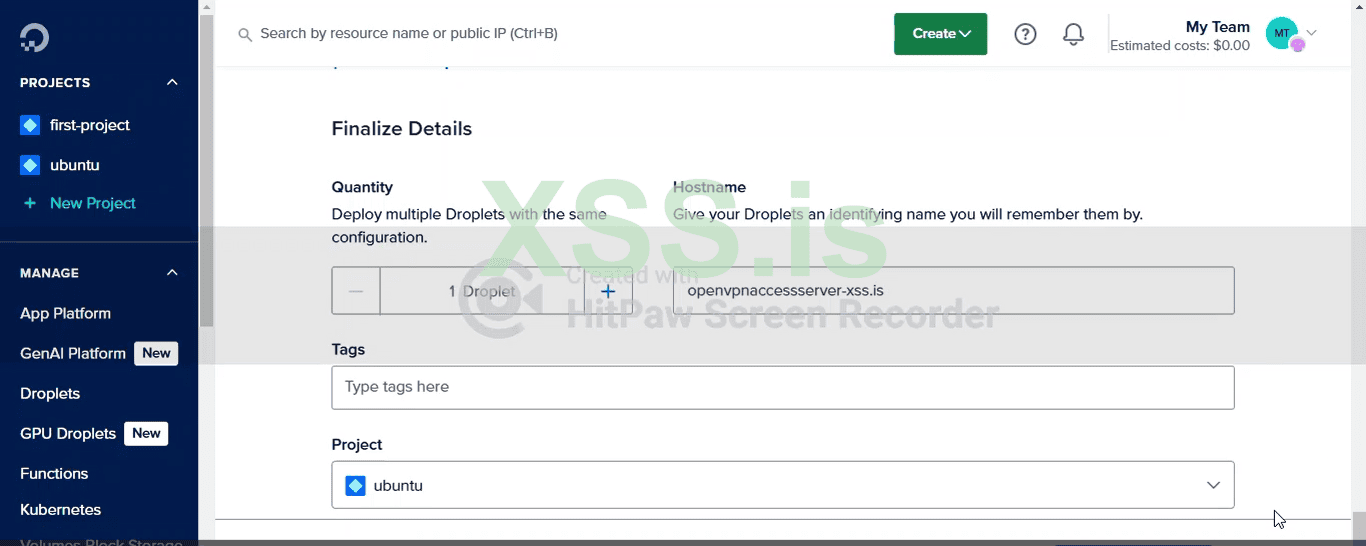
8. Now go to the home page by clicking the digital ocean icon and click on the console and you will be redirected to that page and after clicking the console your SSL registration will be start and you will be directly landed on that page.
NOTE: All the codes that I have been used in making my VPN must be the same while you guys are making your own VPN to overcome useless hazards.
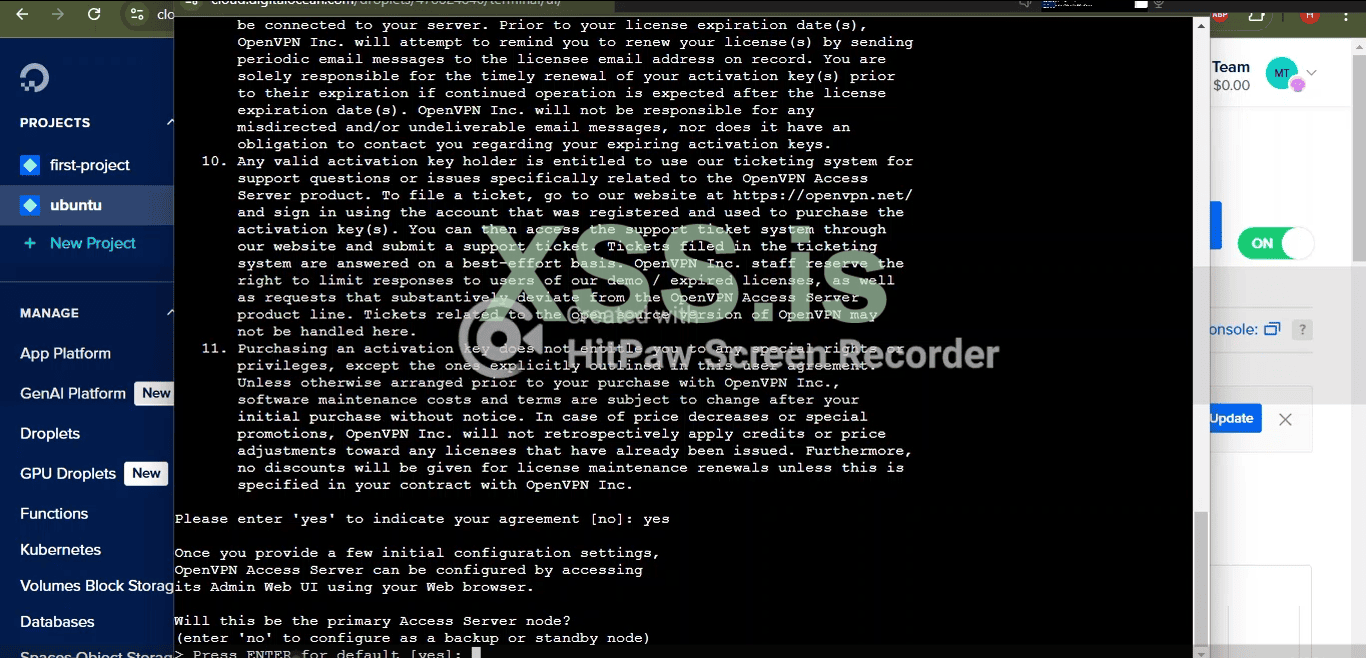
9. Do not press the enter key you have to write the manually "yes" to continue the process of the VPN creation.
10. Then you guys are allowed to just press the enter because enter is set to the default option for the continuation of VPN creation.
Here is the list of default code;
Код: Скопировать в буфер обмена
where you guys just enter or type manually;
11. After that the OpenVPN asks you to make a password just copy and paste the password that we set on the digital ocean droplet.
Код: Скопировать в буфер обмена
12. After that the open asks for the activation key for that step just press the "ENTER" key and move on. After that VPN installation will be started.
Код: Скопировать в буфер обмена
13. Now close the terminal and wait for one minute and then again click on the console for the basic and advance setting of the VPN like(Time Zone, Location, VPN Update and Firewall)
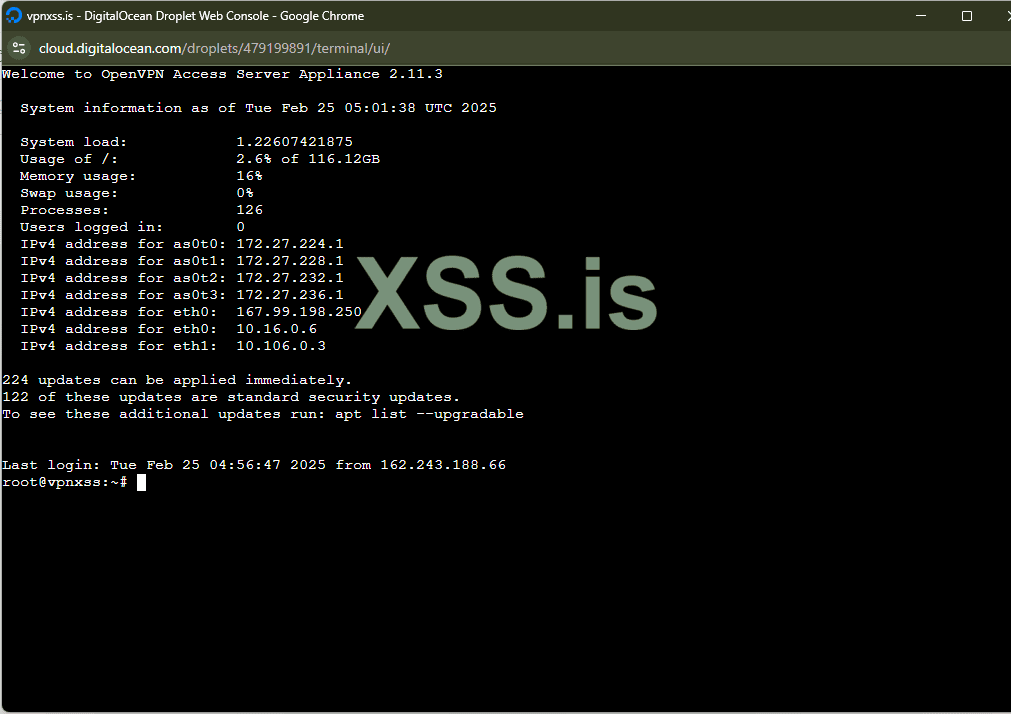
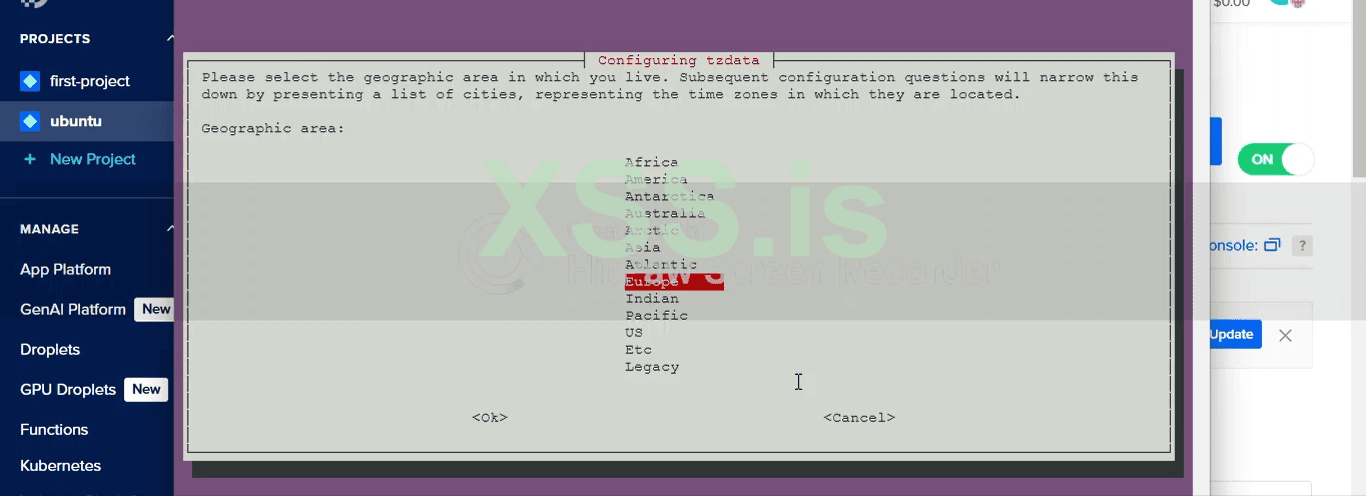
14. Now type in the terminal " sudo dpkg-reconfigure tzdata " just copy and paste that code , this will help you guys to set the time zone and location of your VPN that you want to be use.
NOTE: I am going with the EUROPE(LONDON).
Код: Скопировать в буфер обмена
15. Now type the command "sudo apt-get update && sudo apt-get upgrade -y", this will lead you guys to automatically update the VPN to the latest version and remove all the bugs and glitches.
NOTE: This process is a little lengthy and may take few couple of moments so be patient, here at this step terminal also asks for permission just press the default key as "ENTER" and you guys will be landed on that page and then just press the "ENTER" key.
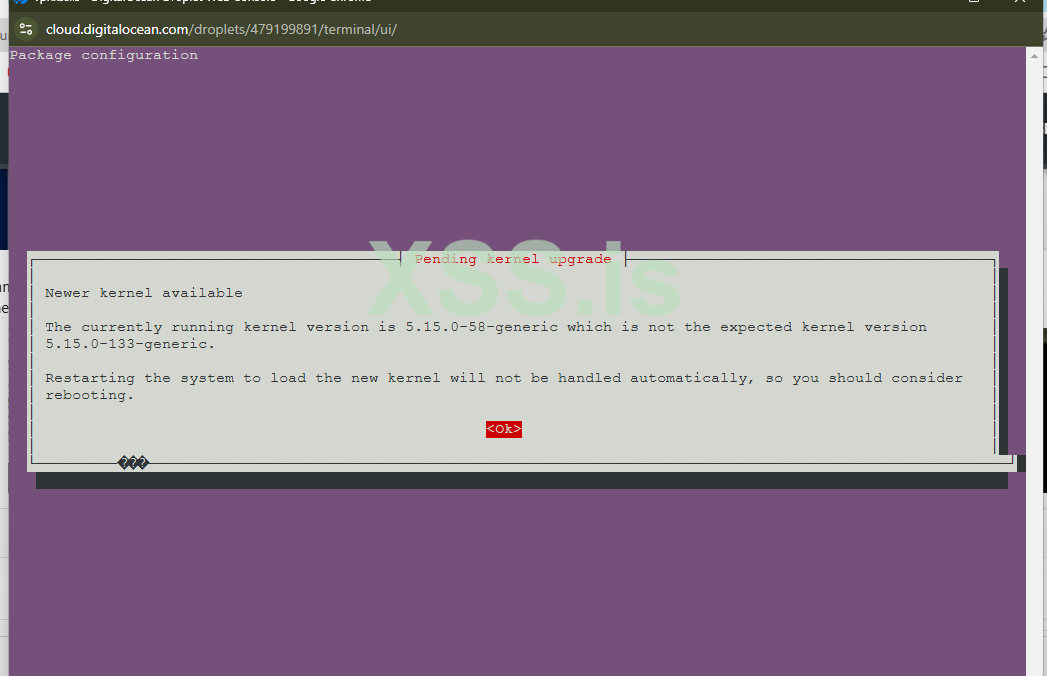
16. Now paste that command "apt-get install vnstat -y" , It will simply install VN STATS that will monitor all the incoming and the out going traffic from you VPN.
17. Than type "REBOOT" to run your VPN smoothly.
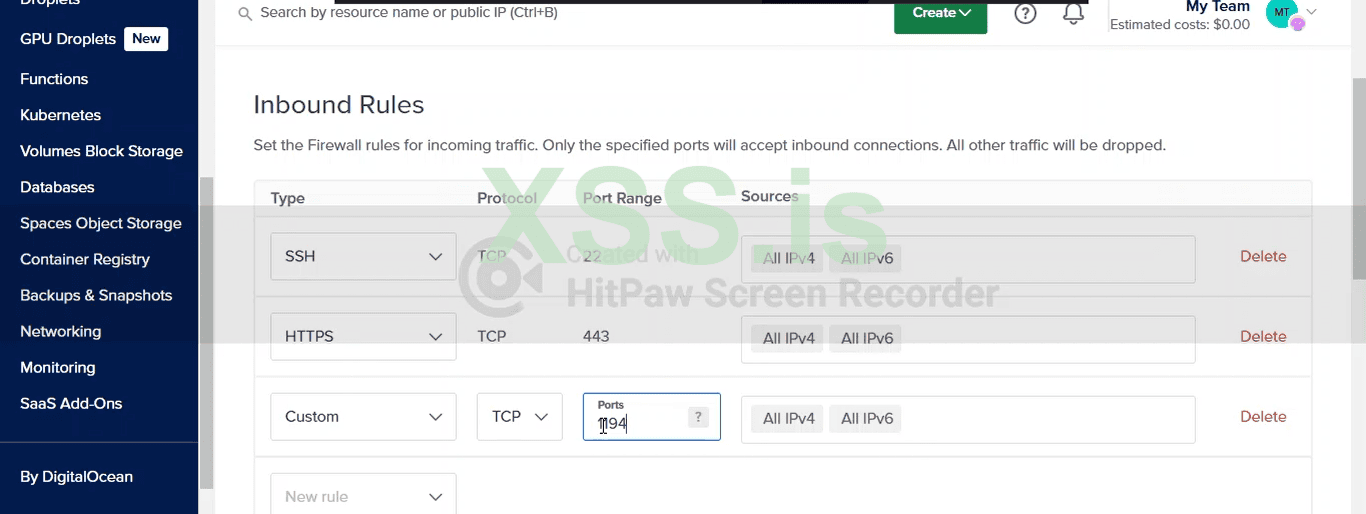
18. For setting up the firewall into your VPN just open the "DIGITAL OCEAN" account and on the left side click on the "NETWORKING" section and then on the Firewall and do all the same setting as i am showing in that image. Then click on the bottom right side button to create a firewall.
19. Now paste the admin login link there and use the user login name and password that you guys created in the starting while we are creating a droplet of VPN in the digital ocean. after entering the detail you will be redirected to that page.
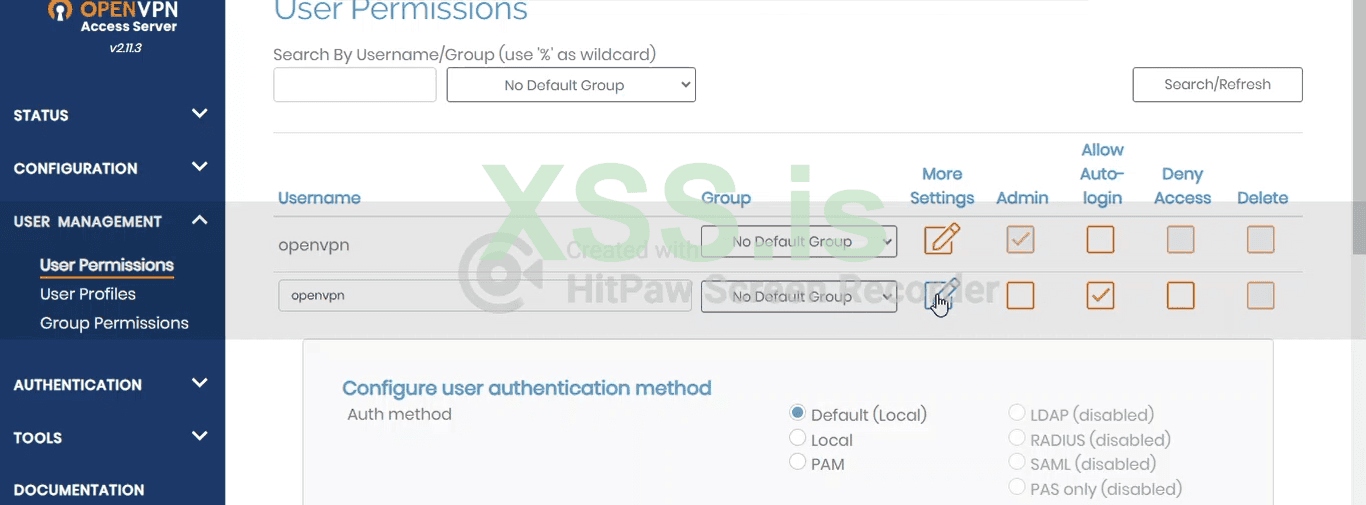
NOTE: In this stage see my settings click on the auto-login give the name to the VPN and click on more settings than scroll down and paste the same password on the "local password" section press "save setting" and enable and update the setting.
20. Now close the VPN tab and again open with the VPN admin portal and you will see the download option then download and install it for windows and then open the VPN.
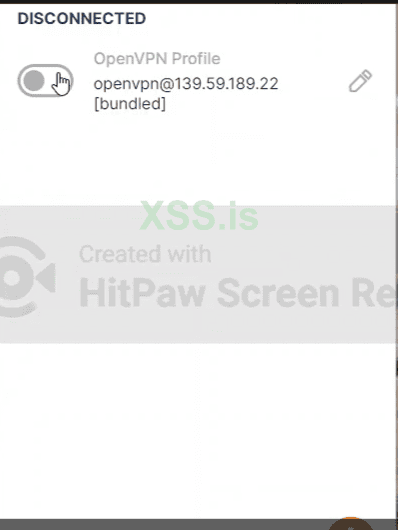
21. Then click on the small bar you will be connected to your own personal fire wall protected VPN with great security and encryption.
PROOF OF VPN:
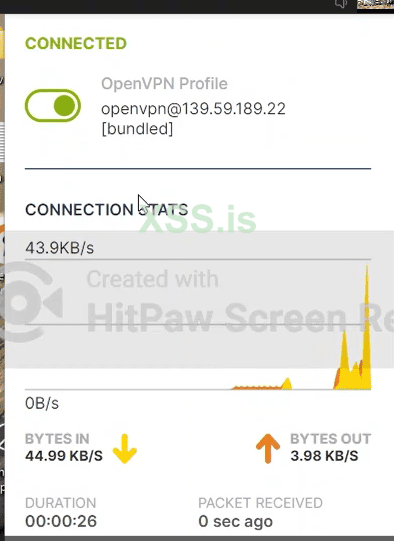
NOTE: You guys may check the same IP of the digital ocean droplet and the VPN IP both are the same.
CONCLUSION: Using our personal VPN leads to our mental health satisfaction because here we have zero percent chances of stealing our data, our personal information our credit card details, prevented from being traceable accessing all the inaccessible sites, apps, and important files with full security and encryption with full privacy.
THANK YOU!
What we are going to cover in that article
1. Brief guide about the VPN.
2. Why do we have to use a VPN rather than our real IP address?
3. Why we don't have to use company VPNs
4. Advantages of the personal VPN.
5. How to set up our own VPN server
Note: All the information provided in that article is only for educational purposes and does not promote any illegal or unethical activities.
"WHAT IS VPN AND ALL NECESSARY GUIDE"
VPN stands for (Virtual Private Network) and this runs on such kind of technology that provides us with a great secure and encrypted connection over the internet and gives full freedom to the user to browse safely and securely with full privacy and anonymity.
"HOW VPN PROVIDE US ANONYMITY AND PRIVACY"
(Virtual Private Network) run for an encrypted technology that masks the user's real IP and provides them a new and unique IP address to ensure that the user browses safely without sharing his/her actual IP address, location, and time zone. (Virtual Private Network) make us untraceable from government officials, hackers, and all the third-party sites that steal our data.
How To Connect 3rd Party VPN?
Connecting a VPN is simple and depending on the device or Company of VPN. Here’s a step-by-step guide:1. Select a VPN Company
There is a vast range of VPN, including both free and paid, such as NordVPN, ExpressVPN, Surfshark, ProtonVPN, and CyberGhost etc.2. Download the VPN Software
Download and install the VPN on your Device.
3. Log In to the VPN App
Open the VPN application on your device and log in using your credentials.
4. Choose a Server Location
VPNs provide a vast range of server locations that you guys will choose according to your needs.
5. Connect to the local VPN
Click the "Connect" button to get the encrypted IP address
6. Make your browsing anonymous
Your real IP address is now hidden and a fake one will work, and your internet activity is secure and encrypted.
7. Disconnect When You are done with browsing
If their is no usage of VPN than , disconnect from it .
ADVANTAGES OF USING A VPN(VIRTUAL PRIVATE NETWORK)
There are so many reasons behind that but using VPN actually depends on the user and for what purpose he/she wants to get from it. now I will share a few most important and useful benefits of using a good VPN.
1. Getting access to inaccessible
VPN allows us to overcome censor barriers put up by the government or regionally geo-restricted content to make sure the terrorists are free and happy countries. VPN’s strong servers enable geo masking making us access all kinds of banned websites, apps, links without and hazards.
2. Extension of bandwidth
VPN extension in bandwidth means if we are using the best and official VPN it provides us a handsome speed of internet which may reach up to 1000MBPS
3. Anonymity Encryption of sensitive transactions
VPN protects personal data like credit cards password details or other blueprints easily accessible over the web at a click.
4. Torrenting without risk
VPN allows users to conceal their identities while downloading torrents, unlike many ISPs and government regulators that put restrictions on it.
5. P2P file share with deep encryption
P2P users are the most sought-after by Cyber criminals because identity theft and credit card fraud are quite common. VPN users are safe in this aspect as well.
6. Prevent Cyber Bullying attacks
VPN allows concealment of real IP address, raising anonymity and protection from advertisers, hackers, or various other accessors.
7. Monitoring by Businesses
VPN provides security to company data, therefore it's easier to control remote employee connections.
The Benefits of a personal VPN
Does not allow the user’s web identity and activities to be viewed or accessed.
Protects against unauthorized access to information on open service areas.
Enables the user to access location-specific content, such as Netflix’s various libraries, along with other blocked sites including sensitive content.
Assists in nations where internet access is heavily filtered or controlled, such as China, UAE, or Iran. After Using A VPN Their can easily access all the inaccessible sites and forums that are banned by the government.
Protects users from internet service providers spying on them tracking and downloading their personal data.
Safeguards online transactions against cyber threats and criminals.
Allows users to download content without being traced or monitored.
Eliminates lag and IP bans in gaming, along with enhancing the overall experience.
Disadvantages of Utilizing a Local Company VPN
The process of encryption, masking the original IP address and rerouting with the fake address and secure Ip servers can lead to a decrease in connection speed if he/she is using the local company or free VPN.
Every free company that provides user free VPN is illegally downloading his/her personal data without permission and sharing it with the government and other third-party companies.
While accessing the inaccessible site and forum it may be detected that you are interacting with the masking IP address rather than the real leads to the ban of your original IP address for that particular site such as(Netflix and banking apps).
The use of VPNs is banned or restricted in countries like China, Russia, the UAE, and Iran. In order to minimize the cyber attacks and spy on every single person that he/she is doing any unethical thing or not.
Trustworthy VPN Charges a heavy amount of subscription fee monthly/yearly.
Not all VPNs are compatible with every device or application, especially for iPhone and Mac users.
How to Create a Personal VPN
It is very easy and simple to create an advanced VPN with zero cost and get full privacy and anonymity control in our hands.
These are the following most important steps that help us to create our own VPN from the scratch with zero investment.
1. Select a Provider for Server Hosting
A good and trustworthy remote server is required to set up a personal VPN. Among the options are:
Cloud service providers such as Vultr, Linode, DigitalOcean, and AWS, Your server (using a dedicated server, an old PC, or a Raspberry Pi)
NOTE: WE will create a free secure VPN by using the digital ocean because it provides us the free 200$ credit for everything we want in our Cloud server.
2. Set up a VPN protocol:
Protocols are needed by VPNs to transmit and encrypt data. The most typical ones are:
The most popular and secure VPN is OpenVPN.(NOTE); WE WILL MAKE A FREE VPN WITH THE HELP OF OPEN VPN
Following is the list of other VPN-making prototypes;
1. Wire Guard (Faster and newer).
2.(Older but still useful) L2TP/IPSec.
3.SoftEther (multiple protocol support, flexible).
3. Set up the VPN server software For Free with Digital Ocean by using OpenVPN:
NOTE: FOLLOW ALL THE STEPS AND CODE THE SAME AS IT IS FOR MAKING FREE SECURE ENCRYPTED VPN WITH FIREWALL SETUP.
1 . Open the digital ocean account and sign up on it to get the free 200$ credit.
2. Click on the create button on the right top appears in the green color.
3. Now select the location what ever you want I would like to go with the London.
4. After selecting the server location, scroll down to the marketplace and search for (OpenVPN access server) and click on it and wait for 30 seconds.
5. Scroll down to select the RAM, ROM, and storage package for a new user it is recommended to go with regular price, but I am according to my budget and using a higher premium intel SSD disc
NOTE: As much you guys go for the higher options it will cost you higher according to per hour.
6. Scroll down now and select the password option and create a unique and handsome password for your droplet of the OpenVPN.
7. Now scroll down and give the name to your own personal VPN server than click on the right bottom button named "create droplet". All set your personal VPN is all most crated.
NOTE: I am using the xss.is forum name because I am making VPN for that forum for the article you guys will choose the best name that suits you.
8. Now go to the home page by clicking the digital ocean icon and click on the console and you will be redirected to that page and after clicking the console your SSL registration will be start and you will be directly landed on that page.
NOTE: All the codes that I have been used in making my VPN must be the same while you guys are making your own VPN to overcome useless hazards.
9. Do not press the enter key you have to write the manually "yes" to continue the process of the VPN creation.
10. Then you guys are allowed to just press the enter because enter is set to the default option for the continuation of VPN creation.
Here is the list of default code;
Код: Скопировать в буфер обмена
Код:
Will this be the primary Access Server node?
(enter 'no' to configure as a backup or standby node)
> Press ENTER for default [yes]: yes
Please specify the network interface and IP address to be
used by the Admin Web UI:
(1) all interfaces: 0.0.0.0
(2) eth0: 167.99.198.250
(3) eth0: 10.16.0.6
(4) eth1: 10.106.0.3
Please enter the option number from the list above (1- 4).
> Press Enter for default [1]:

What public/private type/algorithms do you want to use for the OpenVPN CA?

Recommended choices:

rsa       - maximum compatibility
secp384r1 - elliptic curve, higher security than rsa, allows faster connection setup and smaller user profile files
showall   - shows all options including non-recommended algorithms.
> Press ENTER for default [rsa]:

What key size do you want to use for the certificates?
Key size should be between 2048 and 4096

> Press ENTER for default [ 2048 ]:

What public/private type/algorithms do you want to use for the self-signed web certificate?

Recommended choices:

rsa       - maximum compatibility
secp384r1 - elliptic curve, higher security than rsa, allows faster connection setup and smaller user profile files
showall   - shows all options including non-recommended algorithms.
> Press ENTER for default [rsa]:

What key size do you want to use for the certificates?
Key size should be between 2048 and 4096

> Press ENTER for default [ 2048 ]:

Please specify the port number for the Admin Web UI.
> Press ENTER for default [943]:

Please specify the TCP port number for the OpenVPN Daemon
> Press ENTER for default [443]:

Should client traffic be routed by default through the VPN?
> Press ENTER for default [yes]:

Should client DNS traffic be routed by default through the VPN?
> Press ENTER for default [yes]:
Admin user authentication will be  local

Private subnets detected: ['10.16.0.0/20', '10.106.0.0/20']

Should private subnets be accessible to clients by default?
> Press ENTER for default [yes]:

To initially login to the Admin Web UI, you must use a
username and password that successfully authenticates you
with the host UNIX system (you can later modify the settings
so that RADIUS or LDAP is used for authentication instead).

You can login to the Admin Web UI as "openvpn" or specify
a different user account to use for this purpose.

Do you wish to login to the Admin UI as "openvpn"?
> Press ENTER for default [yes]:11. After that the OpenVPN asks you to make a password just copy and paste the password that we set on the digital ocean droplet.
Код: Скопировать в буфер обмена
Код:
Do you wish to login to the Admin UI as "OpenVPN"?
> Press ENTER for default [yes]:
Type a password for the 'openvpn' account (if left blank, a random password will be generated):
Please, remember this password lhBlY3C1jeIU

> Please specify your Activation key (or leave blank to specify later):
12. After that the open asks for the activation key for that step just press the "ENTER" key and move on. After that VPN installation will be started.
Код: Скопировать в буфер обмена
Код:
Initializing OpenVPN...
Removing Cluster Admin user login...
userdel "admin_c"
Writing as configuration file...
Perform in the heat...
Wiping any previous userdb...
Creating default profile...
Modifying default profile...
Adding new user to userdb...
Modifying new user as superuser in userdb...
Setting password in db...
Getting hostname...
Hostname: vpnxss
Preparing web certificates...
Getting web user account...
Adding web group account...
Adding web group...
Adjusting license directory ownership...
Initializing confdb...
Initial version is not set. Setting it to 2.11.3...
Generating PAM config for openvpnas ...
Enabling service
Created symlink /etc/systemd/system/multi-user.target.wants/openvpnas.service → /lib/systemd/system/openvpnas.service.
Starting openvpnas...

NOTE: Your system clock must be correct for OpenVPN Access Server
to perform correctly.  Please ensure that your time and date
are correct on this system.

Initial Configuration Complete!

You can now continue configuring OpenVPN Access Server by
directing your Web browser to this URL:

https://167.99.198.250:943/admin

During normal operation, OpenVPN AS can be accessed via these URLs:
Admin UI: https://167.99.198.250:943/admin
Client UI: https://167.99.198.250:943/
To login please use the "openvpn" account with  the password you specified during the setup.

See the Release Notes for this release at:
   https://openvpn.net/vpn-server-resources/release-notes/
13. Now close the terminal and wait for one minute and then again click on the console for the basic and advance setting of the VPN like(Time Zone, Location, VPN Update and Firewall)
14. Now type in the terminal " sudo dpkg-reconfigure tzdata " just copy and paste that code , this will help you guys to set the time zone and location of your VPN that you want to be use.
NOTE: I am going with the EUROPE(LONDON).
Код: Скопировать в буфер обмена
Код:
*** System restart required ***
Last login: Tue Feb 25 05:10:35 2025 from 162.243.188.66
root@vpnxss:~# 200~sudo dpkg-reconfigure tzdata
200~sudo: command not found
root@vpnxss:~# sudo dpkg-reconfigure tzdata

Current default time zone: 'Europe/London'
Local time is now:      Tue Feb 25 05:17:31 GMT 2025.
Universal Time is now:  Tue Feb 25 05:17:31 UTC 2025.

root@vpnxss:~#
15. Now type the command "sudo apt-get update && sudo apt-get upgrade -y", this will lead you guys to automatically update the VPN to the latest version and remove all the bugs and glitches.
NOTE: This process is a little lengthy and may take few couple of moments so be patient, here at this step terminal also asks for permission just press the default key as "ENTER" and you guys will be landed on that page and then just press the "ENTER" key.
16. Now paste that command "apt-get install vnstat -y" , It will simply install VN STATS that will monitor all the incoming and the out going traffic from you VPN.
17. Than type "REBOOT" to run your VPN smoothly.
18. For setting up the firewall into your VPN just open the "DIGITAL OCEAN" account and on the left side click on the "NETWORKING" section and then on the Firewall and do all the same setting as i am showing in that image. Then click on the bottom right side button to create a firewall.
19. Now paste the admin login link there and use the user login name and password that you guys created in the starting while we are creating a droplet of VPN in the digital ocean. after entering the detail you will be redirected to that page.
NOTE: In this stage see my settings click on the auto-login give the name to the VPN and click on more settings than scroll down and paste the same password on the "local password" section press "save setting" and enable and update the setting.
20. Now close the VPN tab and again open with the VPN admin portal and you will see the download option then download and install it for windows and then open the VPN.
21. Then click on the small bar you will be connected to your own personal fire wall protected VPN with great security and encryption.
PROOF OF VPN:
NOTE: You guys may check the same IP of the digital ocean droplet and the VPN IP both are the same.
CONCLUSION: Using our personal VPN leads to our mental health satisfaction because here we have zero percent chances of stealing our data, our personal information our credit card details, prevented from being traceable accessing all the inaccessible sites, apps, and important files with full security and encryption with full privacy.
THANK YOU!