D2
Администратор
- Регистрация
- 19 Фев 2025
- Сообщения
- 4,380
- Реакции
- 0
In this article, I will walk you through the step-by-step process of setting up a secure and anonymous Matrix server using Tor, Caddy, Privoxy, and Synapse. This setup not only ensures encrypted communications but also leverages the Tor network to make your server completely anonymous and untraceable. My goal is to create a guide that even users with limited Linux experience can follow, enabling them to build their own private and secure messaging server.
If you're looking to learn how to set up a system that is resistant to intrusion, surveillance, and censorship, this article is exactly what you need. In the following sections, I will provide detailed instructions on installing the necessary tools, configuring the settings, and getting your server ready to use. Let’s get started!
First of all, what is Matrix ?
Matrix is an open, decentralized communication protocol designed with a federated architecture to meet modern communication needs securely, scalably, and transparently. It is specifically built for text messaging, voice and video calls, file sharing, and even interactions between devices and IoT. However, its standout features lie in its decentralized architecture and end-to-end encryption Matrix uses an event-based model, meaning every message, state change, or file is stored as an event in the history of a room. These events are organized into a DAG (Directed Acyclic Graph) structure, enabling the tracking of room states across connected servers. Each Matrix server can be managed independently while synchronizing room information with other servers in the network. This design not only increases resilience to censorship but also eliminates dependency on a central point of control.
- Security Features matrix :
1 .End-to-End Encryption:
Matrix employs the Olm and Megolm protocols to encrypt messages. Olm is used for one-on-one chats, while Megolm handles group chats. These protocols ensure that only the sender and the intended recipients can decrypt the messages.
2. Authentication and Key Management:
Matrix uses advanced mechanisms for encryption key management, including Cross-Signing, which allows device verification and prevents man-in-the-middle (MITM) attacks.
3. Federation-Level Security:
Due to its distributed architecture, even if a specific server is compromised or fails, the rest of the servers and communications remain secure.
Advanced Features Matrix :
- Federation:
Servers communicate using RESTful HTTP protocols and JSON standards. This allows users to interact with others regardless of the server they are registered on.
- Bridge Support:
Matrix can interact with other protocols and services like Slack, Telegram, IRC, and even WhatsApp through software bridges.
- Persistent History:
Unlike other protocols, Matrix retains a permanent communication history that synchronizes across servers. This ensures access to message history, even for users joining a room after its creation.
Advantages for Security Professionals :
- Full Data Control:
Hosting a personal server allows local storage of all communication data.
- Censorship Resistance:
The decentralized nature of the network ensures no single entity can block access to Matrix.
- Implementation Flexibility:
Matrix can be configured to run on anonymous networks like Tor, adding an extra layer of privacy and security.
Caddy Web Server is a modern and powerful web server chosen for this project due to its unique features Key Features and Reasons for Selection :
1. Simple and Flexible Configuration:
- Caddy uses a straightforward configuration file called `Caddyfile`, which is user-friendly for defining routes, proxies, and SSL settings.
- Compared to other web servers like Nginx or Apache, Caddy offers better readability and easier setup.
2. Automatic HTTPS Management:
- One of Caddy's standout features is its ability to automatically issue and manage SSL certificates. Although standard certificates are unnecessary for .onion domains in the Tor network, Caddy can still manage HTTPS connections for external access.
3. Native Reverse Proxy Support:
- Caddy efficiently forwards incoming requests to the Matrix server, separating the web and application layers and providing better server management.
4. HTTP/3 Support and High Performance:
- Caddy natively supports HTTP/3 and QUIC, improving performance and reducing latency in user communications.
5. Advanced Modules:
- Caddy supports plugins and modules for custom features, such as detailed logging or user management.
Combining Caddy with Privoxy for Maximum Security and Flexibility
Caddy:
Manages HTTP/S routes, handles requests, and enhances the user experience.
- Privoxy:
Acts as a secure layer for filtering, load control, and protecting the main server.
Why Tor for Our Project? For setting up Matrix in this project:
- Anonymity:
Tor ensures complete anonymity for the server, making its location and identifying information untraceable.
- User Privacy:
Users can connect to the server through the Tor network without revealing their IP addresses or identities.
- Additional Encryption:
Tor's encrypted communications add another layer of security on top of Matrix's end-to-end encryption.
- .onion Domain Access:
The Matrix service will be accessible through a .onion domain, which is a significant advantage for secure and sensitive communications.
In summary, Tor creates a multi-layered shield of privacy and security, ensuring that both the server and users remain anonymous and safe. The combination of Matrix and Tor delivers completely untraceable communication, resistant to interception and censorship. I plan to explain everything in detail in this project to make it accessible for everyone, even those with minimal Linux knowledge or experience. Let me know what other aspects you'd like me to cover!
Primary Uses of Privoxy in This article
1. Traffic Routing to the Tor Network
Privoxy acts as an intermediary between clients and the Tor service:
- It receives all incoming HTTP requests and routes them to Tor.
- By using the forward-socks5t setting, it forwards traffic to the SOCKS5 port provided by Tor.
- This process ensures that all communications are anonymous and untraceable.
2. Request Filtering
Privoxy can inspect HTTP traffic before sending it to the Tor network and block unwanted or risky requests:
- It filters cookies, modifies headers, and blocks ads or specific content.
- These features provide enhanced security and privacy for your server's users.
Tools to Install
1.Python
Why Use Python?
- Synapse, the main Matrix server software, is written in Python and depends on it.
- Many management and testing tools (such as user management scripts) require Python.
Installing Python on Ubuntu:
Код: Скопировать в буфер обмена
2.caddy
Installing Caddy on Ubuntu:
1. Add the official Caddy repository:
Код: Скопировать в буфер обмена
Код: Скопировать в буфер обмена
3. Installing Privoxy :
Verify Installation Privoxy :
Код: Скопировать в буфер обмена
4.Installing Tor :
Код: Скопировать в буфер обмена
Edit the Tor configuration file :
add :
Код: Скопировать в буфер обмена
These tools provide the necessary infrastructure for deploying a secure and anonymous Matrix server on the Tor network:
- Python: For Synapse and management scripts.
- Caddy: As a web server for handling HTTP/S traffic.
- Privoxy: As a proxy layer for enhanced privacy.
- Tor: For anonymity and creating a hidden service.
With these components installed, we're ready to move on to configuring them to work seamlessly together and deploy our service. Let me know if you'd like me to guide you through the next steps!
5 .Adding the Synapse Repository
Synapse is available in the official Matrix repositories. First, add the repository:
Код: Скопировать в буфер обмена
During the installation, when you're asked to enter the domain name, leave it blank.
Код: Скопировать в буфер обмена
Now, before we manually configure it, let's first access our Onion service. To improve the project's flow, I want to create a custom domain using the `mkp224o` tool. This will allow us to demonstrate setting up a custom domain while also achieving the goal for the project!
Steps to Install and Download mkp224o:
First, install the prerequisites:
Код: Скопировать в буфер обмена
Clone the repository from GitHub:
Navigate to the mkp224o directory:
start compiling with:
Next, create a Makefile with:
Finally, run
Код: Скопировать в буфер обмена
First, generate your custom Onion address. Then, you'll need to place the public-key and private-key files in the directory specified in your torrc file. You need to add the line User debian-tor to the torr file because the Tor service should run under the debian-tor user by default. Start Tor Service to Generate a Random Hidden Service Before configuring your custom keys, start the Tor service so that a random hidden service gets generated. This will allow us to replace the hostname, public-key, and private-key with your custom ones.
The hidden service directory was set as /var/lib/tor/matrix_hidden_service/. The directories related to the Tor service should belong to the debian-tor user. To set the correct ownership, use the following commands :
Код: Скопировать в буфер обмена
now start tor :
Код: Скопировать в буфер обмена
To check if the random hidden service has been created:
Код: Скопировать в буфер обмена
Replace the Hostname, Public-Key, and Private-Key After confirming the hidden service has been created, replace the files with your custom ones:
Код: Скопировать в буфер обмена
Finally, restart Tor to ensure everything is set up correctly:
Код: Скопировать в буфер обмена
Now, you should have your custom Onion address set up and working!
Since we are going to manually generate the
Код: Скопировать в буфер обмена
Once the file is generated, ensure the necessary permissions are set. Now, we need to create a Matrix user who will have the required permissions for these directories:
Код: Скопировать в буфер обмена
--system: Creates a system user.
--no-create-home: Does not create a home directory for the user.
--group: Creates a group with the same name as the user.
--disabled-login: Prevents this user from logging in directly (for security purposes).
All files related to Matrix-Synapse should be assigned to this new user. The default file paths are
Код: Скопировать в буфер обмена
Next, you should configure the systemd service for Matrix-Synapse to restrict execution to this user. Edit the systemd service file:
Код: Скопировать в буфер обмена
Make sure to set the following:
Additionally, in the conf.d directory located at /etc/matrix-synapseedit the server_name.yaml file and add your Onion address as the server_name. Once you've updated the service file, reload the systemd configuration and restart the Matrix-Synapse service:
Код: Скопировать в буфер обмена
Now, let's move on to configuring Privoxy. Open the Privoxy configuration file /etc/privoxy/config, and search for the listen-address line. Once you find it, add the following:
Also, set listen-address to:
start Privoxy services:
Код: Скопировать в буфер обмена
Now, on your client system, configure the proxy settings to route traffic through the Tor network. Set the IP address of the machine and the port 8118:

proxy setting > 0.0.0.0 8118
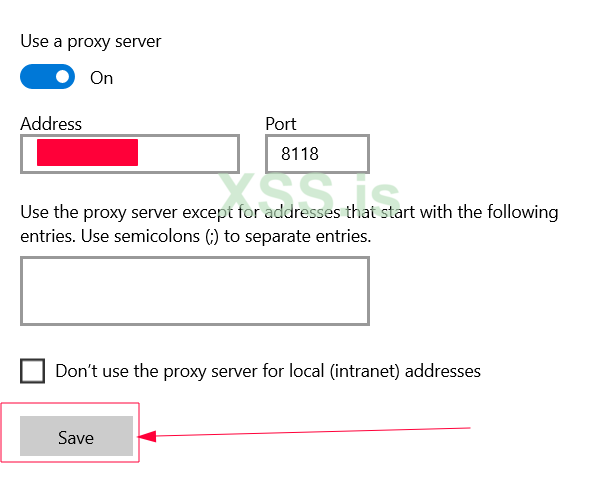
Finally, check if all traffic is routed through the Tor network by visiting Check Tor Project https://check.torproject.org . This will confirm if everything is working as expected.

And with that, your setup is complete!
Great! Now that the homeserver, onion address, Privoxy, and Caddy are all working properly, let's move on to configuring Caddy, homeserver.yaml matrix-synapse, and creating a self-signed certificate for your Onion service. We will also test its functionality on the client
Creating a Self-Signed SSL Certificate
To enhance security and encrypt communications on the Synapse server, I decided to use a self-signed SSL certificate. This allows us to establish secure and encrypted communications, even for .onion domains, thus providing higher security for users. One question that might arise is why we don't use free certificates provided by Let’s Encrypt for .onion domains. Here's why:
Why Not Use Let’s Encrypt? Let’s Encrypt only issues certificates for public DNS domains that can be resolved through the standard DNS system. .onion domains don’t use public DNS but are instead managed internally by the Tor network. As a result, Let’s Encrypt cannot validate these domains. Self-Generated Domains .onion domains are automatically and randomly generated by the Tor network and are not registered in any DNS system. Since Let’s Encrypt requires a validation process (like DNS challenge or HTTP challenge) to issue certificates, it cannot provide certificates for these domains. To address this, I wrote a script that fully automates the certificate creation process. The script is designed to be user-friendly, so even if you’re not familiar with OpenSSL or certificate configuration, you can create your desired certificate with just a few simple commands.
How the Script Works
1. Access Level Check
The script first checks if it’s being run with root access. This ensures it has the necessary permissions to access files and directories.
2. Collecting User Information
The script collects the following information from you:
- Domain name (e.g., xss-matrix.onion)
- File path for storing the certificate and private key
- Certificate validity period (default: 365 days)
- Key size (default: 4096 bits)
- User and group ownership for the files
3. Generating the Private Key
Using OpenSSL, the script generates a private key, which is essential for signing the certificate and securing communications.
4. Creating a Certificate Signing Request (CSR)
A CSR is generated, containing domain information and some organizational details. This serves as the foundation for the certificate.
5. Configuring Certificate Attributes
A file named .ext is created, where certificate attributes, including support for Subject Alternative Name (SAN), are defined.
6. Creating the Final Certificate
Finally, using the private key and CSR, the script generates a self-signed certificate. This certificate is signed with the private key and is ready for use in various services.
7. Transferring Files and Setting Permissions
The certificate and private key files are moved to the specified paths, and their ownership is set to the designated user and group.
The Necessity of Using HTTPS for Matrix The HTTPS protocol (Hypertext Transfer Protocol Secure) is an unavoidable requirement for running Synapse (the Matrix protocol server). This necessity stems from security, functionality, and even the way servers communicate with other servers and clients. Matrix Client Requirements Matrix clients (such as Element) require HTTPS to communicate with the server. If HTTP is used instead:
- Most clients will not allow communication by default.
- Users will encounter security warnings.
- Access to the server will be completely restricted.
To address these issues, creating a self-signed SSL certificate is essential.
ssl.sh :
Bash: Скопировать в буфер обмена
Configuring Caddyfile for Your Matrix Server
Now that we have set up the self-signed certificate for our .onion service and ensured HTTPS is ready, the next step is to configure Caddy which will act as a reverse proxy for your Synapse server. Caddy is an excellent choice because of its simplicity, built-in HTTPS management, and high performance. Here’s a breakdown of the configuration I wrote for setting up Caddy as a reverse proxy for the Matrix server on Tor. Let’s go through each section to understand what it does.
Section 1: Federation Traffic
Код: Скопировать в буфер обмена
Here, we handle requests coming to port 8448, which is specifically used for Federation—when our Matrix server communicates with other servers in the network.
tls: Specifies the path to the certificate and private key to enable HTTPS.
reverse_proxy: Routes any requests related to /federation/* to the Matrix server running on localhost at port 8008.
Section 2: Redirecting HTTP to HTTPS
Код: Скопировать в буфер обмена
This section ensures that any HTTP traffic (port 80) is immediately redirected to HTTPS. In this case, it redirects users to another .onion domain (`xss.onion`) for additional security.
Section 3: HTTPS and Client Configurations
Код: Скопировать в буфер обмена
Here we handle HTTPS traffic on port 443. Each part has a specific role:
- bind 0.0.0.0: Listens on all local IP addresses.
- tls: Configures SSL certificates and restricts the protocol to TLS 1.2 and 1.3 for better security.
- encode gzip: Enables compression to improve loading speed
Special Routes:
- reverse_proxy /_matrix/client/*: Routes all client-related requests (e.g., Element) to the Matrix server running on port `8008`.
- .well-known/matrix/client: Returns a JSON file informing the client where the Homeserver is located.
- .well-known/matrix/server: Returns a JSON file for other servers, specifying where to send messages for our Matrix server.
- .well-known/matrix/support: Provides a simple response indicating that support information is unavailable.
This configuration ensures that:
- Federation Works: Other Matrix servers can exchange messages with our server.
- Secure HTTPS Communication: All connections are encrypted and secure.
- Clients Can Connect: Clients can locate and connect to our server without issues.
Federation Issue with Self-Signed Certificate Although we’ve configured Federation in the Caddy settings and routed requests to the correct path (/_matrix/federation/*), there’s still a problem. The issue is that our server cannot communicate with other servers, such as matrix.org. The root cause is the self-signed certificate we’re using.Why Does a Self-Signed Certificate Cause Problems?
When Matrix servers (like matrix.org) attempt to communicate with our server, they validate our certificate. Since a self-signed certificate isn’t issued by a trusted Certificate Authority (CA), other servers don’t trust it and reject the requests. This is a security mechanism to ensure that communications are secure and data isn’t tampered with.While our server can send Federation requests, the destination server (e.g., matrix.org) identifies our certificate as invalid when trying to respond, and the connection is rejected. As a result, messages that should be exchanged between our server and other servers fail to send or receive.Currently, the Federation issue persists because of the self-signed certificate, and our server cannot establish connections with `matrix.org` or other servers that require valid certificates. I’m actively looking for a better solution to resolve this problem.
Configuration homeserver.yaml synapse
This configuration file is for the main settings of Synapse. Each section serves a specific purpose, managing things like client communications, federation, database, and many other settings. Let’s go through each section step by step to explain what it does.
add :
Core Server Settings :
Код: Скопировать в буфер обмена
- server_name: This is the name of our Matrix server, which we’ve set to the .onion address.
- public_baseurl: The public URL of the server, used by clients and other servers.
- pid_file: The path to the PID file for managing server processes.
Listener Settings
Код: Скопировать в буфер обмена
- port: 8008: The server listens on port 8008 for internal HTTP traffic, as TLS is handled by Caddy.
- tls: false: Synapse itself doesn’t handle TLS. This is delegated to Caddy.
- x_forwarded: true: Supports reverse proxies like Caddy by forwarding the client’s IP address to the server.
- resources: Specifies that this listener handles both client and federation requests.
Database Configuration
Код: Скопировать в буфер обмена
- sqlite3: Uses SQLite, which is suitable for small or testing environments. For production, PostgreSQL is recommended.
- database: Path to the SQLite database file.
Registration Settings
Код: Скопировать в буфер обмена
- enable_registration: Allows users to register.
- enable_registration_without_verification: Enables registration without email or CAPTCHA verification.
- registration_shared_secret: A key used for creating new users via the API.
Media and Logging Paths
Код: Скопировать в буфер обмена
-media_store_path: Specifies where uploaded media files are stored.
-log_config: Path to the log configuration file.
Federation and Related Settings
Код: Скопировать в буфер обмена
- federation_verify_certificates: Enables certificate verification for federation.
- federation_certificate_verification_whitelist: Allows .onion domains even if their certificates are invalid.
- outbound_proxy: Configures the outbound proxy to route through the Tor network.
singup hCAPTCHA :
go to : https://hcaptcha.com
1. singup and select free plan
2.add site key

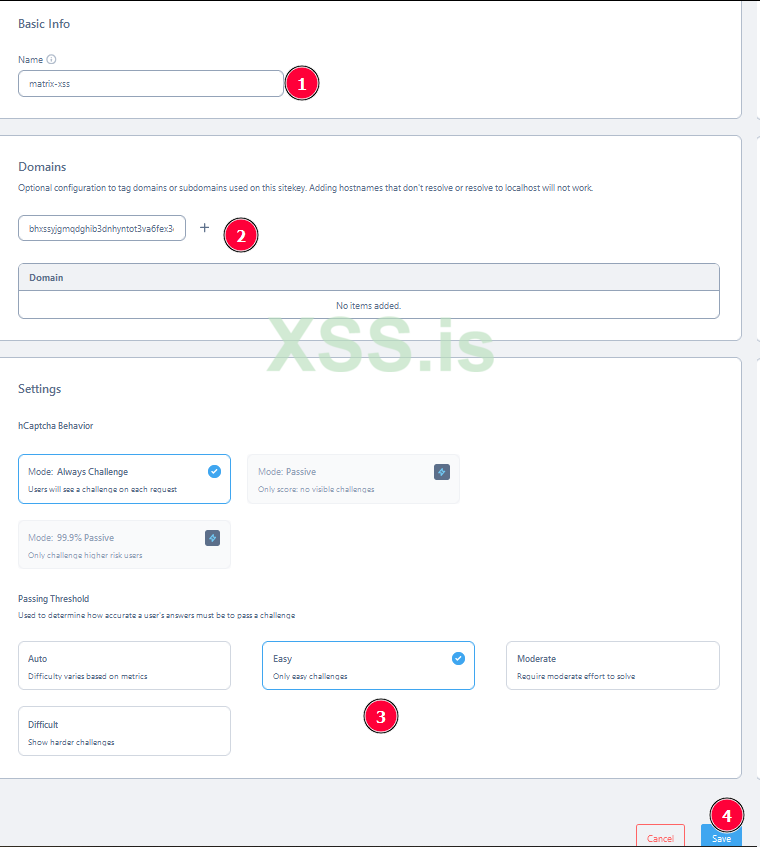
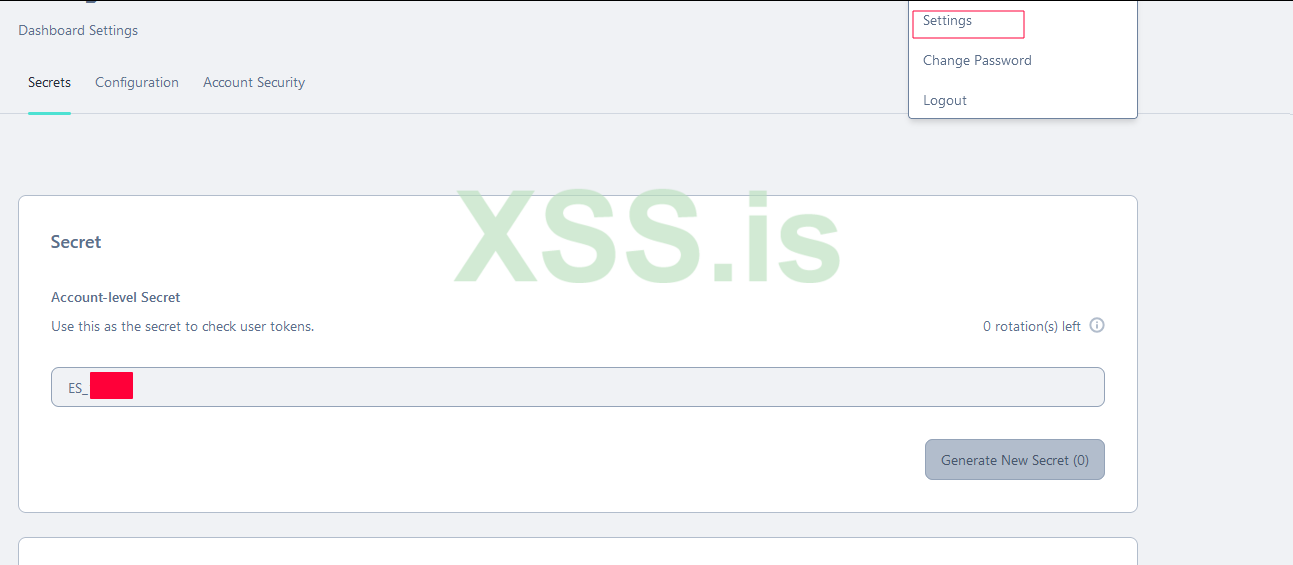
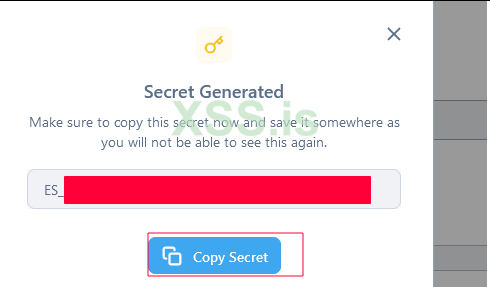

hCAPTCHA and Login Rate Limiting :
Код: Скопировать в буфер обмена
-rc_login: Configures CAPTCHA for login. Currently uses hCaptcha.
- siteverify_api: The API endpoint for CAPTCHA verification.
Why I Enabled hCaptcha:
If hCaptcha isn’t enabled on the Matrix server and registration is left open, users won’t be able to register. This is because the Matrix server by default requires a verification mechanism (like CAPTCHA) for registration to be completed.
Security Settings
Код: Скопировать в буфер обмена
use_insecure_ssl_client_just_for_testing_do_not_use: Allows connections with invalid certificates for testing purposes. Not recommended for production.
Miscellaneous Paths
Код: Скопировать в буфер обмена
- room_prejoin_state: Displays room information to users before they join.
- default_room_version: Sets the default version for new rooms (currently version 10).
This configuration is simple yet functional, focusing on internal communications, federation, and user registration. While the self-signed certificate issue remains unresolved, this setup works well for testing and internal use.
Setting Up Clients to Connect to the Matrix Server
Now that the server setup is complete, the next step is to configure the clients to connect to our Matrix server. Since we’re using a self-signed certificate, the first step is to install the certificate on the client. This is crucial because, without it, the clients won’t be able to connect to the server.
Here’s how to install the onion.crt certificate on the client:
1. Install the Certificate
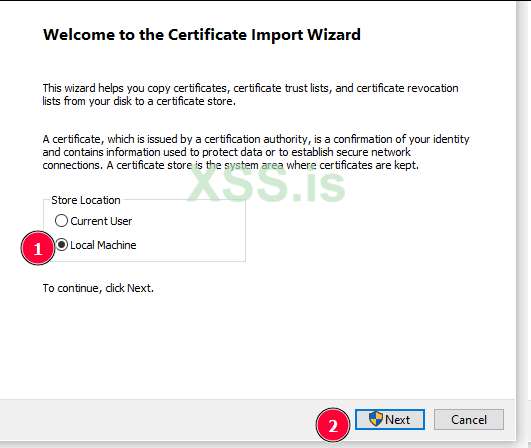
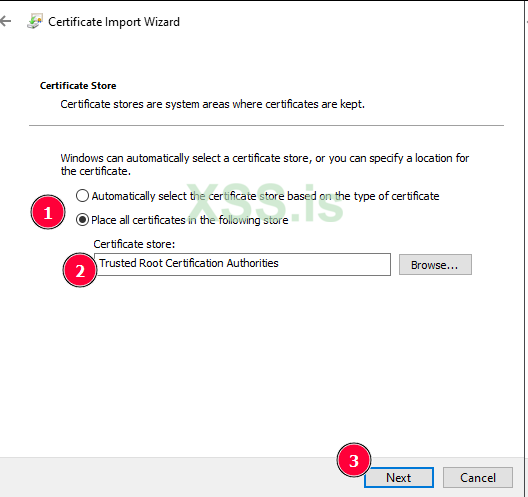
- Right-click on the certificate file and select Install Certificate.
- During the installation process, make sure to add the certificate to Trusted Root Certification Authorities.
2. Verify the Proxy Configuration
Ensure that the proxy you’re using matches the one you configured (e.g., prixovy). Double-check the settings as follows:
- Steps to verify proxy settings based on your platform
3. Run Element with SSL Error Ignoring
Launch Element using the following command to bypass SSL errors:
--ignore-certificate-errors

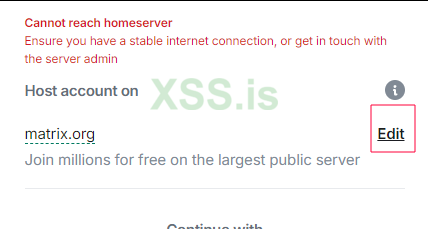
Edit Hostname
Once Element is running, click on Edit Hostname and enter your .onion address without the https:// prefix.
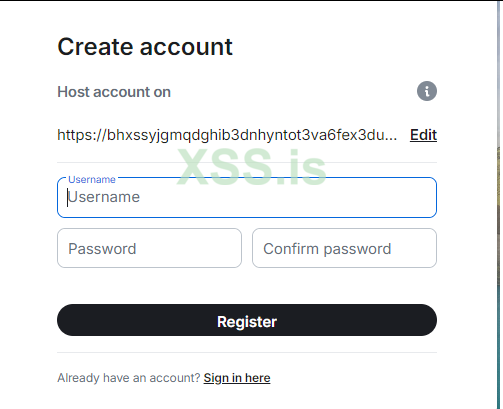
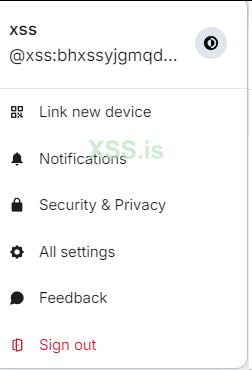
If everything is configured correctly, your clients should now connect to the server without any issues.I hope this article has been helpful, and I look forward to your feedback. If you find any mistakes in the guide or face issues with the configuration or installation, feel free to let me know in the comments under this topic. I’ll be happy to assist you. Have a great day, everyone!
homeserver.yaml
Код: Скопировать в буфер обмена
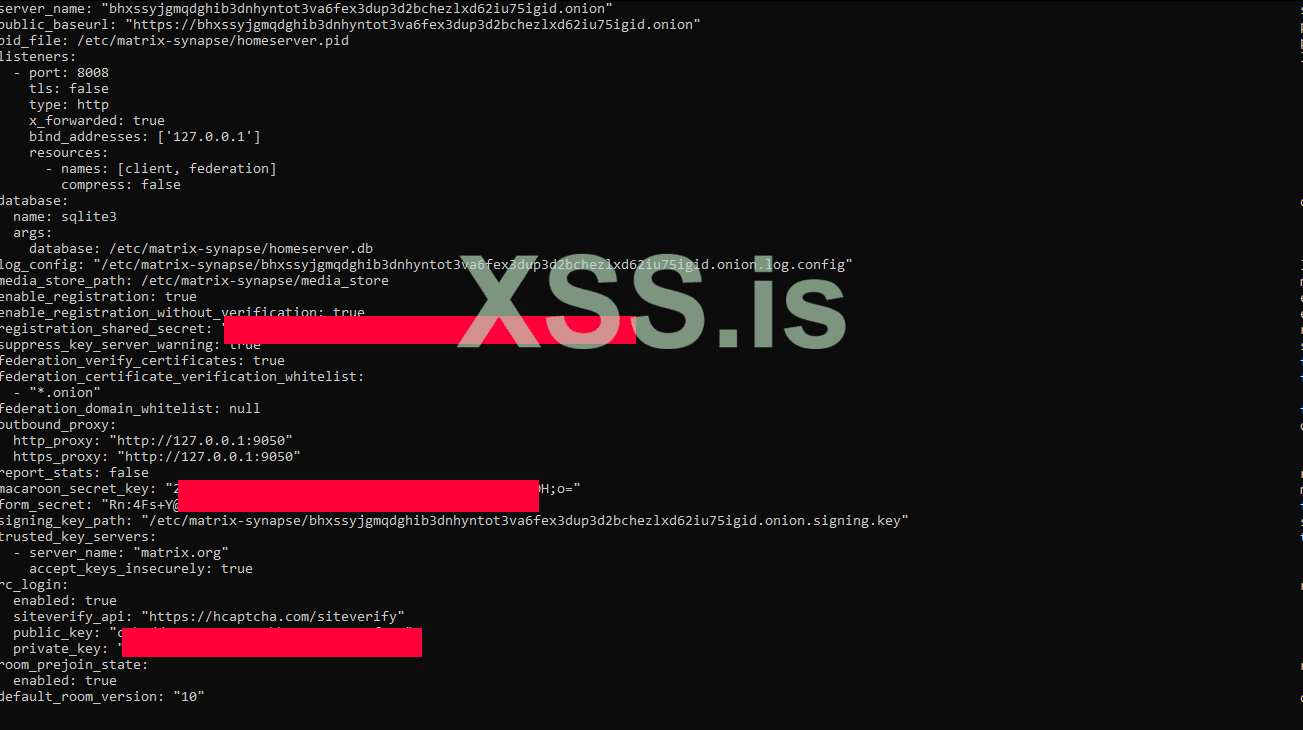
CaddyFile :
Код: Скопировать в буфер обмена
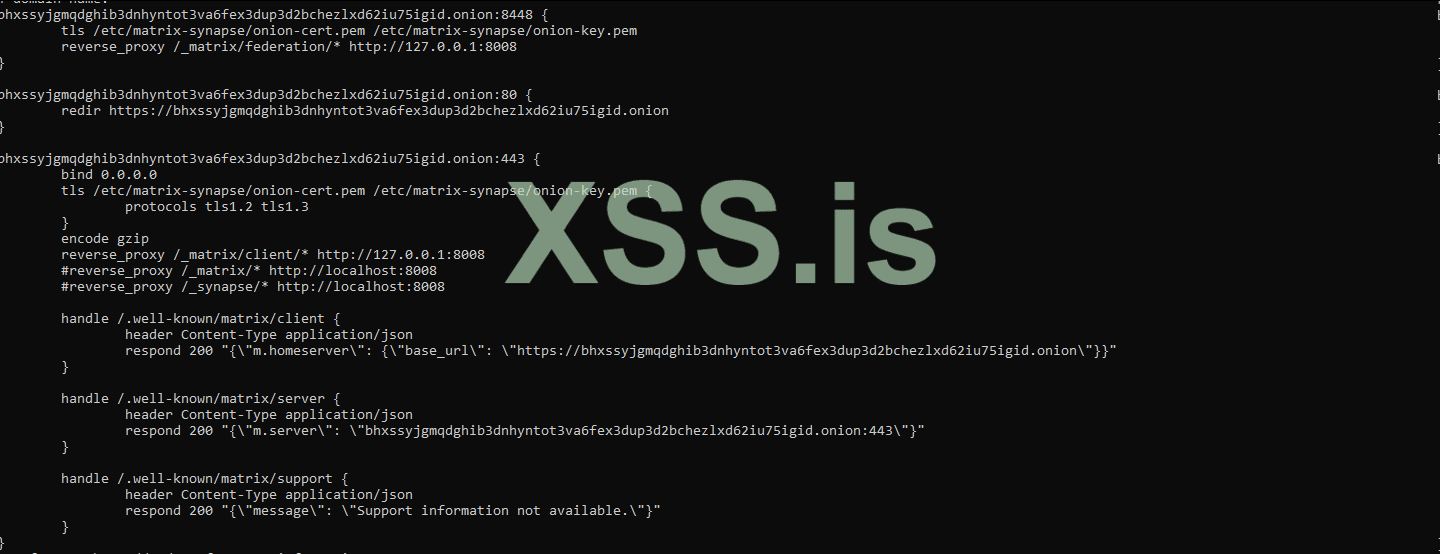
Dear friends, please note that all related files must have the appropriate permissions for their respective user. This means that files located in matrix-synapse should be owned by the synapse user. Refer to the image below for guidance.

HappyNew Year !
Best Regards
Author : blackhunt
Special for xss.is
If you're looking to learn how to set up a system that is resistant to intrusion, surveillance, and censorship, this article is exactly what you need. In the following sections, I will provide detailed instructions on installing the necessary tools, configuring the settings, and getting your server ready to use. Let’s get started!
First of all, what is Matrix ?
Matrix is an open, decentralized communication protocol designed with a federated architecture to meet modern communication needs securely, scalably, and transparently. It is specifically built for text messaging, voice and video calls, file sharing, and even interactions between devices and IoT. However, its standout features lie in its decentralized architecture and end-to-end encryption Matrix uses an event-based model, meaning every message, state change, or file is stored as an event in the history of a room. These events are organized into a DAG (Directed Acyclic Graph) structure, enabling the tracking of room states across connected servers. Each Matrix server can be managed independently while synchronizing room information with other servers in the network. This design not only increases resilience to censorship but also eliminates dependency on a central point of control.
- Security Features matrix :
1 .End-to-End Encryption:
Matrix employs the Olm and Megolm protocols to encrypt messages. Olm is used for one-on-one chats, while Megolm handles group chats. These protocols ensure that only the sender and the intended recipients can decrypt the messages.
2. Authentication and Key Management:
Matrix uses advanced mechanisms for encryption key management, including Cross-Signing, which allows device verification and prevents man-in-the-middle (MITM) attacks.
3. Federation-Level Security:
Due to its distributed architecture, even if a specific server is compromised or fails, the rest of the servers and communications remain secure.
Advanced Features Matrix :
- Federation:
Servers communicate using RESTful HTTP protocols and JSON standards. This allows users to interact with others regardless of the server they are registered on.
- Bridge Support:
Matrix can interact with other protocols and services like Slack, Telegram, IRC, and even WhatsApp through software bridges.
- Persistent History:
Unlike other protocols, Matrix retains a permanent communication history that synchronizes across servers. This ensures access to message history, even for users joining a room after its creation.
Advantages for Security Professionals :
- Full Data Control:
Hosting a personal server allows local storage of all communication data.
- Censorship Resistance:
The decentralized nature of the network ensures no single entity can block access to Matrix.
- Implementation Flexibility:
Matrix can be configured to run on anonymous networks like Tor, adding an extra layer of privacy and security.
Caddy Web Server is a modern and powerful web server chosen for this project due to its unique features Key Features and Reasons for Selection :
1. Simple and Flexible Configuration:
- Caddy uses a straightforward configuration file called `Caddyfile`, which is user-friendly for defining routes, proxies, and SSL settings.
- Compared to other web servers like Nginx or Apache, Caddy offers better readability and easier setup.
2. Automatic HTTPS Management:
- One of Caddy's standout features is its ability to automatically issue and manage SSL certificates. Although standard certificates are unnecessary for .onion domains in the Tor network, Caddy can still manage HTTPS connections for external access.
3. Native Reverse Proxy Support:
- Caddy efficiently forwards incoming requests to the Matrix server, separating the web and application layers and providing better server management.
4. HTTP/3 Support and High Performance:
- Caddy natively supports HTTP/3 and QUIC, improving performance and reducing latency in user communications.
5. Advanced Modules:
- Caddy supports plugins and modules for custom features, such as detailed logging or user management.
Combining Caddy with Privoxy for Maximum Security and Flexibility
Caddy:
Manages HTTP/S routes, handles requests, and enhances the user experience.
- Privoxy:
Acts as a secure layer for filtering, load control, and protecting the main server.
Why Tor for Our Project? For setting up Matrix in this project:
- Anonymity:
Tor ensures complete anonymity for the server, making its location and identifying information untraceable.
- User Privacy:
Users can connect to the server through the Tor network without revealing their IP addresses or identities.
- Additional Encryption:
Tor's encrypted communications add another layer of security on top of Matrix's end-to-end encryption.
- .onion Domain Access:
The Matrix service will be accessible through a .onion domain, which is a significant advantage for secure and sensitive communications.
In summary, Tor creates a multi-layered shield of privacy and security, ensuring that both the server and users remain anonymous and safe. The combination of Matrix and Tor delivers completely untraceable communication, resistant to interception and censorship. I plan to explain everything in detail in this project to make it accessible for everyone, even those with minimal Linux knowledge or experience. Let me know what other aspects you'd like me to cover!
Primary Uses of Privoxy in This article
1. Traffic Routing to the Tor Network
Privoxy acts as an intermediary between clients and the Tor service:
- It receives all incoming HTTP requests and routes them to Tor.
- By using the forward-socks5t setting, it forwards traffic to the SOCKS5 port provided by Tor.
- This process ensures that all communications are anonymous and untraceable.
2. Request Filtering
Privoxy can inspect HTTP traffic before sending it to the Tor network and block unwanted or risky requests:
- It filters cookies, modifies headers, and blocks ads or specific content.
- These features provide enhanced security and privacy for your server's users.
Tools to Install
1.Python
Why Use Python?
- Synapse, the main Matrix server software, is written in Python and depends on it.
- Many management and testing tools (such as user management scripts) require Python.
Installing Python on Ubuntu:
Код: Скопировать в буфер обмена
Код:
apt update
apt install -y python3 python3-pip2.caddy
Installing Caddy on Ubuntu:
1. Add the official Caddy repository:
Код: Скопировать в буфер обмена
Код:
sudo apt install -y debian-keyring debian-archive-keyring apt-transport-https
curl -1sLf 'https://dl.cloudsmith.io/public/caddy/stable/gpg.key' | sudo tee /usr/share/keyrings/caddy-archive-keyring.asc
wget -qO - https://dl.cloudsmith.io/public/caddy/stable/debian.deb.txt | sudo tee /etc/apt/sources.list.d/caddy.list
Код: Скопировать в буфер обмена
Код:
apt update
apt install -y caddy
caddy version
3. Installing Privoxy :
Verify Installation Privoxy :
Код: Скопировать в буфер обмена
prixovy --version4.Installing Tor :
Код: Скопировать в буфер обмена
apt install torEdit the Tor configuration file :
nano /etc/tor/torrcadd :
Код: Скопировать в буфер обмена
Код:
HiddenServiceDir /var/lib/tor/matrix_hidden_service/
HiddenServicePort 80 127.0.0.1:80
HiddenServicePort 443 127.0.0.1:443
HiddenServicePort 8448 127.0.0.1:8448
SOCKSPort 127.0.0.1:9050
AutomapHostsOnResolve 1
DNSPort 127.0.0.2:53
User debian-tor
These tools provide the necessary infrastructure for deploying a secure and anonymous Matrix server on the Tor network:
- Python: For Synapse and management scripts.
- Caddy: As a web server for handling HTTP/S traffic.
- Privoxy: As a proxy layer for enhanced privacy.
- Tor: For anonymity and creating a hidden service.
With these components installed, we're ready to move on to configuring them to work seamlessly together and deploy our service. Let me know if you'd like me to guide you through the next steps!
5 .Adding the Synapse Repository
Synapse is available in the official Matrix repositories. First, add the repository:
Код: Скопировать в буфер обмена
Код:
wget -O /usr/share/keyrings/matrix-org-archive-keyring.gpg https://packages.matrix.org/debian/matrix-org-archive-keyring.gpg
echo "deb [signed-by=/usr/share/keyrings/matrix-org-archive-keyring.gpg] https://packages.matrix.org/debian/ $(lsb_release -cs) main" |sudo tee /etc/apt/sources.list.d/matrix-org.list
apt update
apt install matrix-synapse
During the installation, when you're asked to enter the domain name, leave it blank.
Код: Скопировать в буфер обмена
pip3 install matrix-synapse synapseNow, before we manually configure it, let's first access our Onion service. To improve the project's flow, I want to create a custom domain using the `mkp224o` tool. This will allow us to demonstrate setting up a custom domain while also achieving the goal for the project!
Steps to Install and Download mkp224o:
First, install the prerequisites:
Код: Скопировать в буфер обмена
apt install gcc libc6-dev libsodium-dev make autoconfClone the repository from GitHub:
git clone https://github.com/cathugger/mkp224o.gitNavigate to the mkp224o directory:
cd mkp224ostart compiling with:
./autogen.shNext, create a Makefile with:
./configureFinally, run
make to complete the installation and build process. Now, you can proceed with the command for creating your custom domainКод: Скопировать в буфер обмена
./mkp224o -d xss bhxssFirst, generate your custom Onion address. Then, you'll need to place the public-key and private-key files in the directory specified in your torrc file. You need to add the line User debian-tor to the torr file because the Tor service should run under the debian-tor user by default. Start Tor Service to Generate a Random Hidden Service Before configuring your custom keys, start the Tor service so that a random hidden service gets generated. This will allow us to replace the hostname, public-key, and private-key with your custom ones.
The hidden service directory was set as /var/lib/tor/matrix_hidden_service/. The directories related to the Tor service should belong to the debian-tor user. To set the correct ownership, use the following commands :
Код: Скопировать в буфер обмена
Код:
chown -R debian-tor:debian-tor /var/lib/tor/
chmod -R 700 /var/lib/tor/
now start tor :
Код: Скопировать в буфер обмена
Код:
systemctl start tor
systemctl status tor
To check if the random hidden service has been created:
Код: Скопировать в буфер обмена
ls -la /var/lib/tor/matrix-hidden-serviceReplace the Hostname, Public-Key, and Private-Key After confirming the hidden service has been created, replace the files with your custom ones:
Код: Скопировать в буфер обмена
Код:
cd /var/lib/tor/matrix-hidden-service
cp /home/xss/mkp224o/xss/bhxssyjgmqdghib3dnhyntot3va6fex3dup3d2bchezlxd62iu75igid.onion/* .
Finally, restart Tor to ensure everything is set up correctly:
Код: Скопировать в буфер обмена
Код:
systemctl restart tor
systemctl status tor
Now, you should have your custom Onion address set up and working!
Since we are going to manually generate the
homeserver.yaml configuration file using the Matrix Synapse tool, make sure to run the following command in the /etc/matrix-synapse directory to store the files there:Код: Скопировать в буфер обмена
python3 -m synapse.app.homeserver --server-name xss-matrix.onion --config-path /etc/matrix-synapse/homeserver.yaml --generate-config --report-stats=noOnce the file is generated, ensure the necessary permissions are set. Now, we need to create a Matrix user who will have the required permissions for these directories:
Код: Скопировать в буфер обмена
adduser --system --no-create-home --group --disabled-login synapse--system: Creates a system user.
--no-create-home: Does not create a home directory for the user.
--group: Creates a group with the same name as the user.
--disabled-login: Prevents this user from logging in directly (for security purposes).
All files related to Matrix-Synapse should be assigned to this new user. The default file paths are
/etc/matrix-synapse for configurations and /var/lib/matrix-synapse for data. Set the ownership of these directories:Код: Скопировать в буфер обмена
Код:
chown -R synapse:synapse /etc/matrix-synapse
chown -R synapse:synapse /var/lib/matrix-synapse
Next, you should configure the systemd service for Matrix-Synapse to restrict execution to this user. Edit the systemd service file:
Код: Скопировать в буфер обмена
nano /lib/systemd/system/matrix-synapse.serviceMake sure to set the following:
User=synapseAdditionally, in the conf.d directory located at /etc/matrix-synapseedit the server_name.yaml file and add your Onion address as the server_name. Once you've updated the service file, reload the systemd configuration and restart the Matrix-Synapse service:
Код: Скопировать в буфер обмена
Код:
systemctl daemon-reload
systemctl restart matrix-synapse
systemctl status matrix-synapse
Now, let's move on to configuring Privoxy. Open the Privoxy configuration file /etc/privoxy/config, and search for the listen-address line. Once you find it, add the following:
forward-socks5t / 127.0.0.1:9050 .Also, set listen-address to:
listen-address 0.0.0.0start Privoxy services:
Код: Скопировать в буфер обмена
Код:
systemctl start privoxy
systemctl status privoxy
Now, on your client system, configure the proxy settings to route traffic through the Tor network. Set the IP address of the machine and the port 8118:
proxy setting > 0.0.0.0 8118
Finally, check if all traffic is routed through the Tor network by visiting Check Tor Project https://check.torproject.org . This will confirm if everything is working as expected.
And with that, your setup is complete!
Great! Now that the homeserver, onion address, Privoxy, and Caddy are all working properly, let's move on to configuring Caddy, homeserver.yaml matrix-synapse, and creating a self-signed certificate for your Onion service. We will also test its functionality on the client
Creating a Self-Signed SSL Certificate
To enhance security and encrypt communications on the Synapse server, I decided to use a self-signed SSL certificate. This allows us to establish secure and encrypted communications, even for .onion domains, thus providing higher security for users. One question that might arise is why we don't use free certificates provided by Let’s Encrypt for .onion domains. Here's why:
Why Not Use Let’s Encrypt? Let’s Encrypt only issues certificates for public DNS domains that can be resolved through the standard DNS system. .onion domains don’t use public DNS but are instead managed internally by the Tor network. As a result, Let’s Encrypt cannot validate these domains. Self-Generated Domains .onion domains are automatically and randomly generated by the Tor network and are not registered in any DNS system. Since Let’s Encrypt requires a validation process (like DNS challenge or HTTP challenge) to issue certificates, it cannot provide certificates for these domains. To address this, I wrote a script that fully automates the certificate creation process. The script is designed to be user-friendly, so even if you’re not familiar with OpenSSL or certificate configuration, you can create your desired certificate with just a few simple commands.
How the Script Works
1. Access Level Check
The script first checks if it’s being run with root access. This ensures it has the necessary permissions to access files and directories.
2. Collecting User Information
The script collects the following information from you:
- Domain name (e.g., xss-matrix.onion)
- File path for storing the certificate and private key
- Certificate validity period (default: 365 days)
- Key size (default: 4096 bits)
- User and group ownership for the files
3. Generating the Private Key
Using OpenSSL, the script generates a private key, which is essential for signing the certificate and securing communications.
4. Creating a Certificate Signing Request (CSR)
A CSR is generated, containing domain information and some organizational details. This serves as the foundation for the certificate.
5. Configuring Certificate Attributes
A file named .ext is created, where certificate attributes, including support for Subject Alternative Name (SAN), are defined.
6. Creating the Final Certificate
Finally, using the private key and CSR, the script generates a self-signed certificate. This certificate is signed with the private key and is ready for use in various services.
7. Transferring Files and Setting Permissions
The certificate and private key files are moved to the specified paths, and their ownership is set to the designated user and group.
The Necessity of Using HTTPS for Matrix The HTTPS protocol (Hypertext Transfer Protocol Secure) is an unavoidable requirement for running Synapse (the Matrix protocol server). This necessity stems from security, functionality, and even the way servers communicate with other servers and clients. Matrix Client Requirements Matrix clients (such as Element) require HTTPS to communicate with the server. If HTTP is used instead:
- Most clients will not allow communication by default.
- Users will encounter security warnings.
- Access to the server will be completely restricted.
To address these issues, creating a self-signed SSL certificate is essential.
ssl.sh :
Bash: Скопировать в буфер обмена
Код:
#!/bin/bash

function header() {
    echo "==================================================="
    echo "$1"
    echo "==================================================="
}

if [ "$EUID" -ne 0 ]; then
    echo "This script must be run as root. Please use sudo." >&2
    exit 1
fi

read -p "Enter your domain name (e.g., xss-matrix.onion): " DOMAIN
if [ -z "$DOMAIN" ]; then
    echo "Domain name cannot be empty. Exiting." >&2
    exit 1
fi

read -p "Enter path for the certificate file (default: /etc/matrix-synapse/onion-cert.pem): " CERT_PATH
CERT_PATH=${CERT_PATH:-/etc/matrix-synapse/onion-cert.pem}

read -p "Enter path for the key file (default: /etc/matrix-synapse/onion-key.pem): " KEY_PATH
KEY_PATH=${KEY_PATH:-/etc/matrix-synapse/onion-key.pem}

read -p "Enter the validity period for the certificate in days (default: 365): " DAYS_VALID
DAYS_VALID=${DAYS_VALID:-365}

read -p "Enter the key size (default: 4096): " KEY_SIZE
KEY_SIZE=${KEY_SIZE:-4096}

read -p "Enter the user that should own the certificate files (default: caddy): " TARGET_USER
TARGET_USER=${TARGET_USER:-caddy}

read -p "Enter the group that should own the certificate files (default: caddy): " TARGET_GROUP
TARGET_GROUP=${TARGET_GROUP:-caddy}

if ! id "$TARGET_USER" &>/dev/null; then
    echo "The user '$TARGET_USER' does not exist. Please create the user first or enter a valid username." >&2
    exit 1
fi

if ! getent group "$TARGET_GROUP" &>/dev/null; then
    echo "The group '$TARGET_GROUP' does not exist. Please create the group first or enter a valid group name." >&2
    exit 1
fi

WORK_DIR="/opt/cert_temp"  # Set a safe directory for temporary work files
mkdir -p "$WORK_DIR"

header "Generating Private Key for $DOMAIN"
openssl genrsa -out "$WORK_DIR/$DOMAIN.key" $KEY_SIZE
if [ $? -ne 0 ]; then
    echo "Error generating private key. Exiting." >&2
    exit 1
fi
echo "Private key generated successfully at $WORK_DIR/$DOMAIN.key"

header "Creating Certificate Signing Request (CSR)"
openssl req -new -key "$WORK_DIR/$DOMAIN.key" -out "$WORK_DIR/$DOMAIN.csr" -subj "/C=US/ST=State/L=City/O=Organization/OU=Unit/CN=$DOMAIN"
if [ $? -ne 0 ]; then
    echo "Error creating CSR. Exiting." >&2
    exit 1
fi
echo "CSR created successfully at $WORK_DIR/$DOMAIN.csr"

header "Generating Certificate Configuration File"
cat > "$WORK_DIR/$DOMAIN.ext" <<EOF
authorityKeyIdentifier=keyid,issuer
basicConstraints=CA:FALSE
keyUsage = digitalSignature, nonRepudiation, keyEncipherment, dataEncipherment
subjectAltName = @alt_names

[alt_names]
DNS.1 = $DOMAIN
EOF

header "Creating Self-Signed Certificate"
openssl x509 -req \
    -in "$WORK_DIR/$DOMAIN.csr" \
    -signkey "$WORK_DIR/$DOMAIN.key" \
    -out "$WORK_DIR/$DOMAIN.crt" \
    -days $DAYS_VALID \
    -extfile "$WORK_DIR/$DOMAIN.ext"
if [ $? -ne 0 ]; then
    echo "Error creating self-signed certificate. Exiting." >&2
    exit 1
fi
echo "Self-signed certificate created successfully at $WORK_DIR/$DOMAIN.crt"

# Check if the certificate file was created
if [ ! -f "$WORK_DIR/$DOMAIN.crt" ]; then
    echo "Error: The certificate file does not exist at $WORK_DIR/$DOMAIN.crt." >&2
    exit 1
fi

header "Moving Files to Specified Paths"

# Check if certificate exists before moving
if [ ! -f "$WORK_DIR/$DOMAIN.crt" ]; then
    echo "Error: The certificate file does not exist in the working directory ($WORK_DIR/$DOMAIN.crt)." >&2
    exit 1
fi

# Create directories if not exist
mkdir -p "$(dirname "$CERT_PATH")"
mkdir -p "$(dirname "$KEY_PATH")"

# Move files
mv "$WORK_DIR/$DOMAIN.crt" "$CERT_PATH"
if [ $? -ne 0 ]; then
    echo "Error: Failed to move certificate to $CERT_PATH." >&2
    exit 1
fi

mv "$WORK_DIR/$DOMAIN.key" "$KEY_PATH"
if [ $? -ne 0 ]; then
    echo "Error: Failed to move key to $KEY_PATH." >&2
    exit 1
fi

echo "Files moved successfully:"
echo " - Certificate: $CERT_PATH"
echo " - Private Key: $KEY_PATH"

# Copy certificate for client
header "Copying Certificate for Client"
CLIENT_CERT_PATH="$CLIENT_CERT_DIR/$DOMAIN-client-cert.crt"

if [ ! -f "$CERT_PATH" ]; then
    echo "Error: The certificate file does not exist at $CERT_PATH. Cannot create client certificate." >&2
    exit 1
fi

cp "$CERT_PATH" "$CLIENT_CERT_PATH"
if [ $? -ne 0 ]; then
    echo "Error: Failed to copy certificate to $CLIENT_CERT_PATH." >&2
    exit 1
fi

echo "Client certificate created successfully at $CLIENT_CERT_PATH"
Configuring Caddyfile for Your Matrix Server
Now that we have set up the self-signed certificate for our .onion service and ensured HTTPS is ready, the next step is to configure Caddy which will act as a reverse proxy for your Synapse server. Caddy is an excellent choice because of its simplicity, built-in HTTPS management, and high performance. Here’s a breakdown of the configuration I wrote for setting up Caddy as a reverse proxy for the Matrix server on Tor. Let’s go through each section to understand what it does.
Section 1: Federation Traffic
Код: Скопировать в буфер обмена
Код:
xss:8448 {
        tls /etc/matrix-synapse/onion-cert.pem /etc/matrix-synapse/onion-key.pem
        reverse_proxy /_matrix/federation/* http://127.0.0.1:8008
}
Here, we handle requests coming to port 8448, which is specifically used for Federation—when our Matrix server communicates with other servers in the network.
tls: Specifies the path to the certificate and private key to enable HTTPS.
reverse_proxy: Routes any requests related to /federation/* to the Matrix server running on localhost at port 8008.
Section 2: Redirecting HTTP to HTTPS
Код: Скопировать в буфер обмена
Код:
xss:80 {
        redir https://xss.onion
}
This section ensures that any HTTP traffic (port 80) is immediately redirected to HTTPS. In this case, it redirects users to another .onion domain (`xss.onion`) for additional security.
Section 3: HTTPS and Client Configurations
Код: Скопировать в буфер обмена
Код:
xss:443 {
        bind 0.0.0.0
        tls /etc/matrix-synapse/onion-cert.pem /etc/matrix-synapse/onion-key.pem {
                protocols tls1.2 tls1.3

        }
        encode gzip
        reverse_proxy /_matrix/client/* http://127.0.0.1:8008
        handle /.well-known/matrix/client {
                header Content-Type application/json
                respond 200 "{\"m.homeserver\": {\"base_url\": \"https://xss.onion\"}}"

        }

        handle /.well-known/matrix/server {
                header Content-Type application/json
                respond 200 "{\"m.server\": \"xss.onion:443\"}"
        }

        handle /.well-known/matrix/support {
                header Content-Type application/json
                respond 200 "{\"message\": \"Support information not available.\"}"
        }
}
Here we handle HTTPS traffic on port 443. Each part has a specific role:
- bind 0.0.0.0: Listens on all local IP addresses.
- tls: Configures SSL certificates and restricts the protocol to TLS 1.2 and 1.3 for better security.
- encode gzip: Enables compression to improve loading speed
Special Routes:
- reverse_proxy /_matrix/client/*: Routes all client-related requests (e.g., Element) to the Matrix server running on port `8008`.
- .well-known/matrix/client: Returns a JSON file informing the client where the Homeserver is located.
- .well-known/matrix/server: Returns a JSON file for other servers, specifying where to send messages for our Matrix server.
- .well-known/matrix/support: Provides a simple response indicating that support information is unavailable.
This configuration ensures that:
- Federation Works: Other Matrix servers can exchange messages with our server.
- Secure HTTPS Communication: All connections are encrypted and secure.
- Clients Can Connect: Clients can locate and connect to our server without issues.
Federation Issue with Self-Signed Certificate Although we’ve configured Federation in the Caddy settings and routed requests to the correct path (/_matrix/federation/*), there’s still a problem. The issue is that our server cannot communicate with other servers, such as matrix.org. The root cause is the self-signed certificate we’re using.Why Does a Self-Signed Certificate Cause Problems?
When Matrix servers (like matrix.org) attempt to communicate with our server, they validate our certificate. Since a self-signed certificate isn’t issued by a trusted Certificate Authority (CA), other servers don’t trust it and reject the requests. This is a security mechanism to ensure that communications are secure and data isn’t tampered with.While our server can send Federation requests, the destination server (e.g., matrix.org) identifies our certificate as invalid when trying to respond, and the connection is rejected. As a result, messages that should be exchanged between our server and other servers fail to send or receive.Currently, the Federation issue persists because of the self-signed certificate, and our server cannot establish connections with `matrix.org` or other servers that require valid certificates. I’m actively looking for a better solution to resolve this problem.
Configuration homeserver.yaml synapse
This configuration file is for the main settings of Synapse. Each section serves a specific purpose, managing things like client communications, federation, database, and many other settings. Let’s go through each section step by step to explain what it does.
add :
Core Server Settings :
Код: Скопировать в буфер обмена
Код:
server_name: "xss.onion"
public_baseurl: "https://xss.onion"
pid_file: "/var/run/matrix-synapse.pid"
- server_name: This is the name of our Matrix server, which we’ve set to the .onion address.
- public_baseurl: The public URL of the server, used by clients and other servers.
- pid_file: The path to the PID file for managing server processes.
Listener Settings
Код: Скопировать в буфер обмена
Код:
listeners:
  - port: 8008
    tls: false
    type: http
    x_forwarded: true
    bind_addresses: ['127.0.0.1']
    resources:
      - names: [client, federation]
        compress: false
- port: 8008: The server listens on port 8008 for internal HTTP traffic, as TLS is handled by Caddy.
- tls: false: Synapse itself doesn’t handle TLS. This is delegated to Caddy.
- x_forwarded: true: Supports reverse proxies like Caddy by forwarding the client’s IP address to the server.
- resources: Specifies that this listener handles both client and federation requests.
Database Configuration
Код: Скопировать в буфер обмена
Код:
database:
  name: sqlite3
  args:
    database: /var/lib/matrix-synapse/homeserver.db
- database: Path to the SQLite database file.
Registration Settings
Код: Скопировать в буфер обмена
Код:
enable_registration: true
enable_registration_without_verification: true
registration_shared_secret: ""
- enable_registration: Allows users to register.
- enable_registration_without_verification: Enables registration without email or CAPTCHA verification.
- registration_shared_secret: A key used for creating new users via the API.
Media and Logging Paths
Код: Скопировать в буфер обмена
Код:
media_store_path: /var/lib/matrix-synapse/media
log_config: "/etc/matrix-synapse/log.yaml"
-media_store_path: Specifies where uploaded media files are stored.
-log_config: Path to the log configuration file.
Federation and Related Settings
Код: Скопировать в буфер обмена
Код:
federation_verify_certificates: true
federation_certificate_verification_whitelist:
  - "*.onion"
federation_domain_whitelist: null
outbound_proxy:
  http_proxy: "http://127.0.0.1:9050"
  https_proxy: "http://127.0.0.1:9050"
- federation_verify_certificates: Enables certificate verification for federation.
- federation_certificate_verification_whitelist: Allows .onion domains even if their certificates are invalid.
- outbound_proxy: Configures the outbound proxy to route through the Tor network.
singup hCAPTCHA :
go to : https://hcaptcha.com
1. singup and select free plan
2.add site key
hCAPTCHA and Login Rate Limiting :
Код: Скопировать в буфер обмена
Код:
rc_login:
  enabled: true
  siteverify_api: "https://hcaptcha.com/siteverify"
  public_key: ""
  private_key: ""
-rc_login: Configures CAPTCHA for login. Currently uses hCaptcha.
- siteverify_api: The API endpoint for CAPTCHA verification.
Why I Enabled hCaptcha:
If hCaptcha isn’t enabled on the Matrix server and registration is left open, users won’t be able to register. This is because the Matrix server by default requires a verification mechanism (like CAPTCHA) for registration to be completed.
Security Settings
Код: Скопировать в буфер обмена
Код:
use_insecure_ssl_client_just_for_testing_do_not_use: true
federation_custom_ca_list: null
use_insecure_ssl_client_just_for_testing_do_not_use: Allows connections with invalid certificates for testing purposes. Not recommended for production.
Miscellaneous Paths
Код: Скопировать в буфер обмена
Код:
room_prejoin_state:
  enabled: true
default_room_version: "10"
- room_prejoin_state: Displays room information to users before they join.
- default_room_version: Sets the default version for new rooms (currently version 10).
This configuration is simple yet functional, focusing on internal communications, federation, and user registration. While the self-signed certificate issue remains unresolved, this setup works well for testing and internal use.
Setting Up Clients to Connect to the Matrix Server
Now that the server setup is complete, the next step is to configure the clients to connect to our Matrix server. Since we’re using a self-signed certificate, the first step is to install the certificate on the client. This is crucial because, without it, the clients won’t be able to connect to the server.
Here’s how to install the onion.crt certificate on the client:
1. Install the Certificate
- Right-click on the certificate file and select Install Certificate.
- During the installation process, make sure to add the certificate to Trusted Root Certification Authorities.
2. Verify the Proxy Configuration
Ensure that the proxy you’re using matches the one you configured (e.g., prixovy). Double-check the settings as follows:
- Steps to verify proxy settings based on your platform
3. Run Element with SSL Error Ignoring
Launch Element using the following command to bypass SSL errors:
--ignore-certificate-errors
Edit Hostname
Once Element is running, click on Edit Hostname and enter your .onion address without the https:// prefix.
If everything is configured correctly, your clients should now connect to the server without any issues.I hope this article has been helpful, and I look forward to your feedback. If you find any mistakes in the guide or face issues with the configuration or installation, feel free to let me know in the comments under this topic. I’ll be happy to assist you. Have a great day, everyone!
homeserver.yaml
Код: Скопировать в буфер обмена
Код:
server_name: ""
public_baseurl: "https://"
pid_file: /etc/matrix-synapse/homeserver.pid
listeners:
  - port: 8008
    tls: false
    type: http
    x_forwarded: true
    bind_addresses: ['127.0.0.1']
    resources:
      - names: [client, federation]
        compress: false
database:
  name: sqlite3
  args:
    database: /etc/matrix-synapse/homeserver.db
log_config: "/etc/matrix-synapse/"
media_store_path: /etc/matrix-synapse/media_store
enable_registration: true
enable_registration_without_verification: true
registration_shared_secret: ""
suppress_key_server_warning: true
federation_verify_certificates: true
federation_certificate_verification_whitelist:
  - "*.onion"
federation_domain_whitelist: null
outbound_proxy:
  http_proxy: "http://127.0.0.1:9050"
  https_proxy: "http://127.0.0.1:9050"
report_stats: false
macaroon_secret_key: ""
form_secret: ""
signing_key_path: "/etc/matrix-synapse/"
trusted_key_servers:
  - server_name: "matrix.org"
    accept_keys_insecurely: true
rc_login:
  enabled: true
  siteverify_api: "https://hcaptcha.com/siteverify"
  public_key: ""
  private_key: ""
room_prejoin_state:
  enabled: true
default_room_version: "10"
CaddyFile :
Код: Скопировать в буфер обмена
Код:
.onion:8448 {
        tls /etc/matrix-synapse/onion-cert.pem /etc/matrix-synapse/onion-key.pem
        reverse_proxy /_matrix/federation/* http://127.0.0.1:8008
}

.onion:80 {
        redir https://.onion
}

.onion:443 {
        bind 0.0.0.0
        tls /etc/matrix-synapse/onion-cert.pem /etc/matrix-synapse/onion-key.pem {
                protocols tls1.2 tls1.3
        }
        encode gzip
        reverse_proxy /_matrix/client/* http://127.0.0.1:8008
        #reverse_proxy /_matrix/* http://localhost:8008
        #reverse_proxy /_synapse/* http://localhost:8008

        handle /.well-known/matrix/client {
                header Content-Type application/json
                respond 200 "{\"m.homeserver\": {\"base_url\": \"https://.onion\"}}"
        }

        handle /.well-known/matrix/server {
                header Content-Type application/json
                respond 200 "{\"m.server\": \".onion:443\"}"
        }

        handle /.well-known/matrix/support {
                header Content-Type application/json
                respond 200 "{\"message\": \"Support information not available.\"}"
        }
}
Dear friends, please note that all related files must have the appropriate permissions for their respective user. This means that files located in matrix-synapse should be owned by the synapse user. Refer to the image below for guidance.
HappyNew Year !
Best Regards
Author : blackhunt
Special for xss.is