D2
Администратор
- Регистрация
- 19 Фев 2025
- Сообщения
- 4,380
- Реакции
- 0
A general guide to building a localhost web with (nginx) and implementing a jabber server in VMWARE
Well, to start, a very brief explanation about the steps of the work I want to do.
Well, first of all, let me give a brief technical explanation about nginx and its setup in centos
NGINX :
Nginx is a lightweight and fast web server that can also be used as a reverse proxy server, load balancer, HTTP cache, and more. It is very popular due to its high performance and low resource consumption.
So now let's go to install NGINX prerequisites
First, update the repositories and packages in the system:
Bash: Скопировать в буфер обмена
Install Last version of Nginx using the add the NGINX repository to yum.repos.d
Bash: Скопировать в буфер обмена
you will need to first install the `dnf` utilities:
Bash: Скопировать в буфер обмена
With the `
Bash: Скопировать в буфер обмена
install NGINX :
Bash: Скопировать в буфер обмена
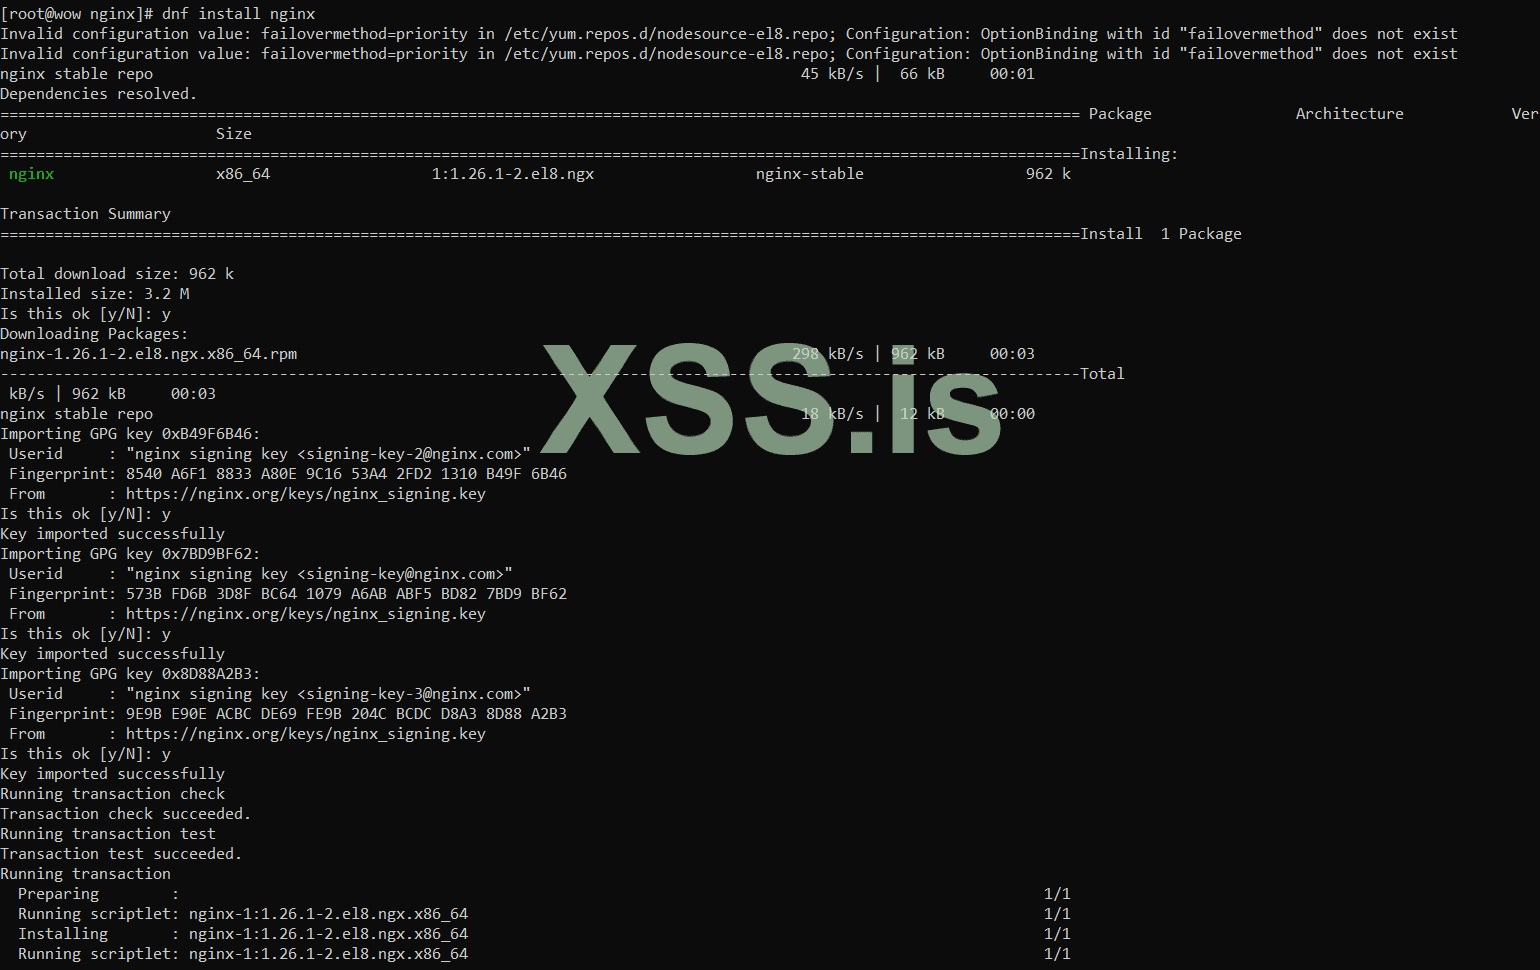
now make DIR sites-available and sites-enabled :
Bash: Скопировать в буфер обмена
Bash: Скопировать в буфер обмена
now open nginx.conf and add include
Bash: Скопировать в буфер обмена
now make config file site in site-available :
Bash: Скопировать в буфер обмена
Bash: Скопировать в буфер обмена
now add conf to
Bash: Скопировать в буфер обмена
now we need make ssl :
Bash: Скопировать в буфер обмена
Now we create a certificate for the site :
Bash: Скопировать в буфер обмена
Bash: Скопировать в буфер обмена
ok, now i will test nginx config:
Bash: Скопировать в буфер обмена
result:
now start and enable nginx services :
Bash: Скопировать в буфер обмена
and check status :
Bash: Скопировать в буфер обмена

Well, now we have launched a site and now we have to install the bind service, before that I will give a very brief explanation about bind:
BIND :
BIND (Berkeley Internet Name Domain) service is a DNS (Domain Name System) server software that is used to manage and provide domain name services in Internet networks. Basically, BIND is responsible for translating domain names to IP addresses (and vice versa), a process known as name resolution.
install bind :
Bash: Скопировать в буфер обмена
Well, after installing bind, we have to go to the named configuration
Let's define ZONE together for named :
Bash: Скопировать в буфер обмена
Now we create a zone database :
Bash: Скопировать в буфер обмена
and add config :
Bash: Скопировать в буфер обмена
Revers DNS :
Reverse DNS (rDNS) or reverse naming is a process in DNS (Domain Name System) that translates IP addresses to equivalent domain names. In contrast to DNS, which translates a domain name to an IP address, rDNS does the opposite and translates the IP address to the associated domain name with the help of the information in the reverse names (Reverse DNS records).
Now it's time to configure reverse DNS :
Bash: Скопировать в буфер обмена
note :
To set rDNS, a Reverse DNS record must be set in the Reverse Zone in the DNS system. This record is created based on the IP address and points to the equivalent domain name of that IP address.
For example, if the IP address 10.1.4.192 belongs to the matrix.local domain, a Reverse DNS record for 4.1.10.in-addr.arpa should point to matrix.local.
config db.10.1.4:
Bash: Скопировать в буфер обмена
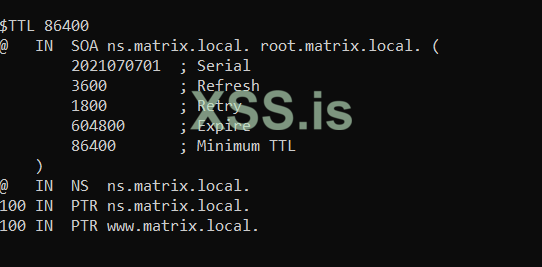
Now let's create the necessary configurations in named.conf:
Bash: Скопировать в буфер обмена
now i will start and enable named(bind) services :
Bash: Скопировать в буфер обмена
and status :
Bash: Скопировать в буфер обмена

Well, now it's time to come to Windows to check the site. Well, here we have defined dns for our site, whose name is matrix.local. Now, in order to be able to have the site with our main system, we must first remove firewalld in Linux (here I delete it because it is educational) and also the iptables rules. also delete
Well, first we remove firewalld:
Bash: Скопировать в буфер обмена
now remove iptables rules :
Bash: Скопировать в буфер обмена
Well, now we will set up our main system and Linux IP in the Windows DNS section so that we can have the site:
go to
Click-Right Ethernet and open Ethernet Properties now double-click on IP V4 and use the following DNS server addresses and finally add your Linux IP address to preferred DNS server LIKE this :
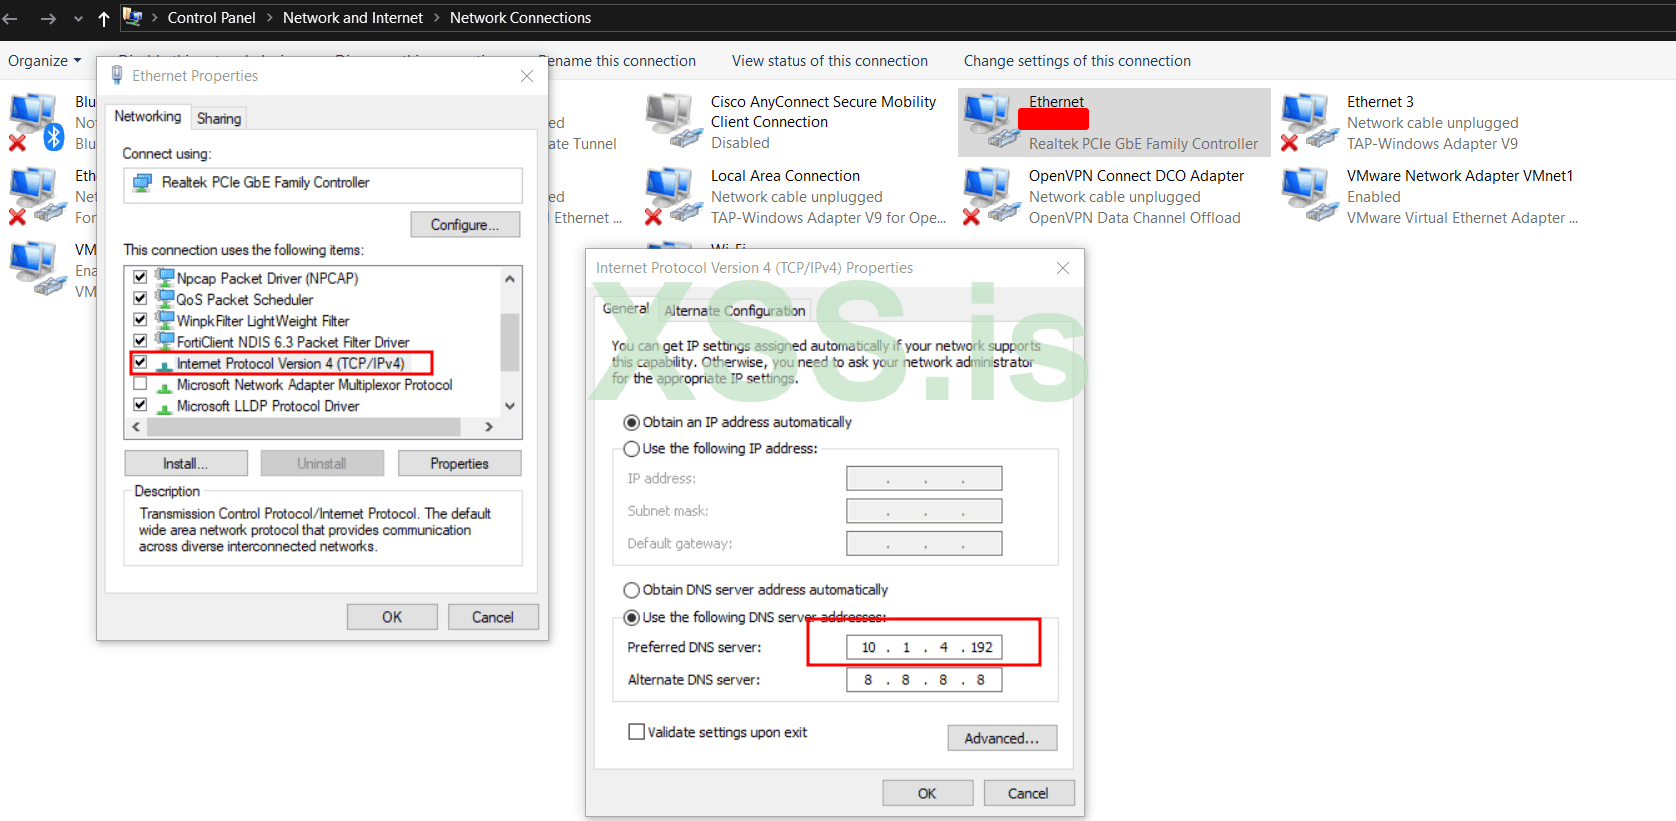
Now, in order to see if we have access to the site or not, first of all, open a (win+r and type CMD) CMD and enter the command ipconfig /flushdns to clear the previous cache.
Now I get ping from the site:
ping matrix.local
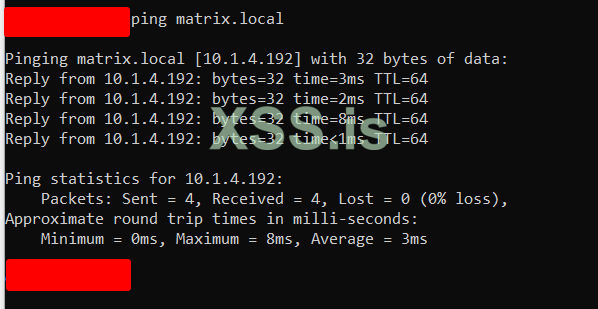
Well, now that everything has been executed successfully, let's go to install ejabberd:
Ejabberd:
ejabberd is an instant messaging server that implements XMPP (Extensible Messaging and Presence Protocol). This server is written in Erlang language and is known for its reliability, high scalability and support for clustering.
First of all, we install the prerequisites:
Bash: Скопировать в буфер обмена
now install ejabberd:
Bash: Скопировать в буфер обмена
Now let's do an initial configuration in ejabberd config :
Maybe your file is here
Bash: Скопировать в буфер обмена

and set admin user :

Now we need to create an admin user using ejabberdctl:
Bash: Скопировать в буфер обмена
and now start ejabberd servies :
Bash: Скопировать в буфер обмена
now i will try to access web page Ejabberd :
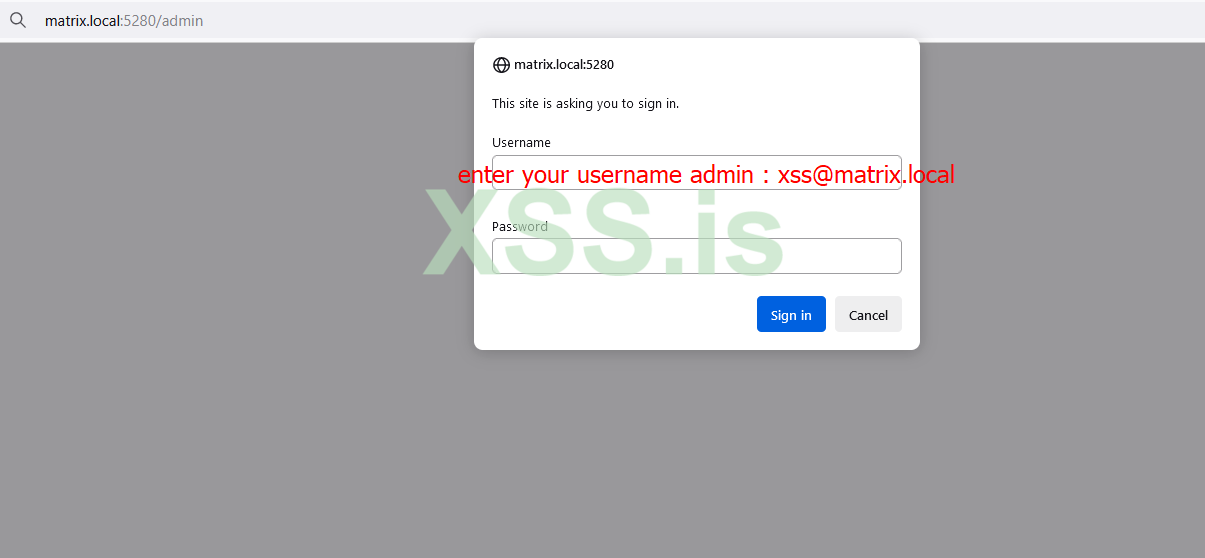
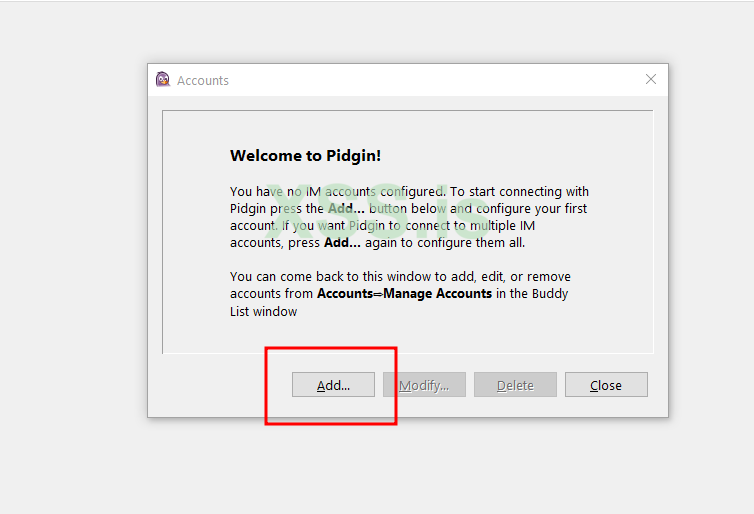
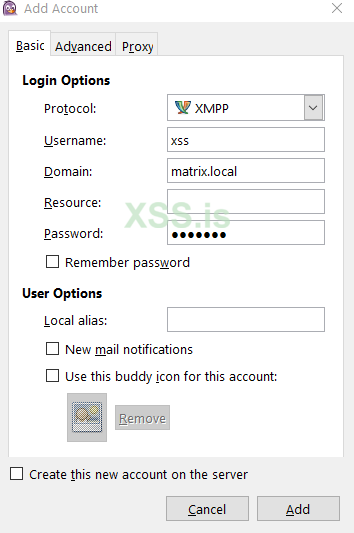
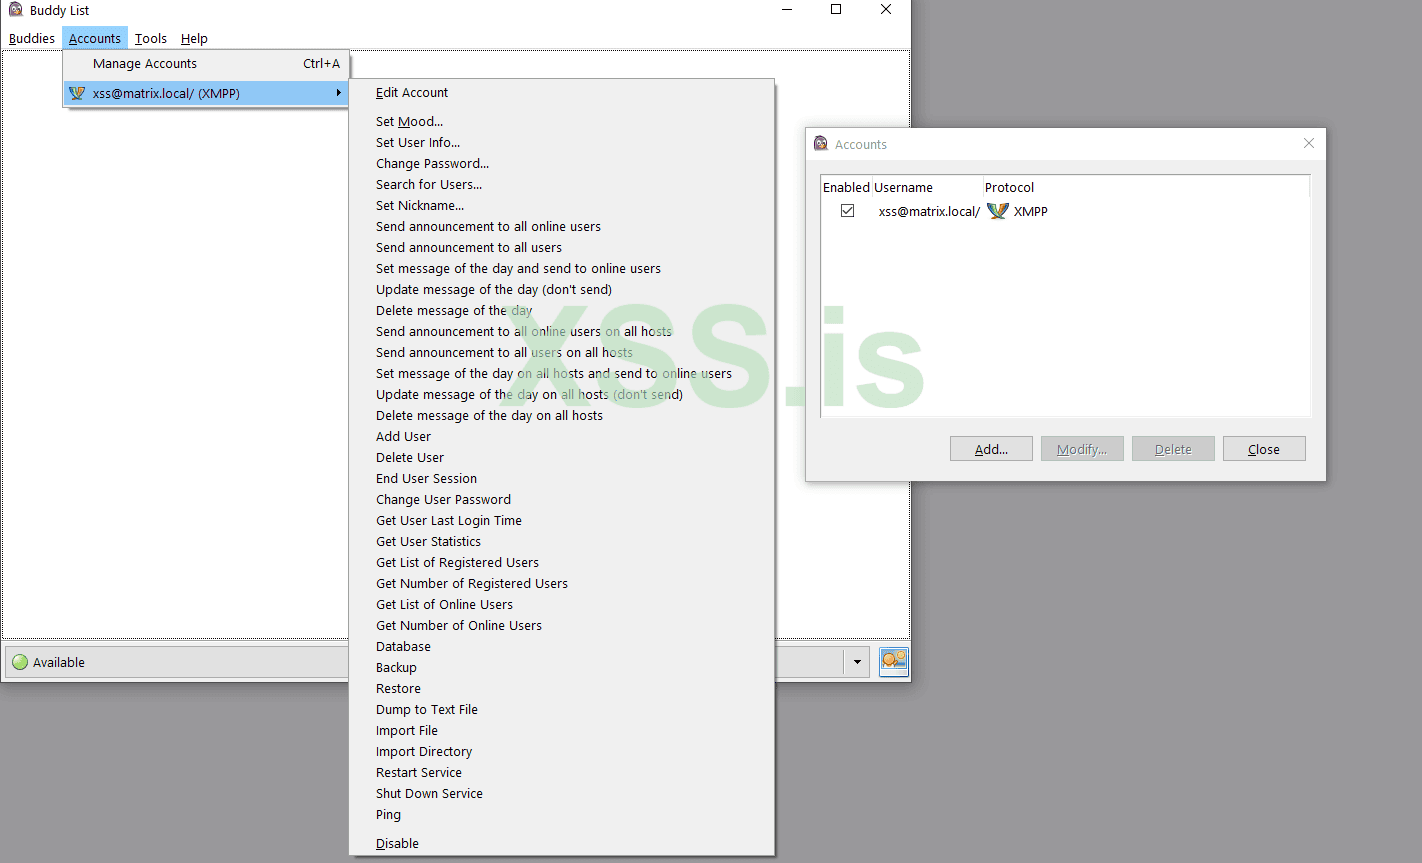
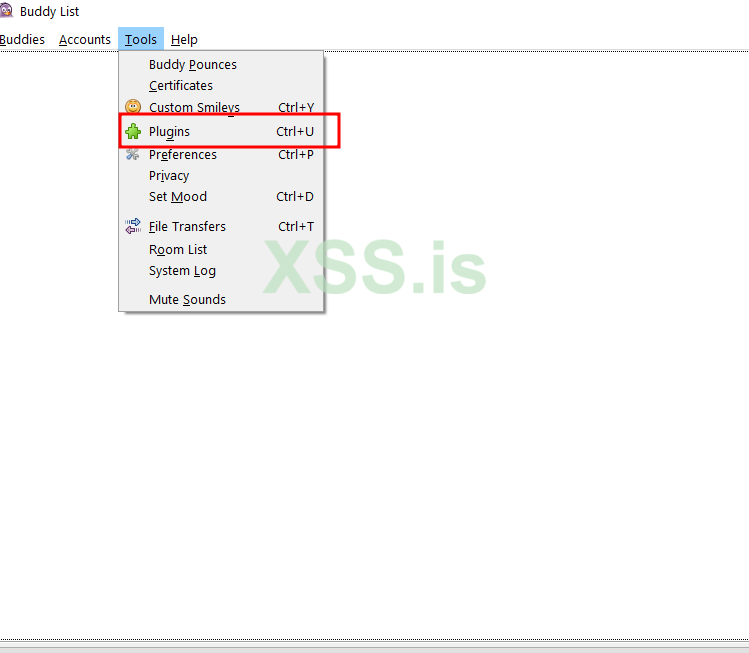
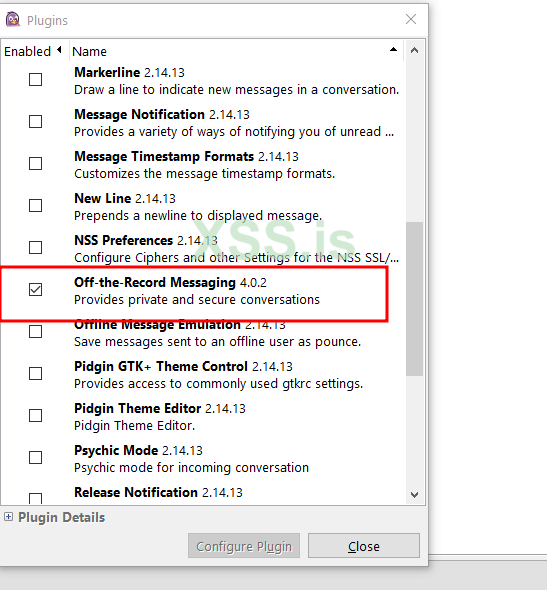
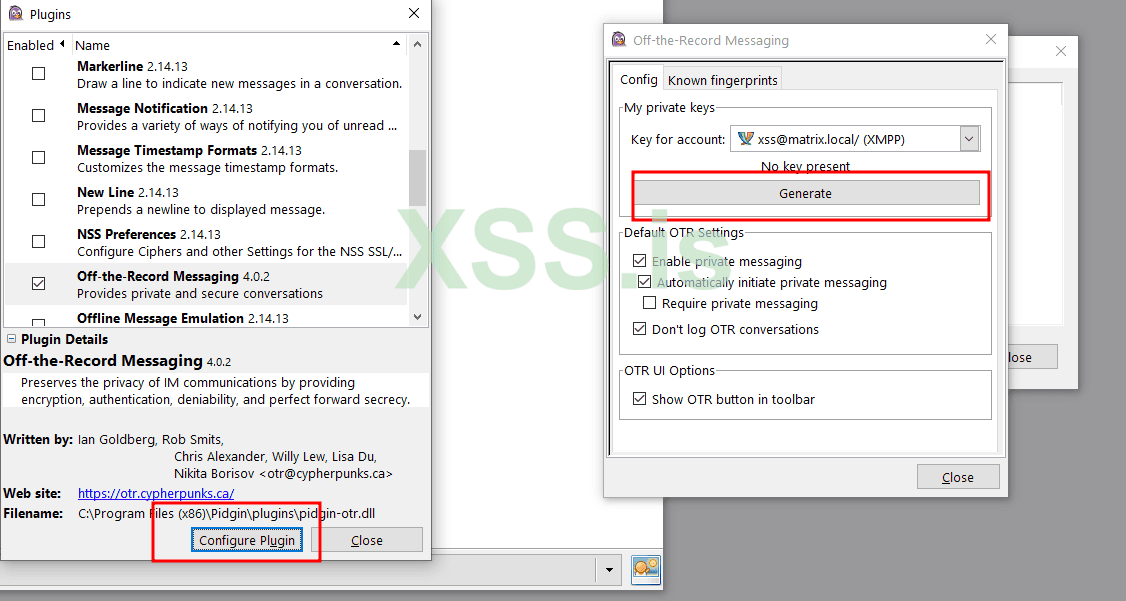
now test on pidgin:
download pidgin and OTR from here :
pidgin
OTR
Author : blackhunt
special for XSS.is
Of course, this article is written for beginners, I hope it can help )))
~./Enjoy!
Well, to start, a very brief explanation about the steps of the work I want to do.
- -Configure a host using NGINX and creating a self-signed SSL certificate
- -Setting up the bind and revers service
- -DNS settings on Windows
- -Setting up a jabber server and configuring it and test in pidgin
- -And finally they worked in the environment
Well, first of all, let me give a brief technical explanation about nginx and its setup in centos
NGINX :
Nginx is a lightweight and fast web server that can also be used as a reverse proxy server, load balancer, HTTP cache, and more. It is very popular due to its high performance and low resource consumption.
So now let's go to install NGINX prerequisites
First, update the repositories and packages in the system:
Bash: Скопировать в буфер обмена
dnf or (yum) update && upgrade -yInstall Last version of Nginx using the add the NGINX repository to yum.repos.d
Bash: Скопировать в буфер обмена
nano /etc/yum.repos.d/nginx.repoyou will need to first install the `dnf` utilities:
Bash: Скопировать в буфер обмена
dnf install dnf-utilsWith the `
nginx.repo` that we just added, dnf will install the stable Nginx version. In case you want to, you could use the Mainline, which includes some new features, you need to run the following command :Bash: Скопировать в буфер обмена
yum-config-manager --enable nginx-mainlineinstall NGINX :
Bash: Скопировать в буфер обмена
dnf install nginxnow make DIR sites-available and sites-enabled :
Bash: Скопировать в буфер обмена
mkdir /etc/nginx/sites-availableBash: Скопировать в буфер обмена
mkdir /etc/nginx/sites-enablednow open nginx.conf and add include
/etc/nginx/sites-enabled/*.conf :Bash: Скопировать в буфер обмена
nano /etc/nginx/nginx.confnow make config file site in site-available :
Bash: Скопировать в буфер обмена
cd /etc/nginx/site-avaliableBash: Скопировать в буфер обмена
nano matrix.local.confnow add conf to
[B]matrix.local.conf[/B]:Bash: Скопировать в буфер обмена
Код:
server {
    listen 443 ssl;
    server_name matrix.local;

    ssl_certificate /etc/nginx/ssl/nginx.crt;
    ssl_certificate_key /etc/nginx/ssl/nginx.key;

    ssl_protocols TLSv1.2 TLSv1.3;
    ssl_prefer_server_ciphers on;
    ssl_ciphers 'EECDH+AESGCM:EDH+AESGCM:AES256+EECDH:AES256+EDH';
    ssl_session_timeout 10m;
    ssl_session_cache shared:SSL:10m;

    location / {
        root /var/www/html/nginx/public_html/;
        index index.html index.htm;
    }

}

server {
    listen 80;
    server_name matrix.local www.matrix.local;

    # Redirect http to https
    return 301 https://$host$request_uri;
}
now we need make ssl :
Bash: Скопировать в буфер обмена
sudo dnf install openssl -yNow we create a certificate for the site :
Bash: Скопировать в буфер обмена
mkdir -p /etc/nginx/sslBash: Скопировать в буфер обмена
openssl req -x509 -nodes -days 365 -newkey rsa:2048 -keyout /etc/nginx/ssl/nginx.key -out /etc/nginx/ssl/nginx.crtok, now i will test nginx config:
Bash: Скопировать в буфер обмена
nginx -tresult:
nginx: the configuration file /etc/nginx/nginx.conf syntax is ok[B]nginx: configuration file /etc/nginx/nginx.conf test is successful[/B]now start and enable nginx services :
Bash: Скопировать в буфер обмена
Код:
systemctl start nginx
systemctl enable nginx
and check status :
Bash: Скопировать в буфер обмена
systemctl status nginxWell, now we have launched a site and now we have to install the bind service, before that I will give a very brief explanation about bind:
BIND :
BIND (Berkeley Internet Name Domain) service is a DNS (Domain Name System) server software that is used to manage and provide domain name services in Internet networks. Basically, BIND is responsible for translating domain names to IP addresses (and vice versa), a process known as name resolution.
install bind :
Bash: Скопировать в буфер обмена
dnf install bind -yWell, after installing bind, we have to go to the named configuration
Let's define ZONE together for named :
Bash: Скопировать в буфер обмена
mkdir -p /etc/named/zoneNow we create a zone database :
Bash: Скопировать в буфер обмена
nano /etc/named/zone/db.matrix.localand add config :
Bash: Скопировать в буфер обмена
Код:
$TTL 86400
@   IN  SOA ns.matrix.local. root.matrix.local. (
        2021070701  ; Serial
        3600        ; Refresh
        1800        ; Retry
        604800      ; Expire
        86400       ; Minimum TTL
    )
@   IN  NS  ns.matrix.local.
ns  IN  A   10.1.4.192
@   IN  A   10.1.4.192
Revers DNS :
Reverse DNS (rDNS) or reverse naming is a process in DNS (Domain Name System) that translates IP addresses to equivalent domain names. In contrast to DNS, which translates a domain name to an IP address, rDNS does the opposite and translates the IP address to the associated domain name with the help of the information in the reverse names (Reverse DNS records).
Now it's time to configure reverse DNS :
Bash: Скопировать в буфер обмена
nano /etc/named/zone/db.10.1.4note :
To set rDNS, a Reverse DNS record must be set in the Reverse Zone in the DNS system. This record is created based on the IP address and points to the equivalent domain name of that IP address.
For example, if the IP address 10.1.4.192 belongs to the matrix.local domain, a Reverse DNS record for 4.1.10.in-addr.arpa should point to matrix.local.
config db.10.1.4:
Bash: Скопировать в буфер обмена
Код:
$TTL 86400
@   IN  SOA ns.matrix.local. root.matrix.local. (
        2021070701  ; Serial
        3600        ; Refresh
        1800        ; Retry
        604800      ; Expire
        86400       ; Minimum TTL
    )
@   IN  NS  ns.matrix.local.
100 IN  PTR ns.matrix.local.
100 IN  PTR www.matrix.local.
Now let's create the necessary configurations in named.conf:
Bash: Скопировать в буфер обмена
Код:
zone "matrix.local" {
    type master;
    file "/etc/named/zone/db.matrix.local";
};

zone "4.1.10.in-addr.arpa" {
    type master;
    file "/etc/named/zone/db.10.1.4";
};
now i will start and enable named(bind) services :
Bash: Скопировать в буфер обмена
Код:
systemctl start named
systemctl enable named
and status :
Bash: Скопировать в буфер обмена
systemctl status namedWell, now it's time to come to Windows to check the site. Well, here we have defined dns for our site, whose name is matrix.local. Now, in order to be able to have the site with our main system, we must first remove firewalld in Linux (here I delete it because it is educational) and also the iptables rules. also delete
Well, first we remove firewalld:
Bash: Скопировать в буфер обмена
dnf remove firewalld -ynow remove iptables rules :
Bash: Скопировать в буфер обмена
iptables -FWell, now we will set up our main system and Linux IP in the Windows DNS section so that we can have the site:
go to
Control Panel\Network and Internet\Network ConnectionsClick-Right Ethernet and open Ethernet Properties now double-click on IP V4 and use the following DNS server addresses and finally add your Linux IP address to preferred DNS server LIKE this :
Now, in order to see if we have access to the site or not, first of all, open a (win+r and type CMD) CMD and enter the command ipconfig /flushdns to clear the previous cache.
Now I get ping from the site:
ping matrix.local
Well, now that everything has been executed successfully, let's go to install ejabberd:
Ejabberd:
ejabberd is an instant messaging server that implements XMPP (Extensible Messaging and Presence Protocol). This server is written in Erlang language and is known for its reliability, high scalability and support for clustering.
First of all, we install the prerequisites:
Bash: Скопировать в буфер обмена
sudo dnf install -y gcc gcc-c++ make openssl-devel expat-devel yaml-devel pam-devel zlib-develnow install ejabberd:
Bash: Скопировать в буфер обмена
Код:
dnf install -y epel-release
dnf install -y ejabberd
Now let's do an initial configuration in ejabberd config :
Maybe your file is here
/opt/ejabberd/conf/ejabberd.yml or here /etc/ejabberd/ejabberd.yml for me it is in /opt/ejabberd/conf/ejabberd.yml so i open ejabberd.yml :Bash: Скопировать в буфер обмена
nano /opt/ejabberd/conf/ejabberd.ymladd hosts: - matrix.localand set admin user :
acl: admin: user: xss@matrix.localNow we need to create an admin user using ejabberdctl:
Bash: Скопировать в буфер обмена
ejabberdctl register (user)xss (yuour domain)matrix.local (your password)123@123and now start ejabberd servies :
Bash: Скопировать в буфер обмена
Код:
systemctl start ejabberd

systemctl enable ejabberd
now i will try to access web page Ejabberd :
now test on pidgin:
download pidgin and OTR from here :
pidgin
OTR
Author : blackhunt
special for XSS.is
Of course, this article is written for beginners, I hope it can help )))
~./Enjoy!